> ## Documentation Index
> Fetch the complete documentation index at: https://documentation.onesignal.com/llms.txt
> Use this file to discover all available pages before exploring further.
# Android SDK setup
> Install the OneSignal Android SDK in Android Studio to add push and in-app messages, with FCM credentials, initialization, and test sends.
export const SdkReleasesIframe = ({sdkFilter = undefined, viewMode = undefined, height, ...frameProps}) => {
const baseUrl = 'https://onesignal.github.io/sdk-releases';
const buildUrl = (theme, sdkFilter, viewMode) => {
const url = new URL(baseUrl);
const params = new URLSearchParams();
if (theme) {
params.set('theme', theme);
}
if (sdkFilter) {
params.set('sdk', sdkFilter);
}
if (viewMode) {
params.set('viewMode', viewMode);
}
if (params.toString()) {
url.search = params.toString();
}
return url.toString();
};
const detectTheme = () => {
if (document.documentElement.classList.contains('dark')) {
return 'dark';
}
return 'light';
};
const [theme, setTheme] = useState('light');
const [iframeSrc, setIframeSrc] = useState(() => {
const initialTheme = detectTheme();
return buildUrl(initialTheme, sdkFilter, viewMode);
});
useEffect(() => {
const currentTheme = detectTheme();
setTheme(currentTheme);
setIframeSrc(buildUrl(currentTheme, sdkFilter, viewMode));
const mediaQuery = window.matchMedia('(prefers-color-scheme: dark)');
const handleThemeChange = () => {
const newTheme = detectTheme();
setTheme(newTheme);
setIframeSrc(buildUrl(newTheme, sdkFilter, viewMode));
};
if (mediaQuery.addEventListener) {
mediaQuery.addEventListener('change', handleThemeChange);
} else {
mediaQuery.addListener(handleThemeChange);
}
window.addEventListener('storage', handleThemeChange);
const observer = new MutationObserver(handleThemeChange);
observer.observe(document.documentElement, {
attributes: true,
attributeFilter: ['class', 'data-theme']
});
return () => {
if (mediaQuery.removeEventListener) {
mediaQuery.removeEventListener('change', handleThemeChange);
} else {
mediaQuery.removeListener(handleThemeChange);
}
window.removeEventListener('storage', handleThemeChange);
observer.disconnect();
};
}, [sdkFilter, viewMode]);
const getIframeHeight = () => {
if (viewMode === 'table') {
return '450';
}
if (viewMode === 'mini') {
return '170';
}
return '800';
};
const iframeHeight = height || getIframeHeight();
return
;
};
This guide walks you through adding OneSignal to your Android app using Android Studio. You'll install our SDK, set up push and in-app messages, and send test messages to confirm everything is working.
If this is your first time using OneSignal, follow the steps in order. If you're experienced, feel free to jump to the sections you need.
**Using an AI coding assistant?**
For AI-driven installation, use this prompt:
```
Integrate the OneSignal Android SDK into this codebase.
Follow the instructions at:
https://raw.githubusercontent.com/OneSignal/sdk-ai-prompts/main/docs/android/ai-prompt.md
```
## Step 0. Configure FCM in OneSignal (required to deliver push)
You can install and initialize the OneSignal Android SDK without completing this step. However, **push notifications will not deliver** until Firebase Cloud Messaging (FCM) credentials are configured in your OneSignal app.
If your company already has a OneSignal account, [ask to be invited as an admin role](./manage-team-members) to configure the app. Otherwise, [sign up for a free account](https://onesignal.com) to get started.
These steps connect your OneSignal app to Firebase Cloud Messaging (FCM). You only need to do this once per app.
1. Log in to [https://onesignal.com](https://onesignal.com) and create or select your App.
2. Navigate to **Settings > Push & In-App**.
3. Select **Google Android (FCM)** and **Continue** through the setup wizard.
4. Upload your [FCM Service Account JSON](./android-firebase-credentials).
5. Continue through the setup wizard to get your App ID. This will be used to initialize the SDK.
For full setup instructions, see our [Mobile push setup](./mobile-push-setup) guide.
***
## Setup contract & requirements
This section summarizes the tools, versions, and assumptions used throughout the guide.
* **SDK version:** `5.6.1+` (latest: check [releases](https://github.com/OneSignal/OneSignal-Android-SDK/releases))
* **AI setup instructions:** `https://raw.githubusercontent.com/OneSignal/sdk-ai-prompts/main/docs/android/ai-prompt.md`
* **SDK repo:** `https://github.com/OneSignal/OneSignal-Android-SDK`
* **Android Studio:** Meerkat | 2024.3.1+
* **Android API:** 23+ minimum (Android 6.0+), 31+ recommended (Android 12+)
* **Device/emulator:** Android 7.0+ with Google Play Services installed
* **Required dependency:** `com.onesignal:OneSignal:[5.6.1, 5.99.99]`
* **Application class:** Required for proper SDK initialization
* **App ID format:** 36-character UUID (example: `12345678-1234-1234-1234-123456789012`). Find it at **Dashboard > Settings > Keys & IDs**.
* **Initialize:** `OneSignal.initWithContext(this, "YOUR_APP_ID")`
* **Battery optimization:** May affect background notifications
* **Recommended:** Assign External ID via `OneSignal.login("user_id")` to unify users across devices
***
## Android setup steps
By the end of the steps below, you will have:
* The OneSignal SDK installed and initialized in your Android app
* Push notification permissions prompting correctly on a real device
* A test push and in-app message successfully delivered
If you skipped **Step 0 (Configuring FCM in OneSignal)**, you can still complete the Android Studio setup below. Complete Step 0 before you test or send push notifications.
### Step 1. Add the OneSignal SDK
1. In Android Studio, open your `build.gradle.kts (Module: app)` or `build.gradle (Module: app)` file
2. Add OneSignal to your `dependencies` section:
```kotlin app/build.gradle.kts theme={null}
implementation("com.onesignal:OneSignal:[5.6.1, 5.99.99]")
```
```groovy app/build.gradle theme={null}
implementation 'com.onesignal:OneSignal:[5.6.1, 5.99.99]'
```
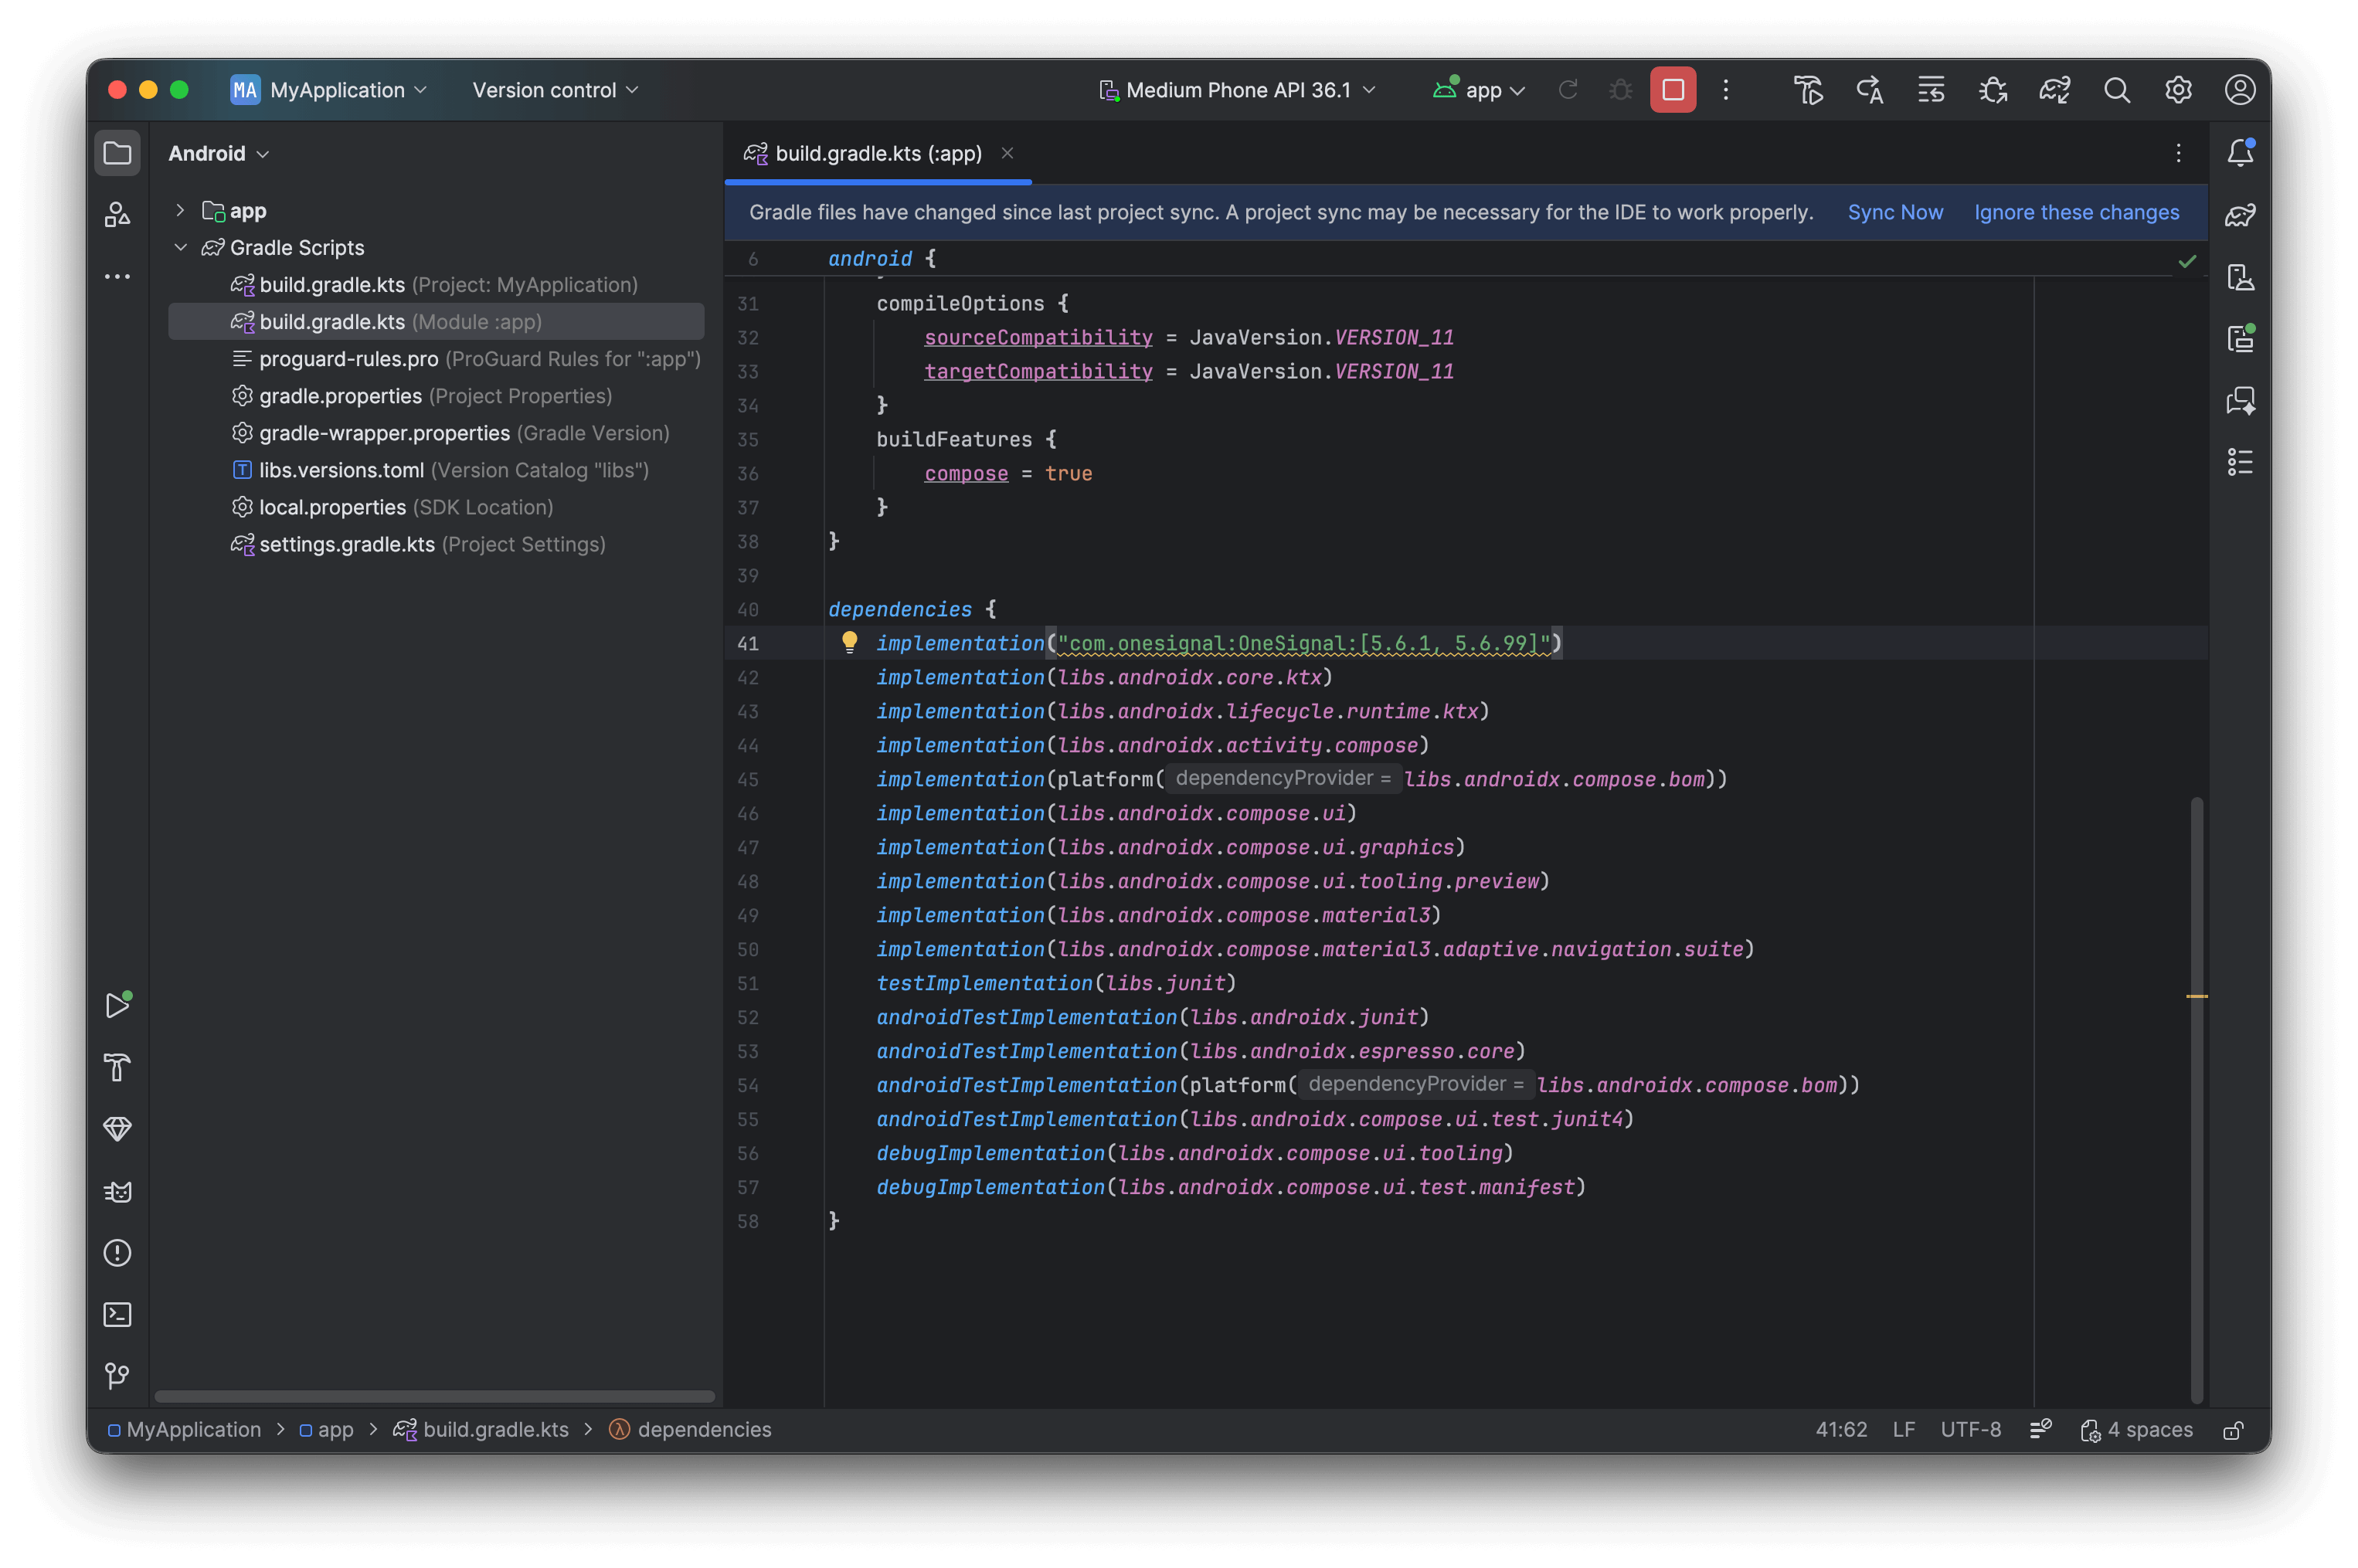 3. **Sync Gradle:** Click **Sync Now** in the banner that appears or go to **File > Sync Project with Gradle Files**
Verify that the gradle sync completes successfully without dependency conflicts.
### Step 2. Create and configure Application class
It's best practice to initialize OneSignal in the `onCreate` method of your `Application` class to ensure proper SDK setup across all entry points.
**Create an Application class if you don't already have one:**
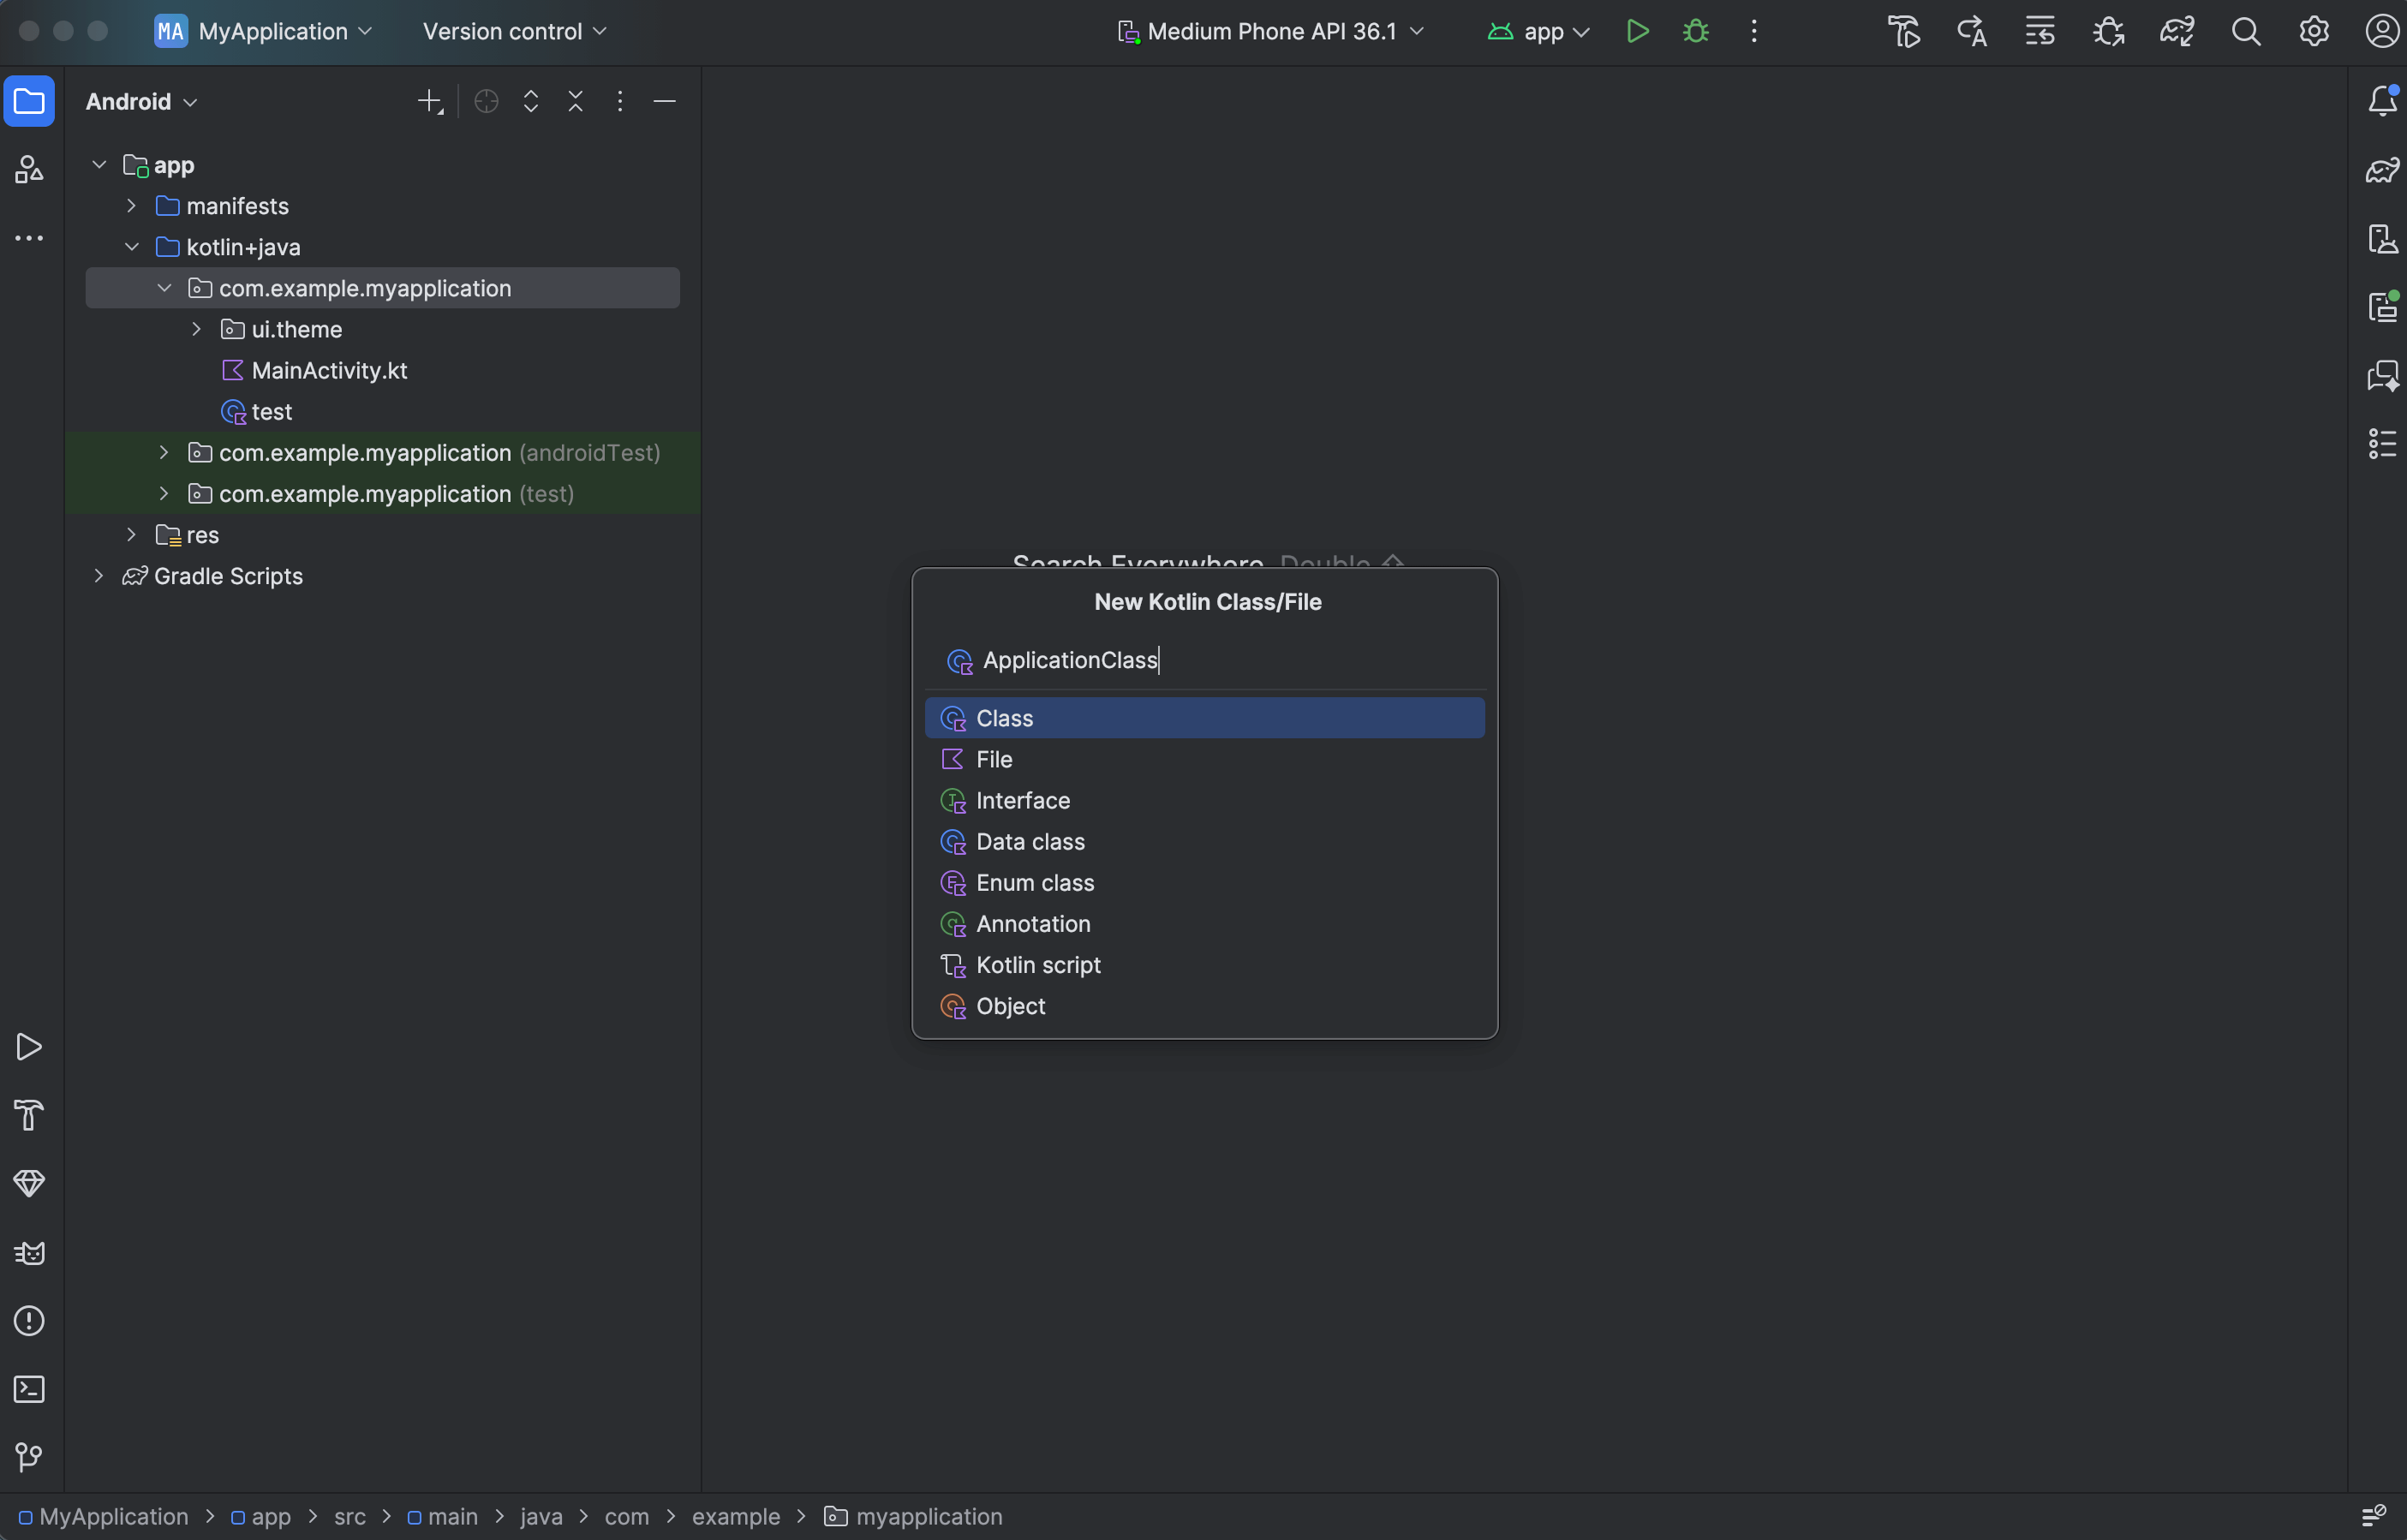
1. **File > New > Kotlin Class/File** (or Java Class)
2. Name: `ApplicationClass` (or your preferred name)
3. **Sync Gradle:** Click **Sync Now** in the banner that appears or go to **File > Sync Project with Gradle Files**
Verify that the gradle sync completes successfully without dependency conflicts.
### Step 2. Create and configure Application class
It's best practice to initialize OneSignal in the `onCreate` method of your `Application` class to ensure proper SDK setup across all entry points.
**Create an Application class if you don't already have one:**
1. **File > New > Kotlin Class/File** (or Java Class)
2. Name: `ApplicationClass` (or your preferred name)
 **Add the following OneSignal code to the Application class.**
Replace `YOUR_APP_ID` with your actual OneSignal App ID from the Dashboard > Settings > [Keys & IDs](./keys-and-ids).
```kotlin ApplicationClass.kt theme={null}
// FILE: ApplicationClass.kt
// PURPOSE: Initialize OneSignal when your app launches
// REQUIREMENT: Must be registered in AndroidManifest.xml
package com.your.package.name // Replace with your actual package name
import android.app.Application
import kotlinx.coroutines.CoroutineScope
import kotlinx.coroutines.Dispatchers
import kotlinx.coroutines.launch
import com.onesignal.OneSignal
import com.onesignal.debug.LogLevel
class ApplicationClass : Application() {
override fun onCreate() {
super.onCreate()
// Enable verbose logging to debug issues (remove in production)
OneSignal.Debug.logLevel = LogLevel.VERBOSE
// Replace with your 36-character App ID from Dashboard > Settings > Keys & IDs
OneSignal.initWithContext(this, "YOUR_APP_ID")
// Prompt for push permission. fallbackToSettings = false does not send the user
// to system settings if they previously denied. See the Mobile SDK reference.
// In production, consider using an in-app message instead for better opt-in rates.
CoroutineScope(Dispatchers.IO).launch {
OneSignal.Notifications.requestPermission(false)
}
}
}
```
```java ApplicationClass.java theme={null}
// FILE: ApplicationClass.java
// PURPOSE: Initialize OneSignal when your app launches
// REQUIREMENT: Must be registered in AndroidManifest.xml
package com.your.package.name; // Replace with your actual package name
import android.app.Application;
import com.onesignal.Continue;
import com.onesignal.OneSignal;
import com.onesignal.debug.LogLevel;
public class ApplicationClass extends Application {
@Override
public void onCreate() {
super.onCreate();
// Enable verbose logging to debug issues (remove in production)
OneSignal.getDebug().setLogLevel(LogLevel.VERBOSE);
// Replace with your 36-character App ID from Dashboard > Settings > Keys & IDs
OneSignal.initWithContext(this, "YOUR_APP_ID");
// Prompt for push permission. fallbackToSettings = false does not send the user
// to system settings if they previously denied. See the Mobile SDK reference.
// In production, consider using an in-app message instead for better opt-in rates.
OneSignal.getNotifications().requestPermission(false, Continue.none());
}
}
```
**Add the following OneSignal code to the Application class.**
Replace `YOUR_APP_ID` with your actual OneSignal App ID from the Dashboard > Settings > [Keys & IDs](./keys-and-ids).
```kotlin ApplicationClass.kt theme={null}
// FILE: ApplicationClass.kt
// PURPOSE: Initialize OneSignal when your app launches
// REQUIREMENT: Must be registered in AndroidManifest.xml
package com.your.package.name // Replace with your actual package name
import android.app.Application
import kotlinx.coroutines.CoroutineScope
import kotlinx.coroutines.Dispatchers
import kotlinx.coroutines.launch
import com.onesignal.OneSignal
import com.onesignal.debug.LogLevel
class ApplicationClass : Application() {
override fun onCreate() {
super.onCreate()
// Enable verbose logging to debug issues (remove in production)
OneSignal.Debug.logLevel = LogLevel.VERBOSE
// Replace with your 36-character App ID from Dashboard > Settings > Keys & IDs
OneSignal.initWithContext(this, "YOUR_APP_ID")
// Prompt for push permission. fallbackToSettings = false does not send the user
// to system settings if they previously denied. See the Mobile SDK reference.
// In production, consider using an in-app message instead for better opt-in rates.
CoroutineScope(Dispatchers.IO).launch {
OneSignal.Notifications.requestPermission(false)
}
}
}
```
```java ApplicationClass.java theme={null}
// FILE: ApplicationClass.java
// PURPOSE: Initialize OneSignal when your app launches
// REQUIREMENT: Must be registered in AndroidManifest.xml
package com.your.package.name; // Replace with your actual package name
import android.app.Application;
import com.onesignal.Continue;
import com.onesignal.OneSignal;
import com.onesignal.debug.LogLevel;
public class ApplicationClass extends Application {
@Override
public void onCreate() {
super.onCreate();
// Enable verbose logging to debug issues (remove in production)
OneSignal.getDebug().setLogLevel(LogLevel.VERBOSE);
// Replace with your 36-character App ID from Dashboard > Settings > Keys & IDs
OneSignal.initWithContext(this, "YOUR_APP_ID");
// Prompt for push permission. fallbackToSettings = false does not send the user
// to system settings if they previously denied. See the Mobile SDK reference.
// In production, consider using an in-app message instead for better opt-in rates.
OneSignal.getNotifications().requestPermission(false, Continue.none());
}
}
```
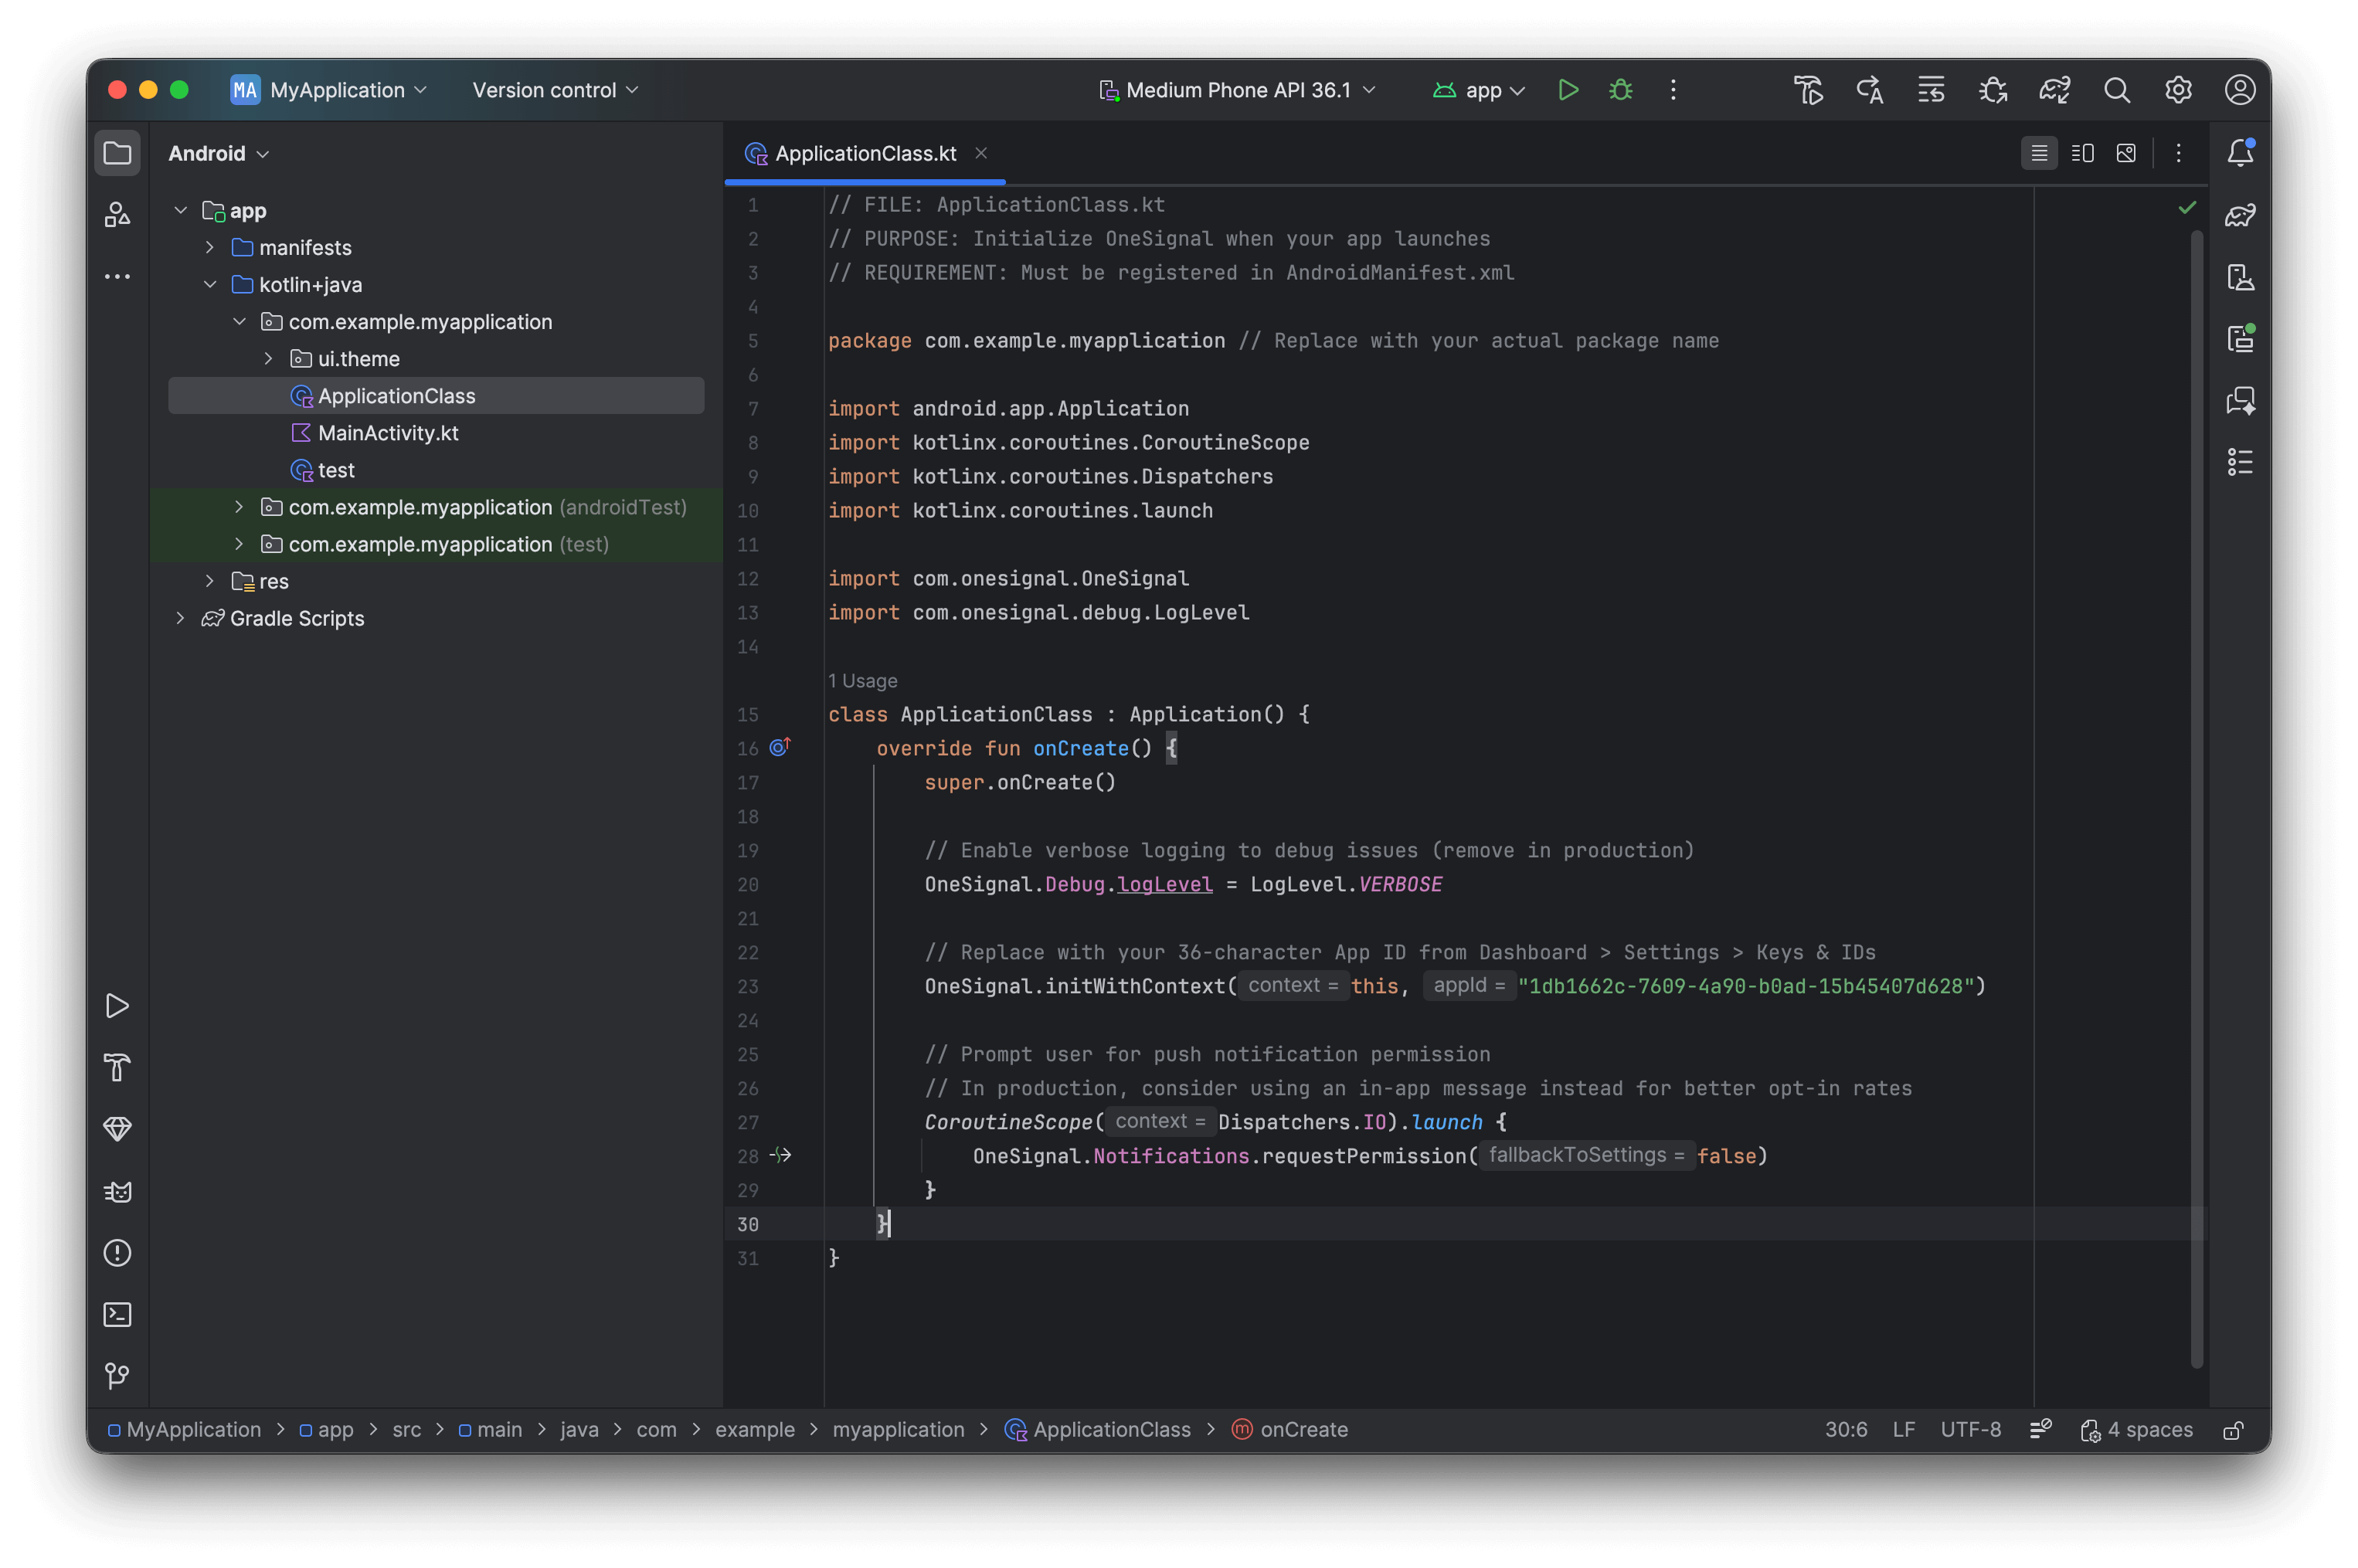 Initializing in an `Activity` (like `MainActivity`) is not recommended because it may not be called on app cold-starts from deep links or notifications. Always initialize OneSignal in your `Application` class for reliability.
**Register the Application class:**
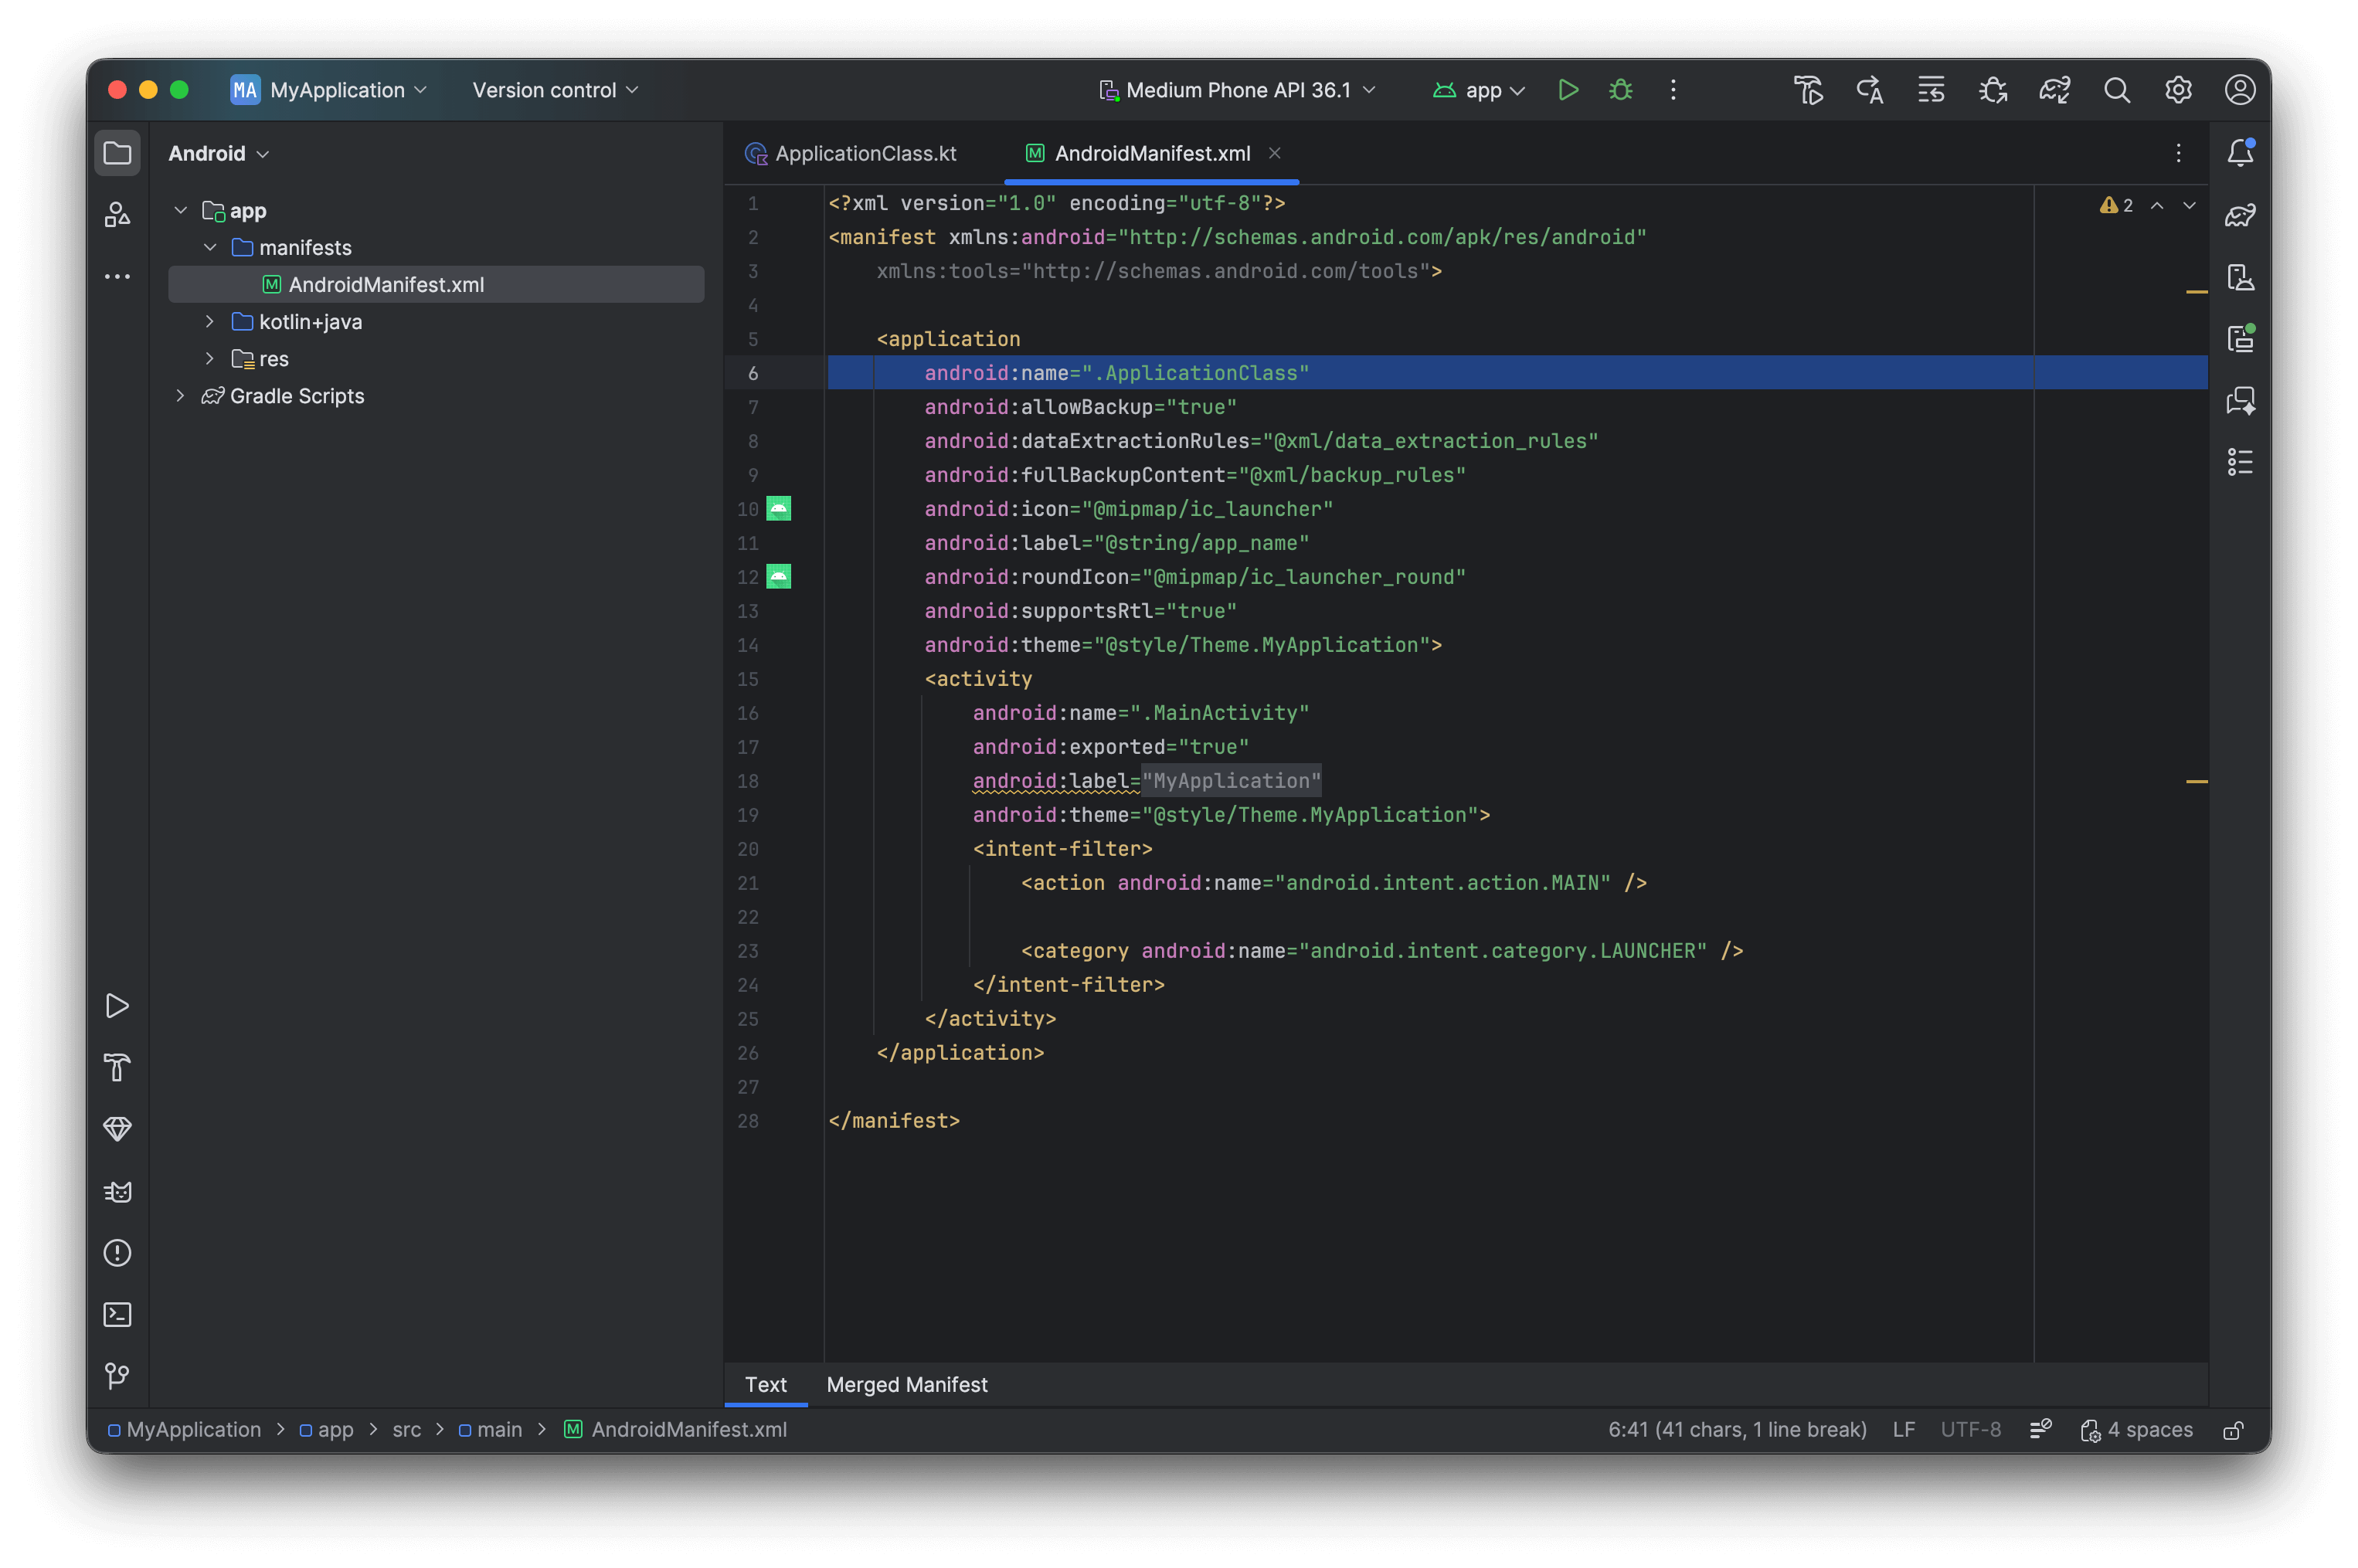
1. Open your app's `AndroidManifest.xml`
2. In your `` tag add `android:name=".ApplicationClass"` (replace `.ApplicationClass` with your actual class name if set it to something different).
```xml AndroidManifest.xml theme={null}
```
Check your `` tag for `tools:node="replace"`. That marker drops library-merged components, including OneSignal's `PermissionsActivity`. The notification permission flow then crashes with `ActivityNotFoundException`. Remove `tools:node="replace"`. If you only need to override one attribute, use `tools:replace="android:theme"` (or the attribute you are changing).
Initializing in an `Activity` (like `MainActivity`) is not recommended because it may not be called on app cold-starts from deep links or notifications. Always initialize OneSignal in your `Application` class for reliability.
**Register the Application class:**
1. Open your app's `AndroidManifest.xml`
2. In your `` tag add `android:name=".ApplicationClass"` (replace `.ApplicationClass` with your actual class name if set it to something different).
```xml AndroidManifest.xml theme={null}
```
Check your `` tag for `tools:node="replace"`. That marker drops library-merged components, including OneSignal's `PermissionsActivity`. The notification permission flow then crashes with `ActivityNotFoundException`. Remove `tools:node="replace"`. If you only need to override one attribute, use `tools:replace="android:theme"` (or the attribute you are changing).
 Verify that the app builds and runs without errors.
### Step 3. Configure default notification icons (recommended)
Replace the default bell icon with a small icon named `ic_stat_onesignal_default`. Use a monochrome silhouette on a transparent background, or Android will render a white square.
1. Generate densities with [Android Asset Studio](https://romannurik.github.io/AndroidAssetStudio/icons-notification.html#source.space.trim=1\&source.space.pad=0\&name=ic_stat_onesignal_default).
2. Place `ic_stat_onesignal_default` in each density folder: `res/drawable-mdpi/` (24×24) through `res/drawable-xxxhdpi/` (96×96).
See [Notification icons](./notification-icons) for large icons, accent color, and Android 17 launcher-icon behavior.
### Step 4. Test the integration
**Verify Subscription creation:**
1. Launch app on a device or emulator with Google Play Services.
2. Check **Audience > Users & subscriptions > Subscriptions**. Status shows **Never Subscribed**.
3. Accept the permission prompt when it appears.
4. Refresh the dashboard. Status changes to **Subscribed**.
Verify that the app builds and runs without errors.
### Step 3. Configure default notification icons (recommended)
Replace the default bell icon with a small icon named `ic_stat_onesignal_default`. Use a monochrome silhouette on a transparent background, or Android will render a white square.
1. Generate densities with [Android Asset Studio](https://romannurik.github.io/AndroidAssetStudio/icons-notification.html#source.space.trim=1\&source.space.pad=0\&name=ic_stat_onesignal_default).
2. Place `ic_stat_onesignal_default` in each density folder: `res/drawable-mdpi/` (24×24) through `res/drawable-xxxhdpi/` (96×96).
See [Notification icons](./notification-icons) for large icons, accent color, and Android 17 launcher-icon behavior.
### Step 4. Test the integration
**Verify Subscription creation:**
1. Launch app on a device or emulator with Google Play Services.
2. Check **Audience > Users & subscriptions > Subscriptions**. Status shows **Never Subscribed**.
3. Accept the permission prompt when it appears.
4. Refresh the dashboard. Status changes to **Subscribed**.
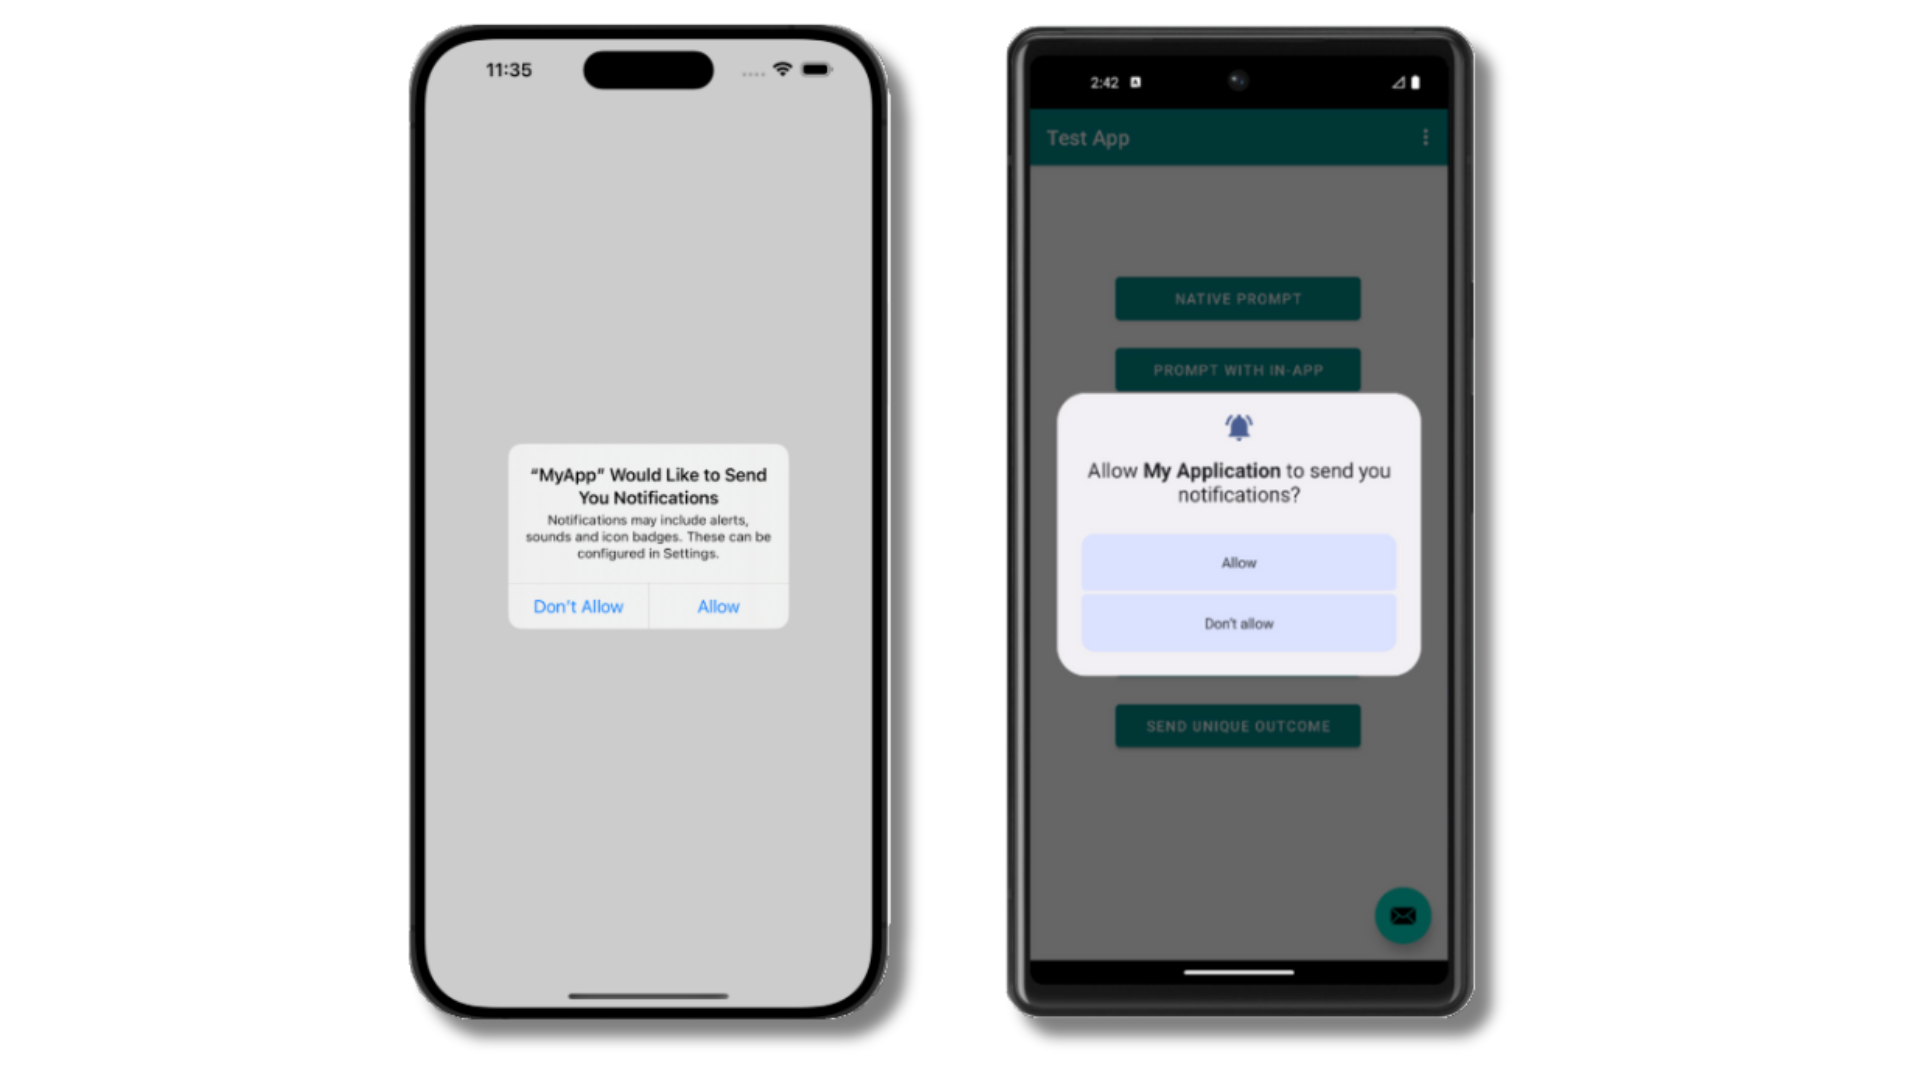
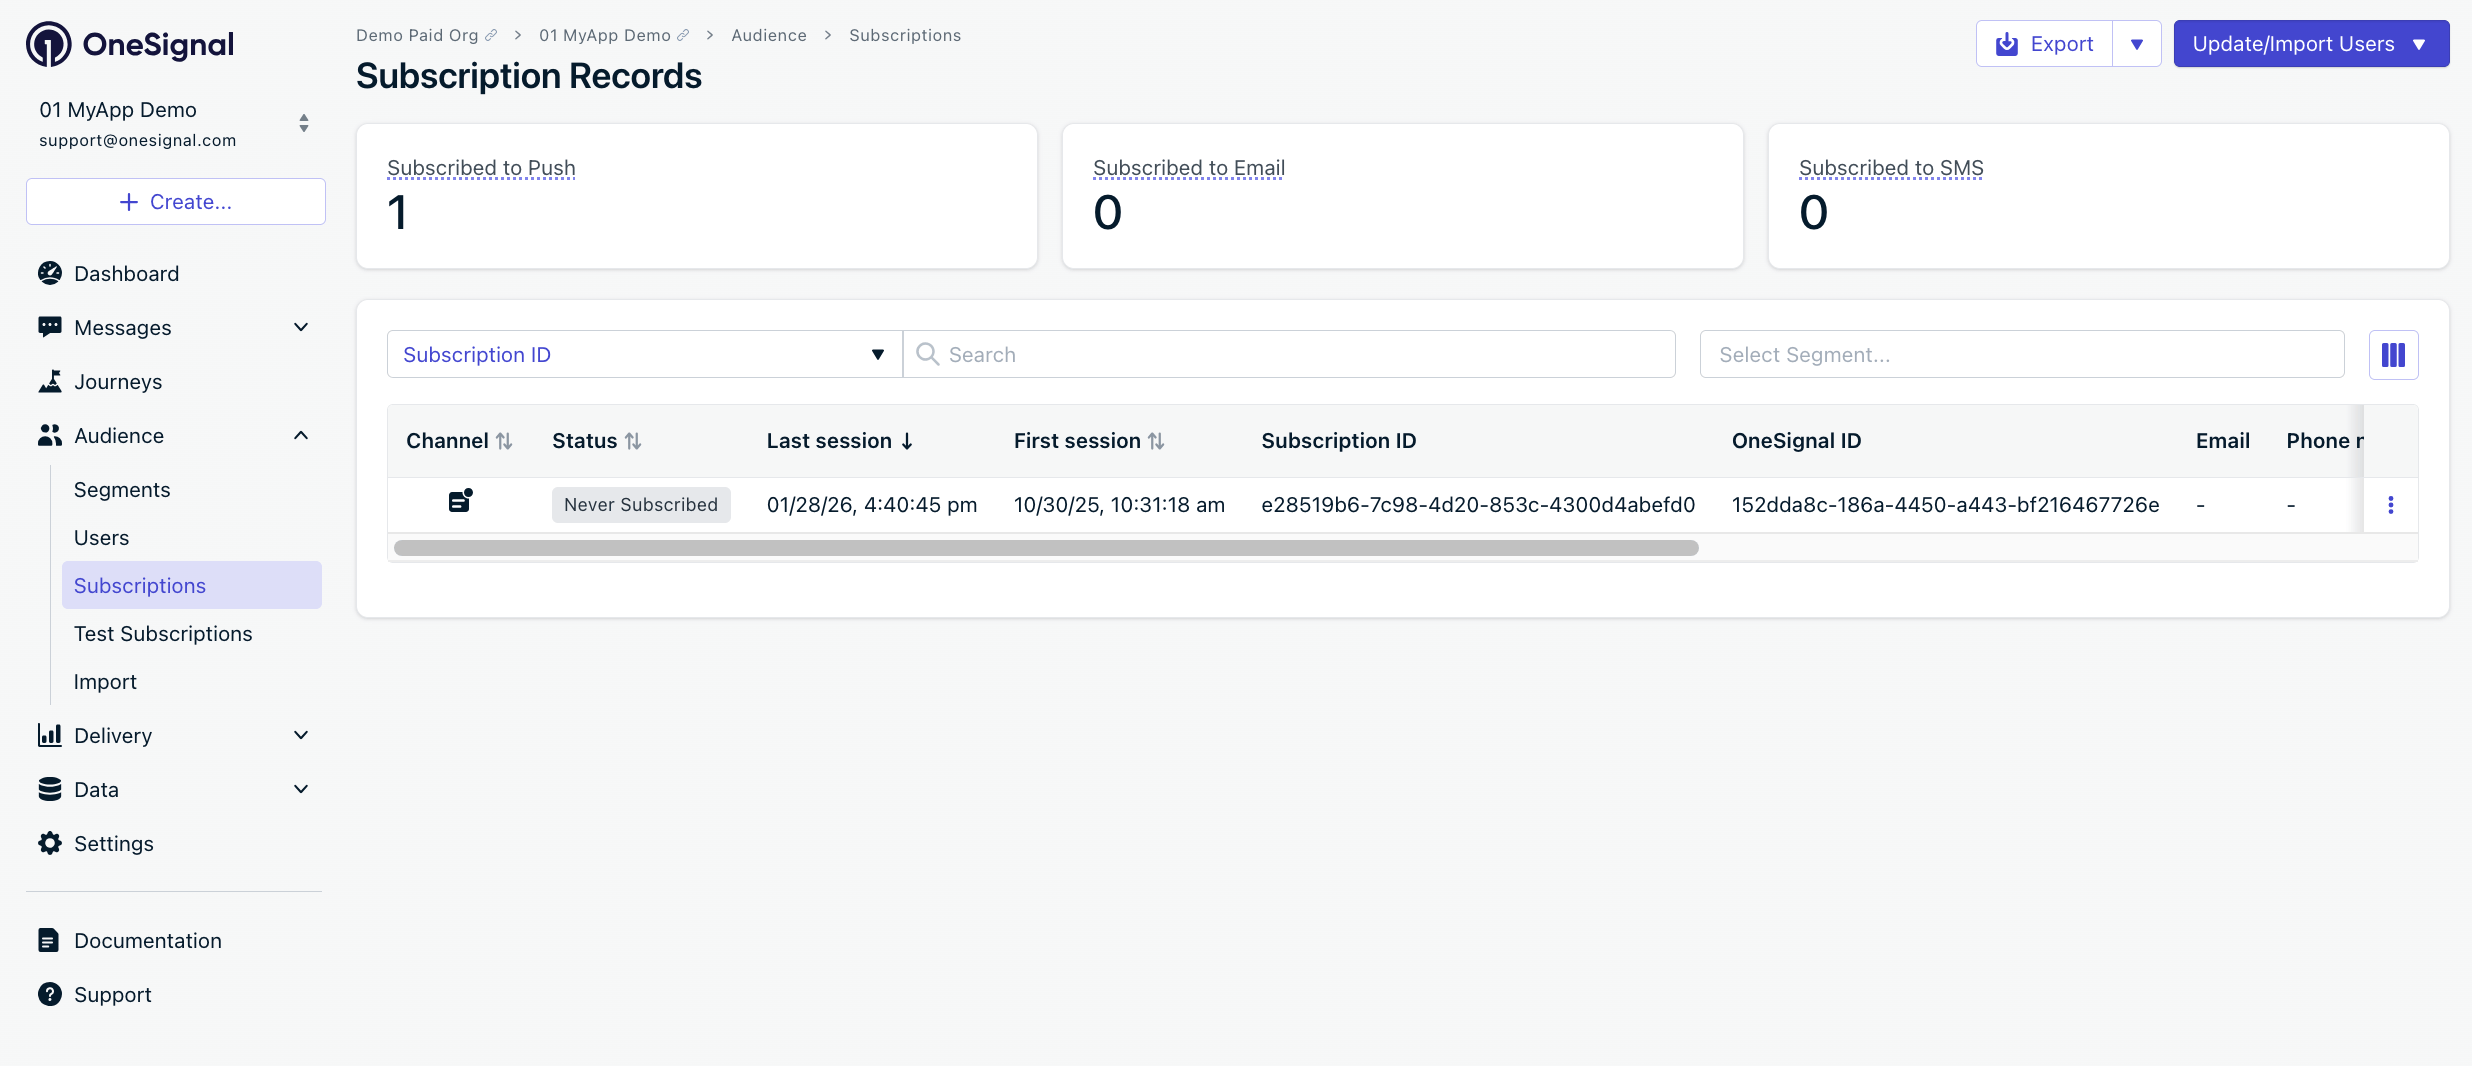
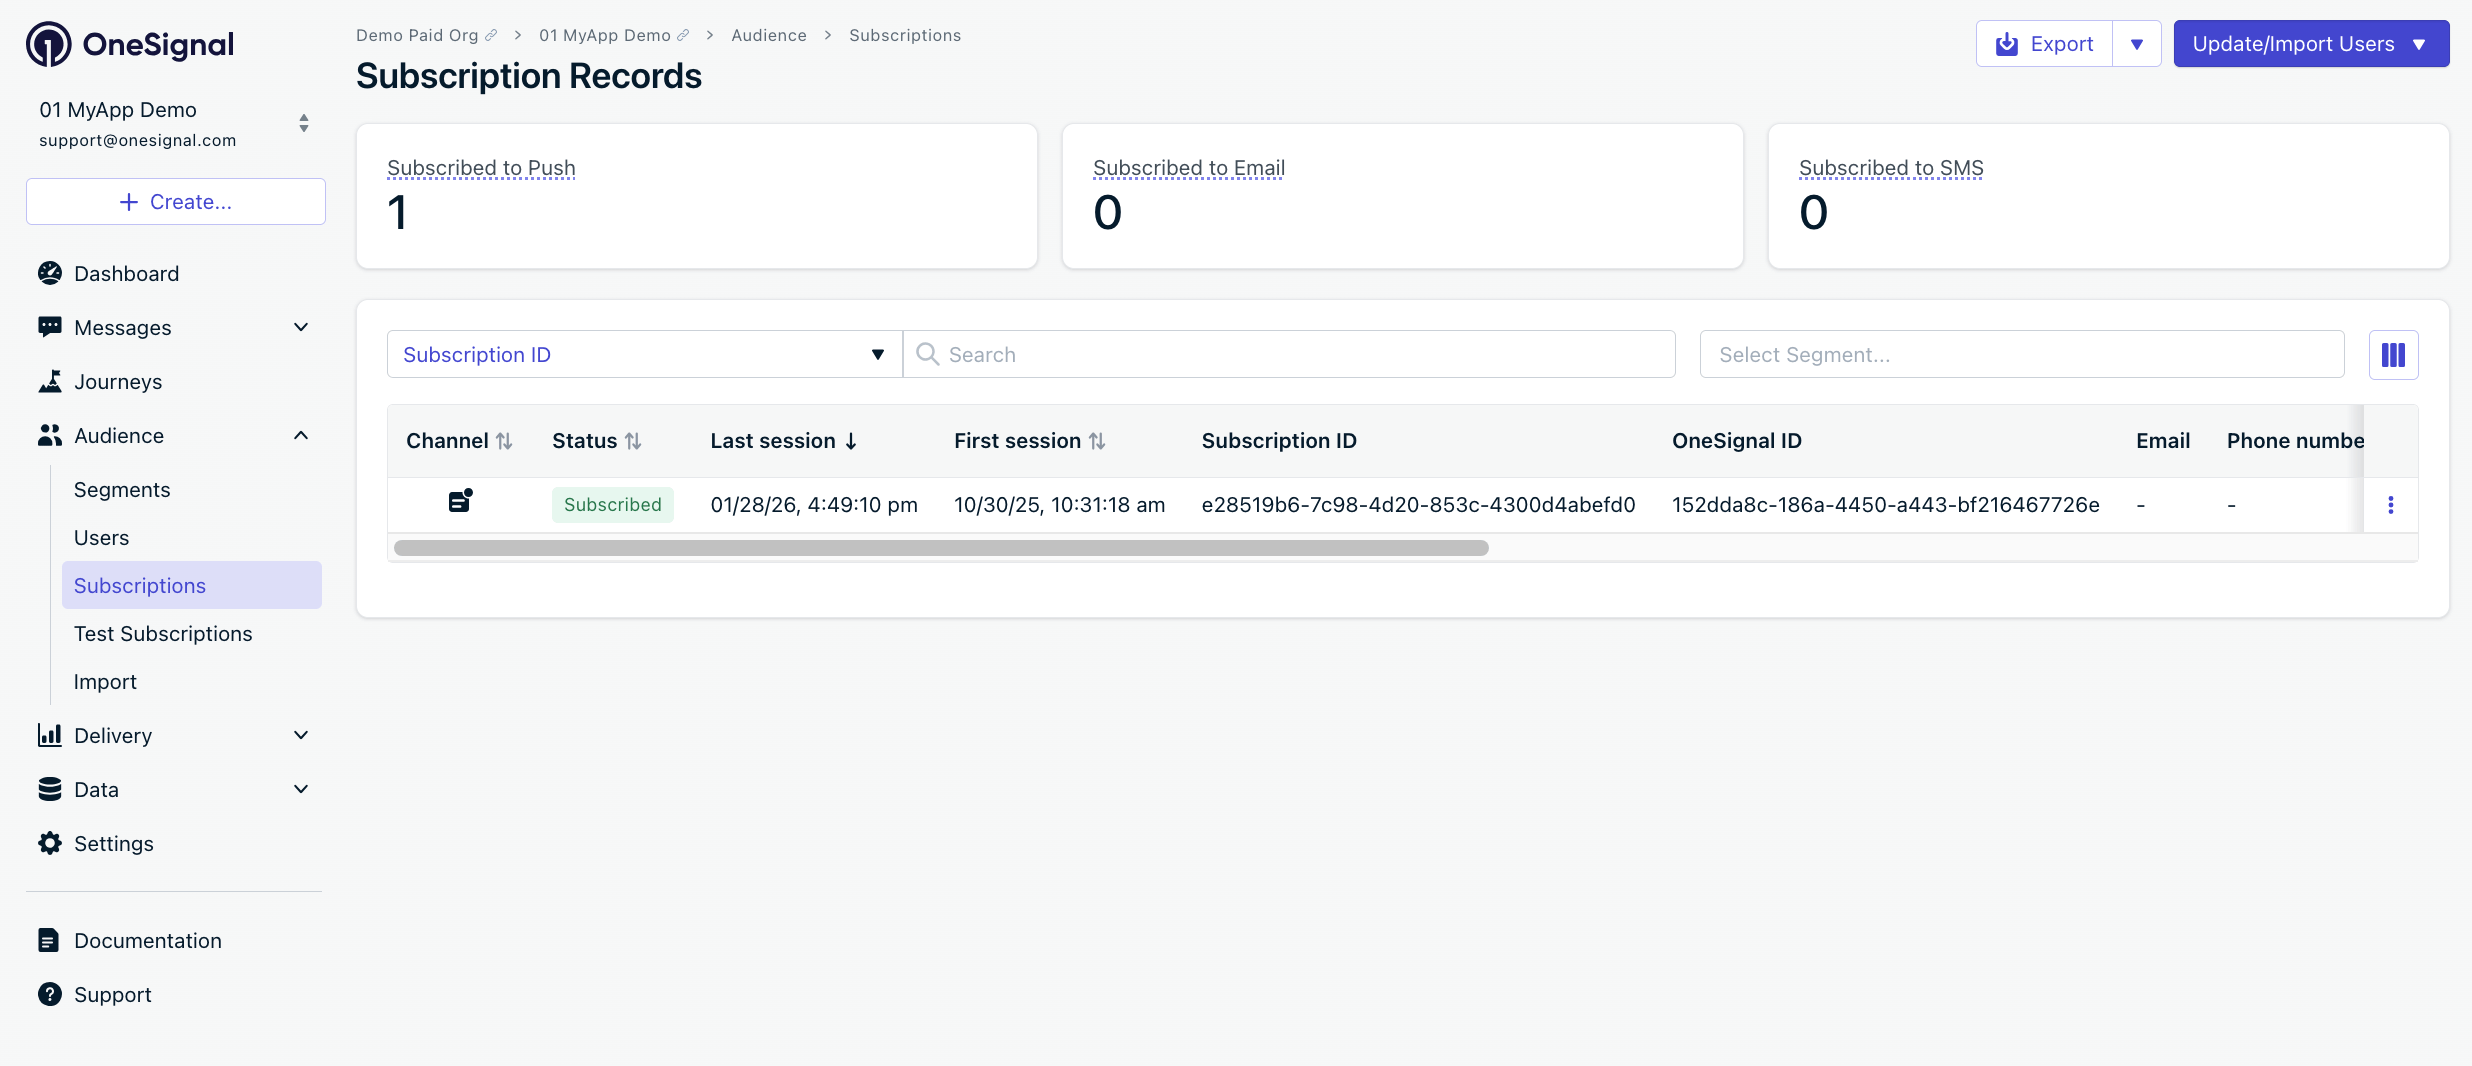 A [mobile Subscription](./subscriptions) is created when the user first opens your app on a device, or if they uninstall and reinstall on the same device. After they accept the permission prompt, the dashboard status should show **Subscribed**.
#### Create test user and segment
1. Next to the Subscription, select **Options > Add as test user** and enter a name.
2. Go to **Audience > Segments > New Segment**.
3. Name: `Test Users`, add filter **Test Users** > **Create Segment**.
A [mobile Subscription](./subscriptions) is created when the user first opens your app on a device, or if they uninstall and reinstall on the same device. After they accept the permission prompt, the dashboard status should show **Subscribed**.
#### Create test user and segment
1. Next to the Subscription, select **Options > Add as test user** and enter a name.
2. Go to **Audience > Segments > New Segment**.
3. Name: `Test Users`, add filter **Test Users** > **Create Segment**.
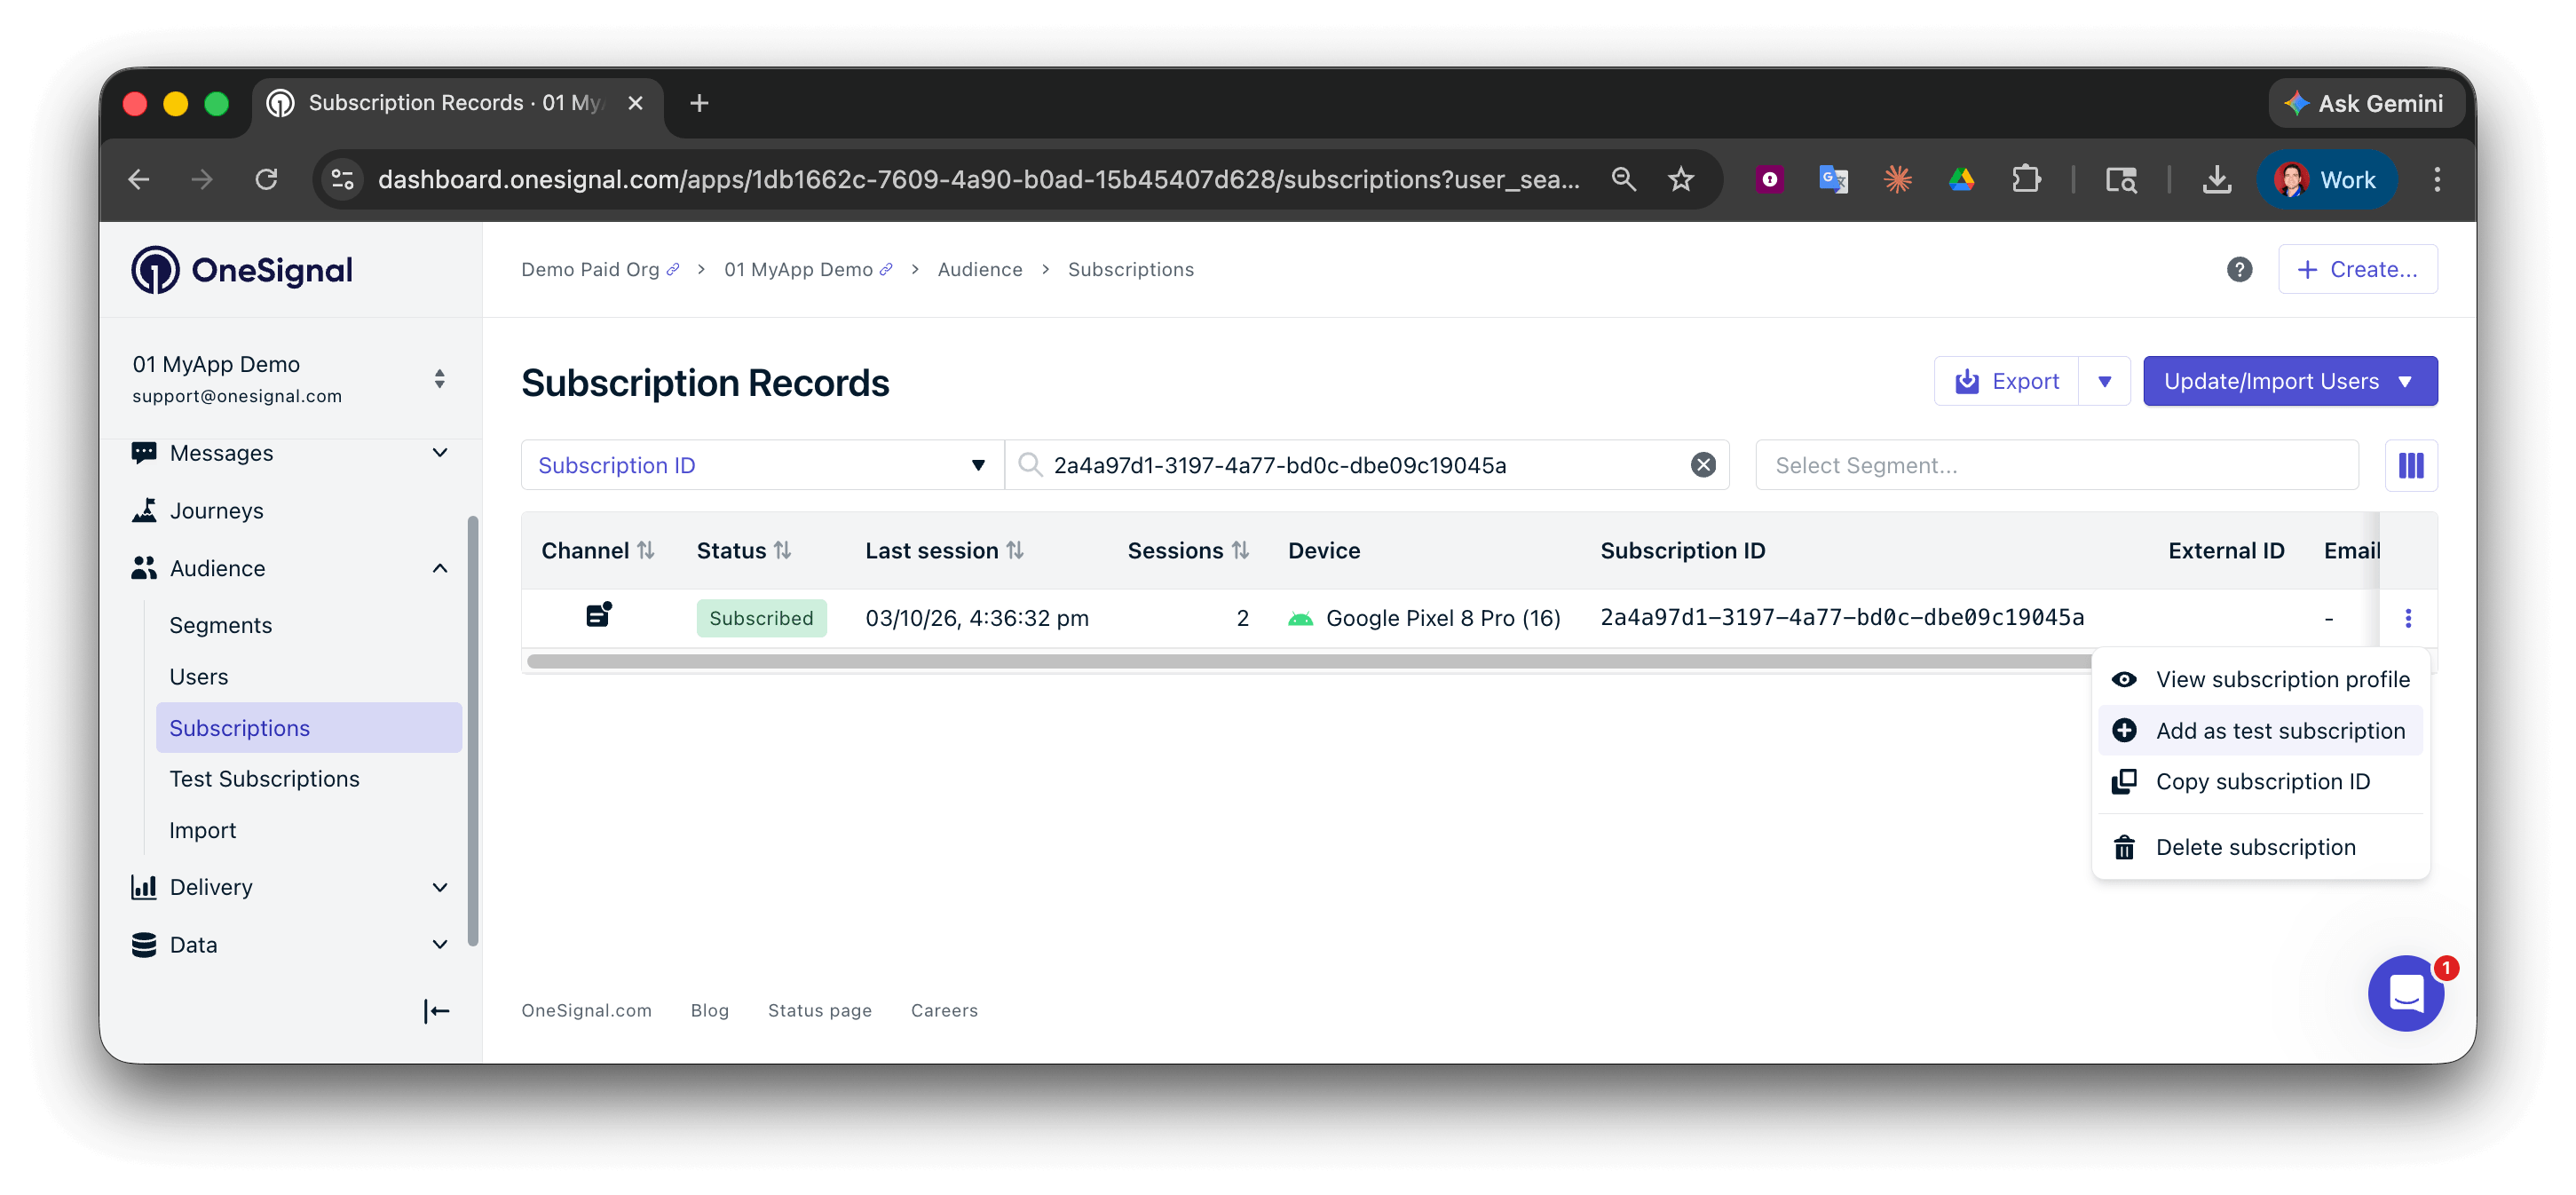
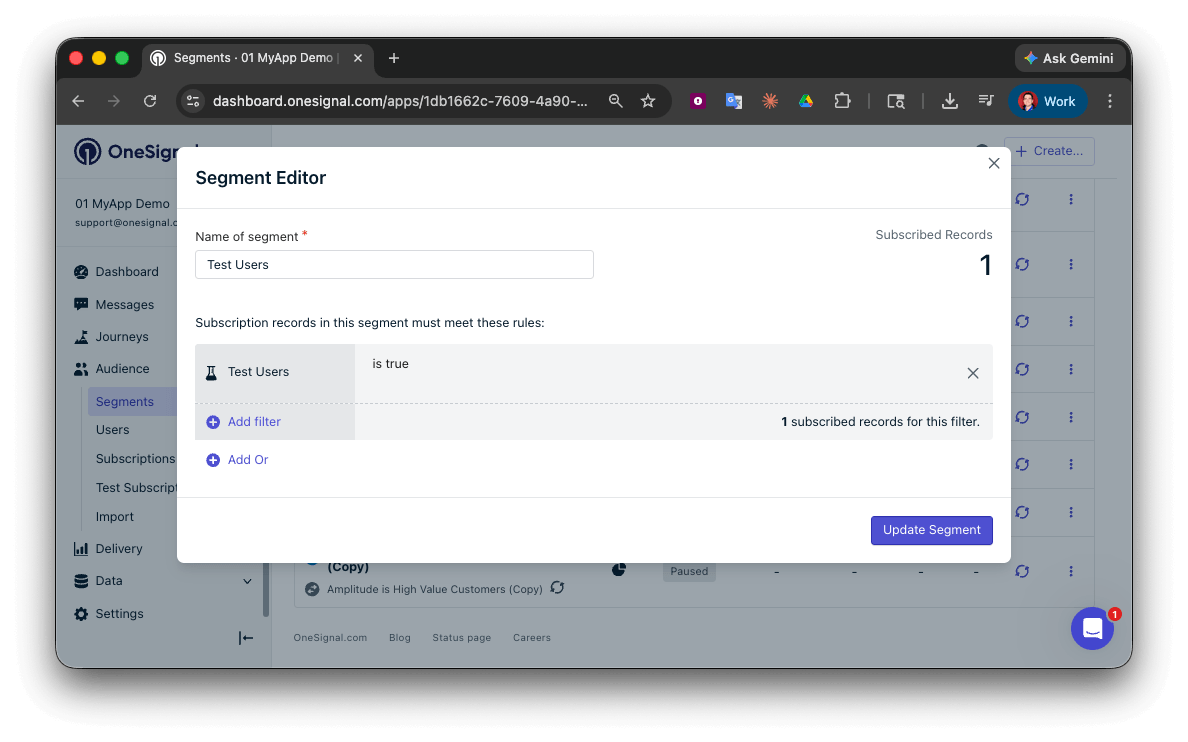 You can now send test messages to this device and to the Test Users segment.
#### Send test push via API
1. Navigate to **Settings > [Keys & IDs](./keys-and-ids)**.
2. In the provided code, replace `YOUR_APP_API_KEY` and `YOUR_APP_ID` in the code below with your actual keys. This code uses the `Test Users` segment we created earlier.
```bash theme={null}
curl -X POST 'https://api.onesignal.com/notifications' \
-H 'Content-Type: application/json; charset=utf-8' \
-H 'Authorization: Key YOUR_APP_API_KEY' \
-d '{
"app_id": "YOUR_APP_ID",
"target_channel": "push",
"name": "Testing basic setup",
"headings": { "en": "👋" },
"contents": {"en": "Hello world!"},
"included_segments": ["Test Users"],
"big_picture": "https://avatars.githubusercontent.com/u/11823027?s=200&v=4"
}'
```
You can now send test messages to this device and to the Test Users segment.
#### Send test push via API
1. Navigate to **Settings > [Keys & IDs](./keys-and-ids)**.
2. In the provided code, replace `YOUR_APP_API_KEY` and `YOUR_APP_ID` in the code below with your actual keys. This code uses the `Test Users` segment we created earlier.
```bash theme={null}
curl -X POST 'https://api.onesignal.com/notifications' \
-H 'Content-Type: application/json; charset=utf-8' \
-H 'Authorization: Key YOUR_APP_API_KEY' \
-d '{
"app_id": "YOUR_APP_ID",
"target_channel": "push",
"name": "Testing basic setup",
"headings": { "en": "👋" },
"contents": {"en": "Hello world!"},
"included_segments": ["Test Users"],
"big_picture": "https://avatars.githubusercontent.com/u/11823027?s=200&v=4"
}'
```
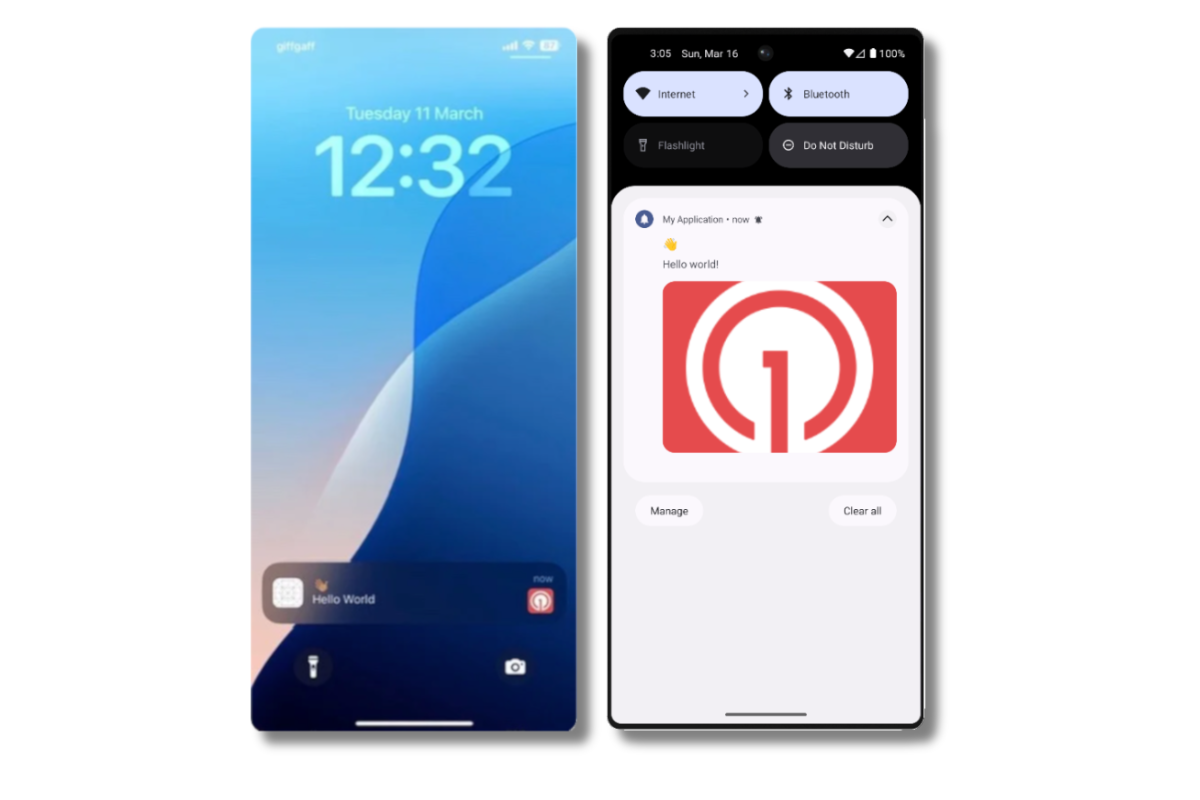
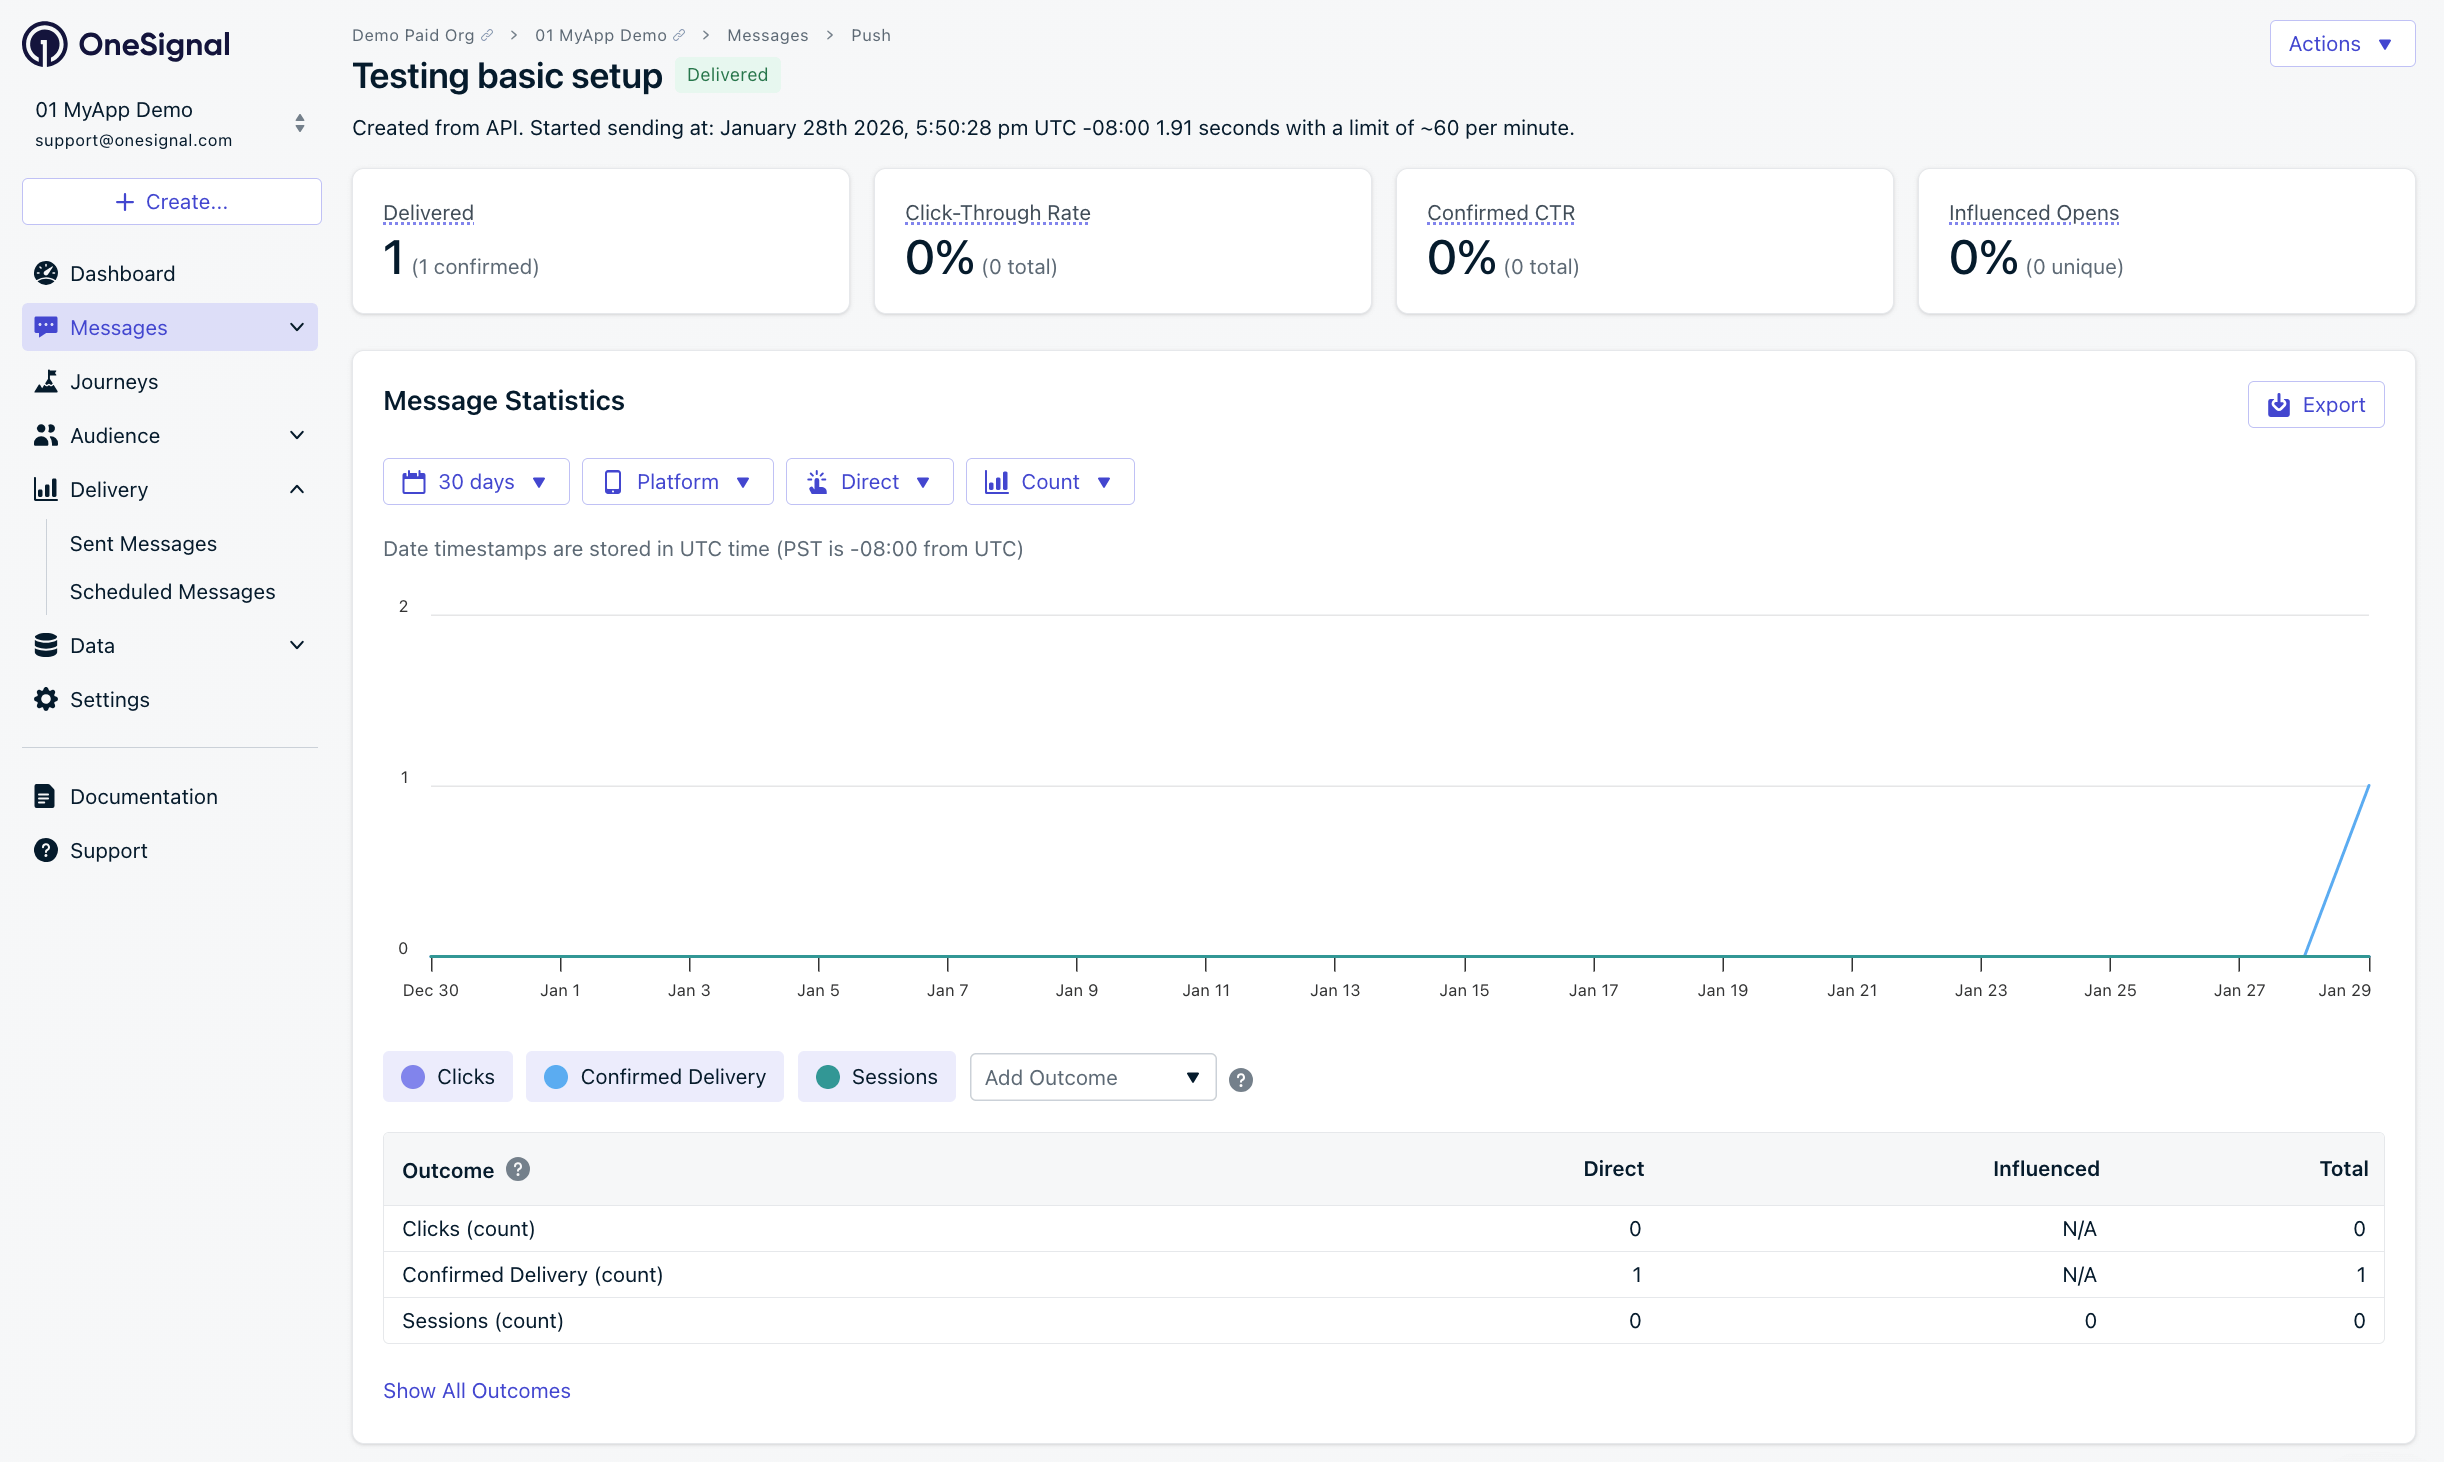 Confirm the test device received a notification with your custom icon (if configured) and the large image when expanded. On paid plans, **Messages > All messages** can show Confirmed receipt.
* No notification received? See [Mobile push not shown](./notifications-show-successful-but-are-not-being-shown).
* No custom icon? Verify the icon name is `ic_stat_onesignal_default` and in the correct drawable folders.
* Having issues? Copy-paste the api request and a log from start to finish of app launch into a `.txt` file. Then share both with `support@onesignal.com`.
#### Test in-app messages
1. Close app for 30+ seconds
2. **Messages > In-App > New In-App** > select **Welcome** template
3. Audience: **Test Users** segment
4. Trigger: **On app open**
5. Schedule: **Every time trigger conditions are satisfied**
6. Click **Make Message Live**
7. Open app
Confirm the test device received a notification with your custom icon (if configured) and the large image when expanded. On paid plans, **Messages > All messages** can show Confirmed receipt.
* No notification received? See [Mobile push not shown](./notifications-show-successful-but-are-not-being-shown).
* No custom icon? Verify the icon name is `ic_stat_onesignal_default` and in the correct drawable folders.
* Having issues? Copy-paste the api request and a log from start to finish of app launch into a `.txt` file. Then share both with `support@onesignal.com`.
#### Test in-app messages
1. Close app for 30+ seconds
2. **Messages > In-App > New In-App** > select **Welcome** template
3. Audience: **Test Users** segment
4. Trigger: **On app open**
5. Schedule: **Every time trigger conditions are satisfied**
6. Click **Make Message Live**
7. Open app
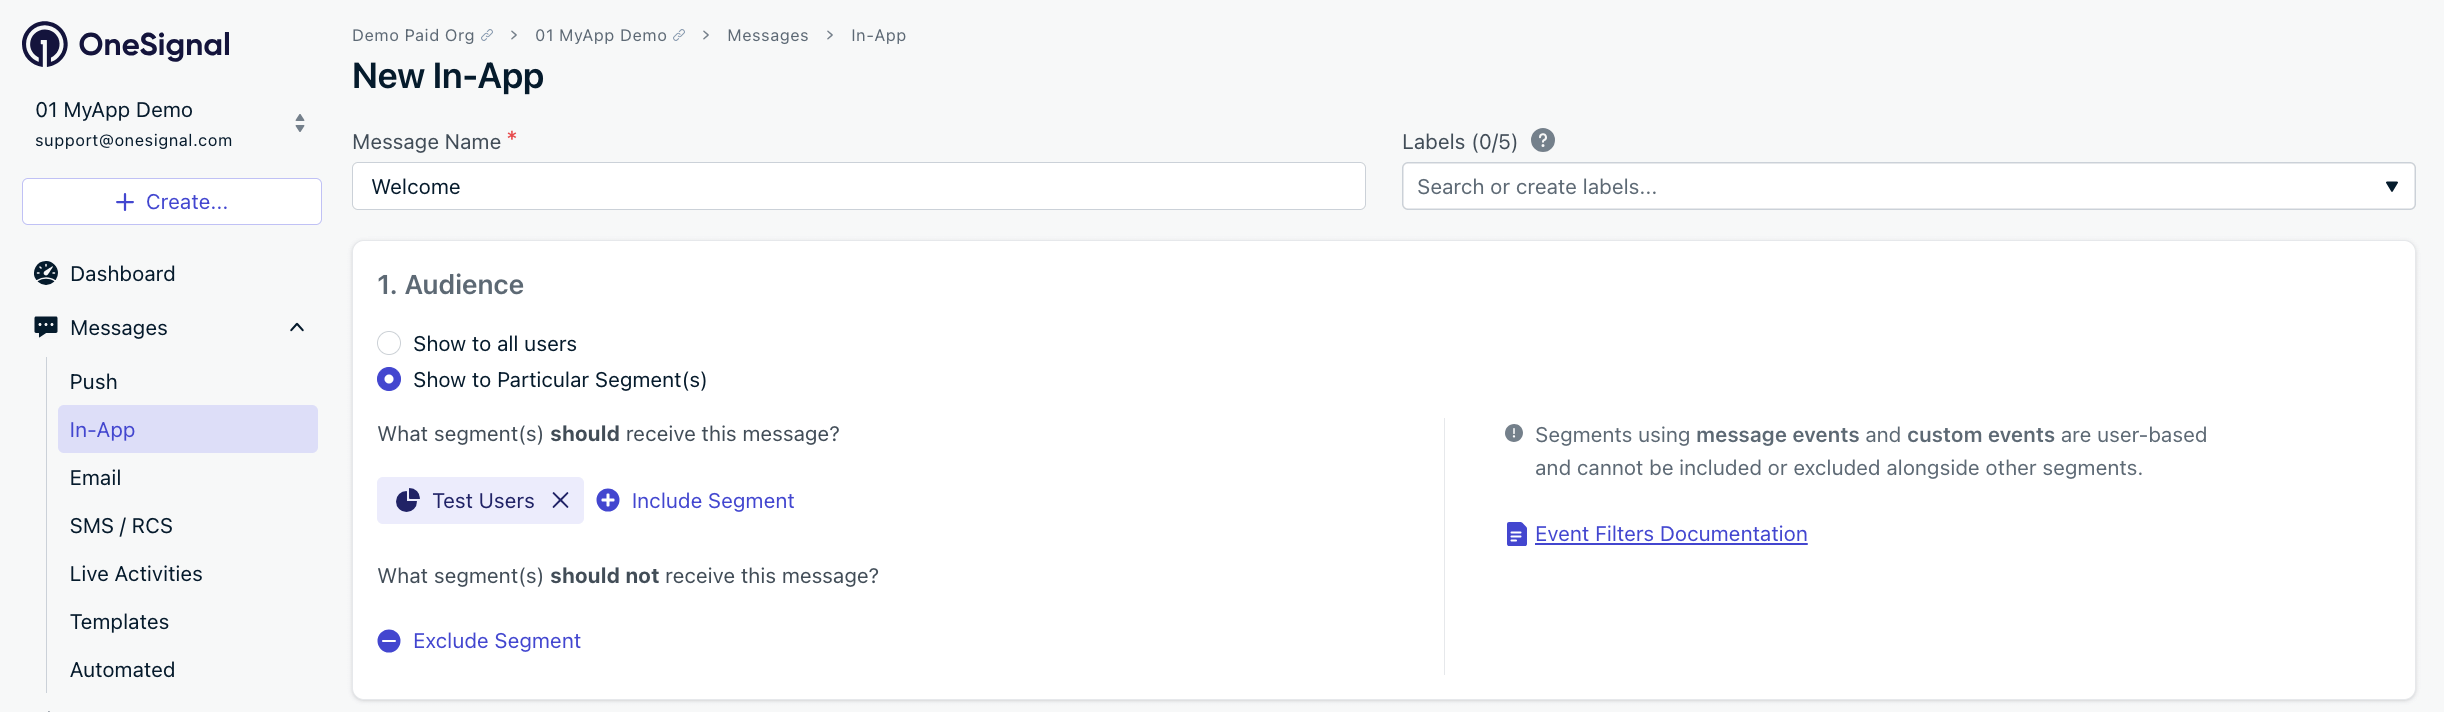
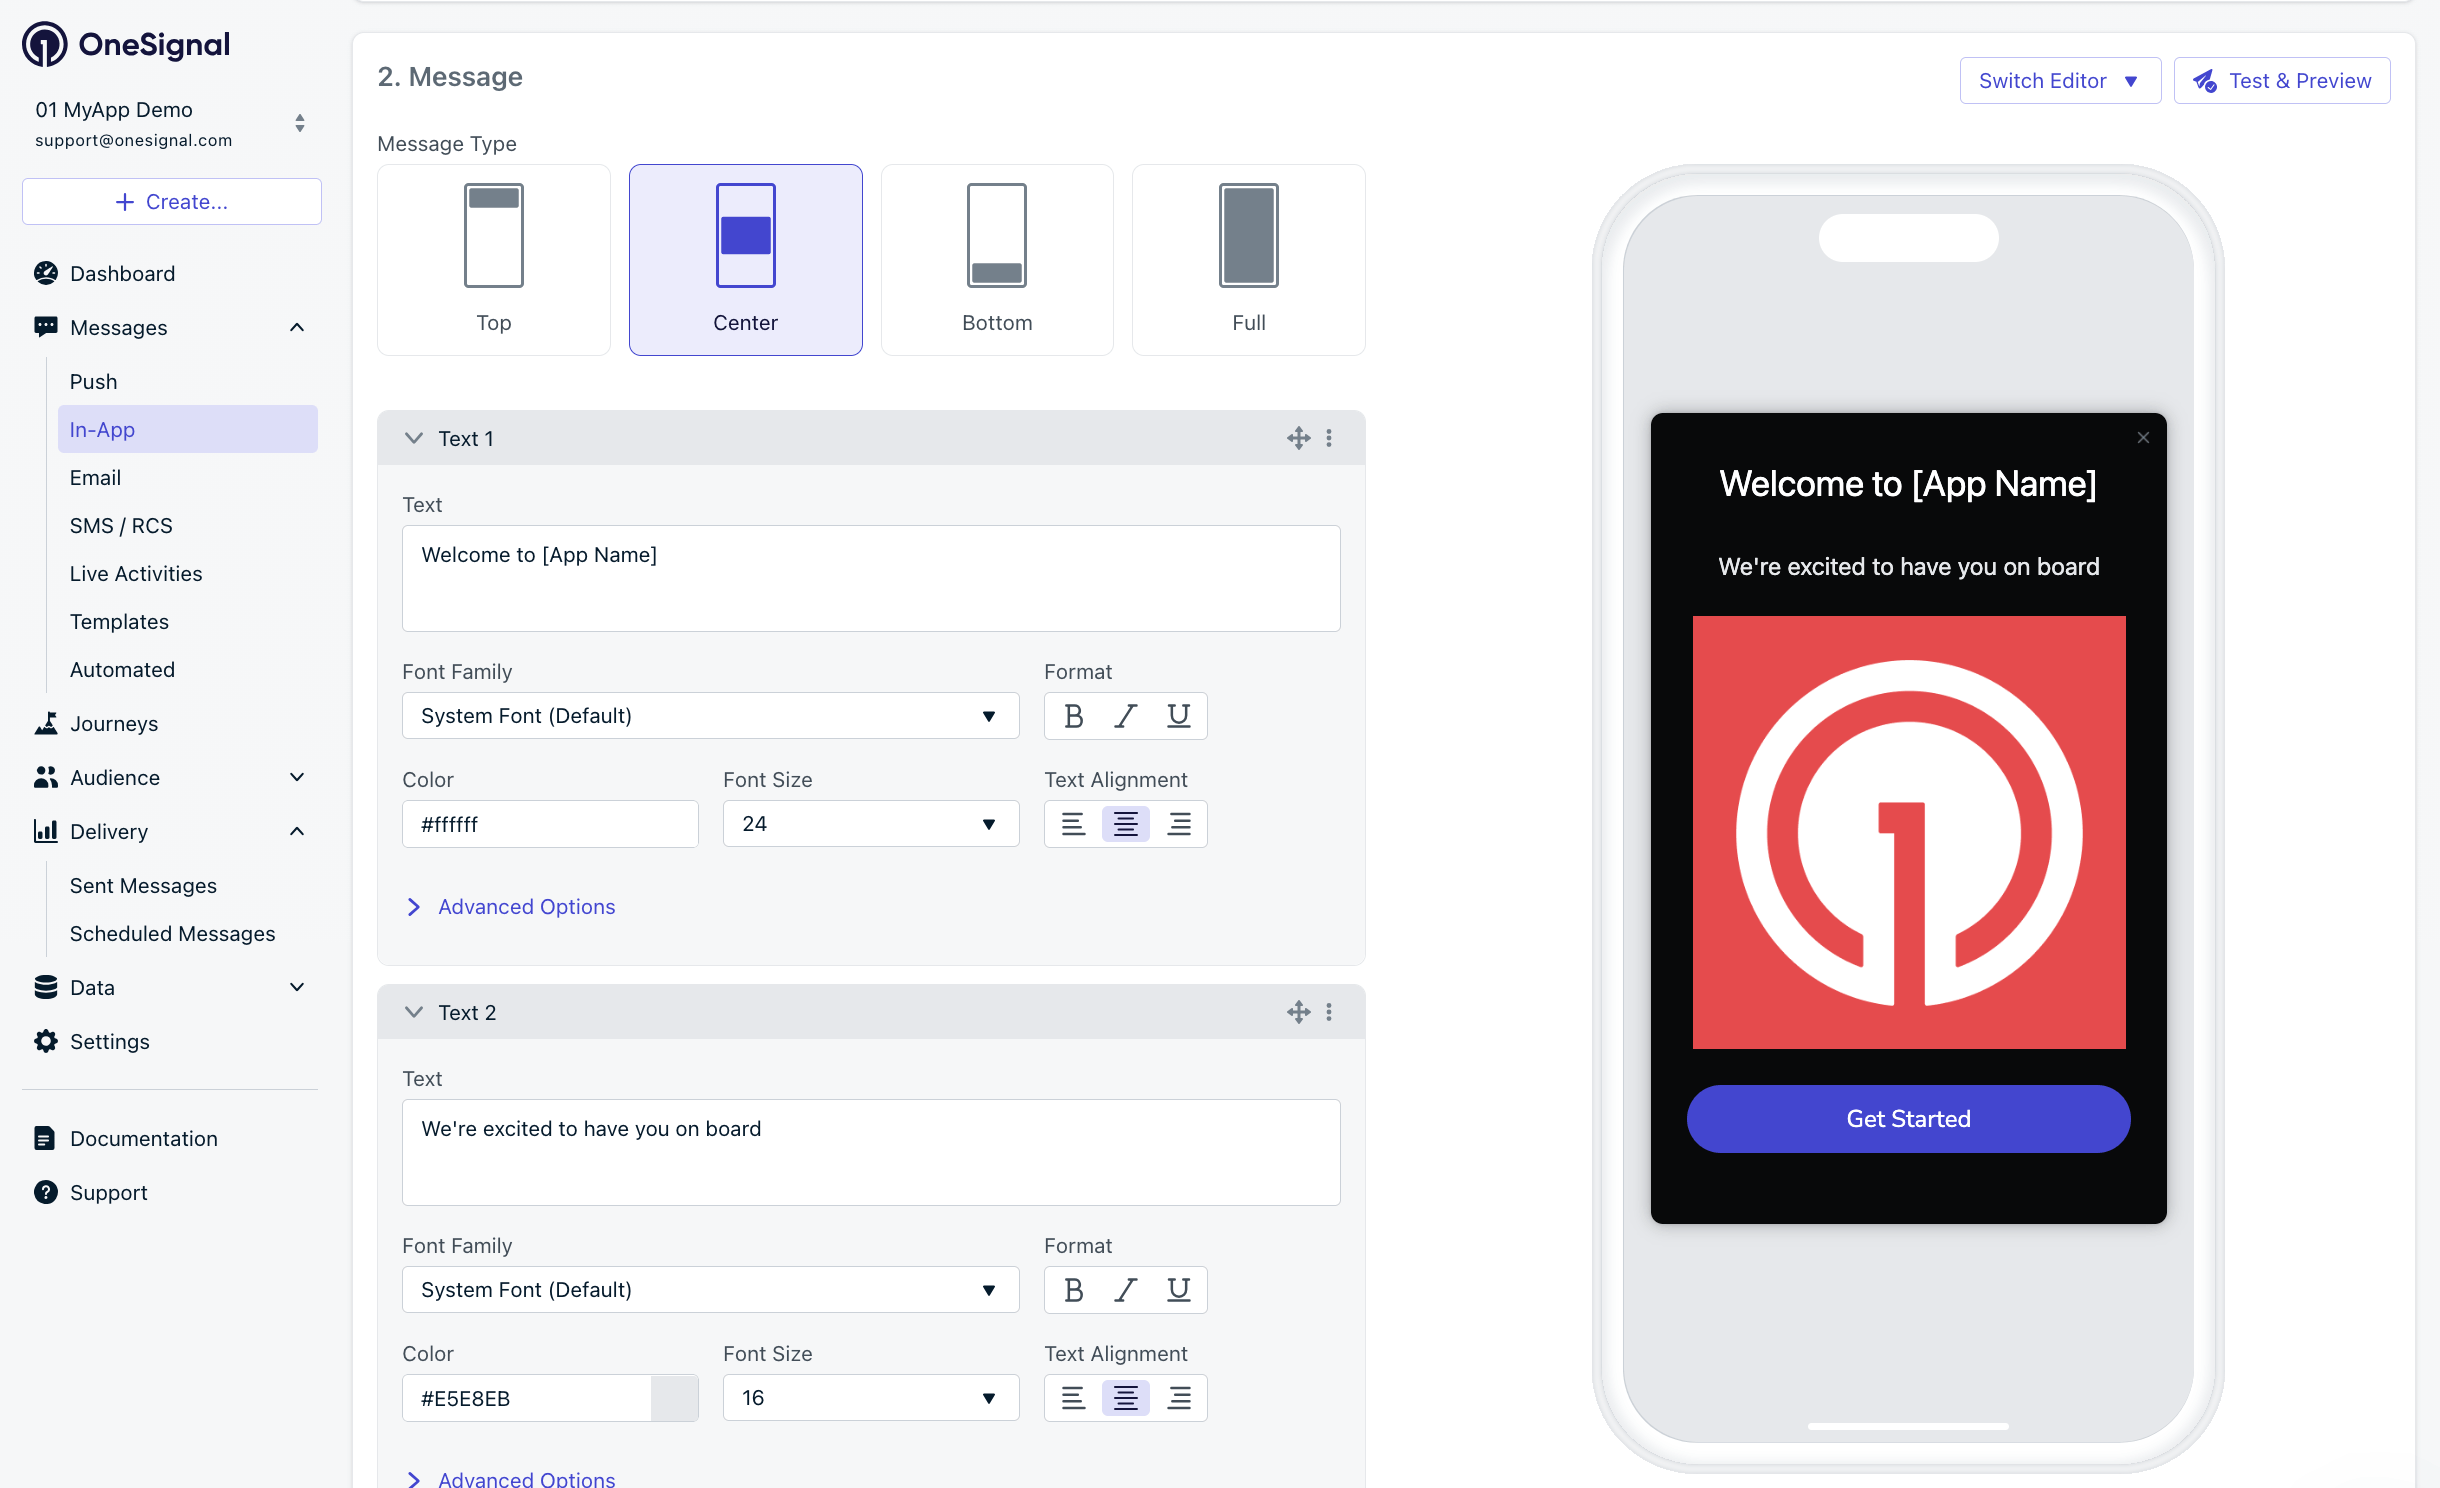
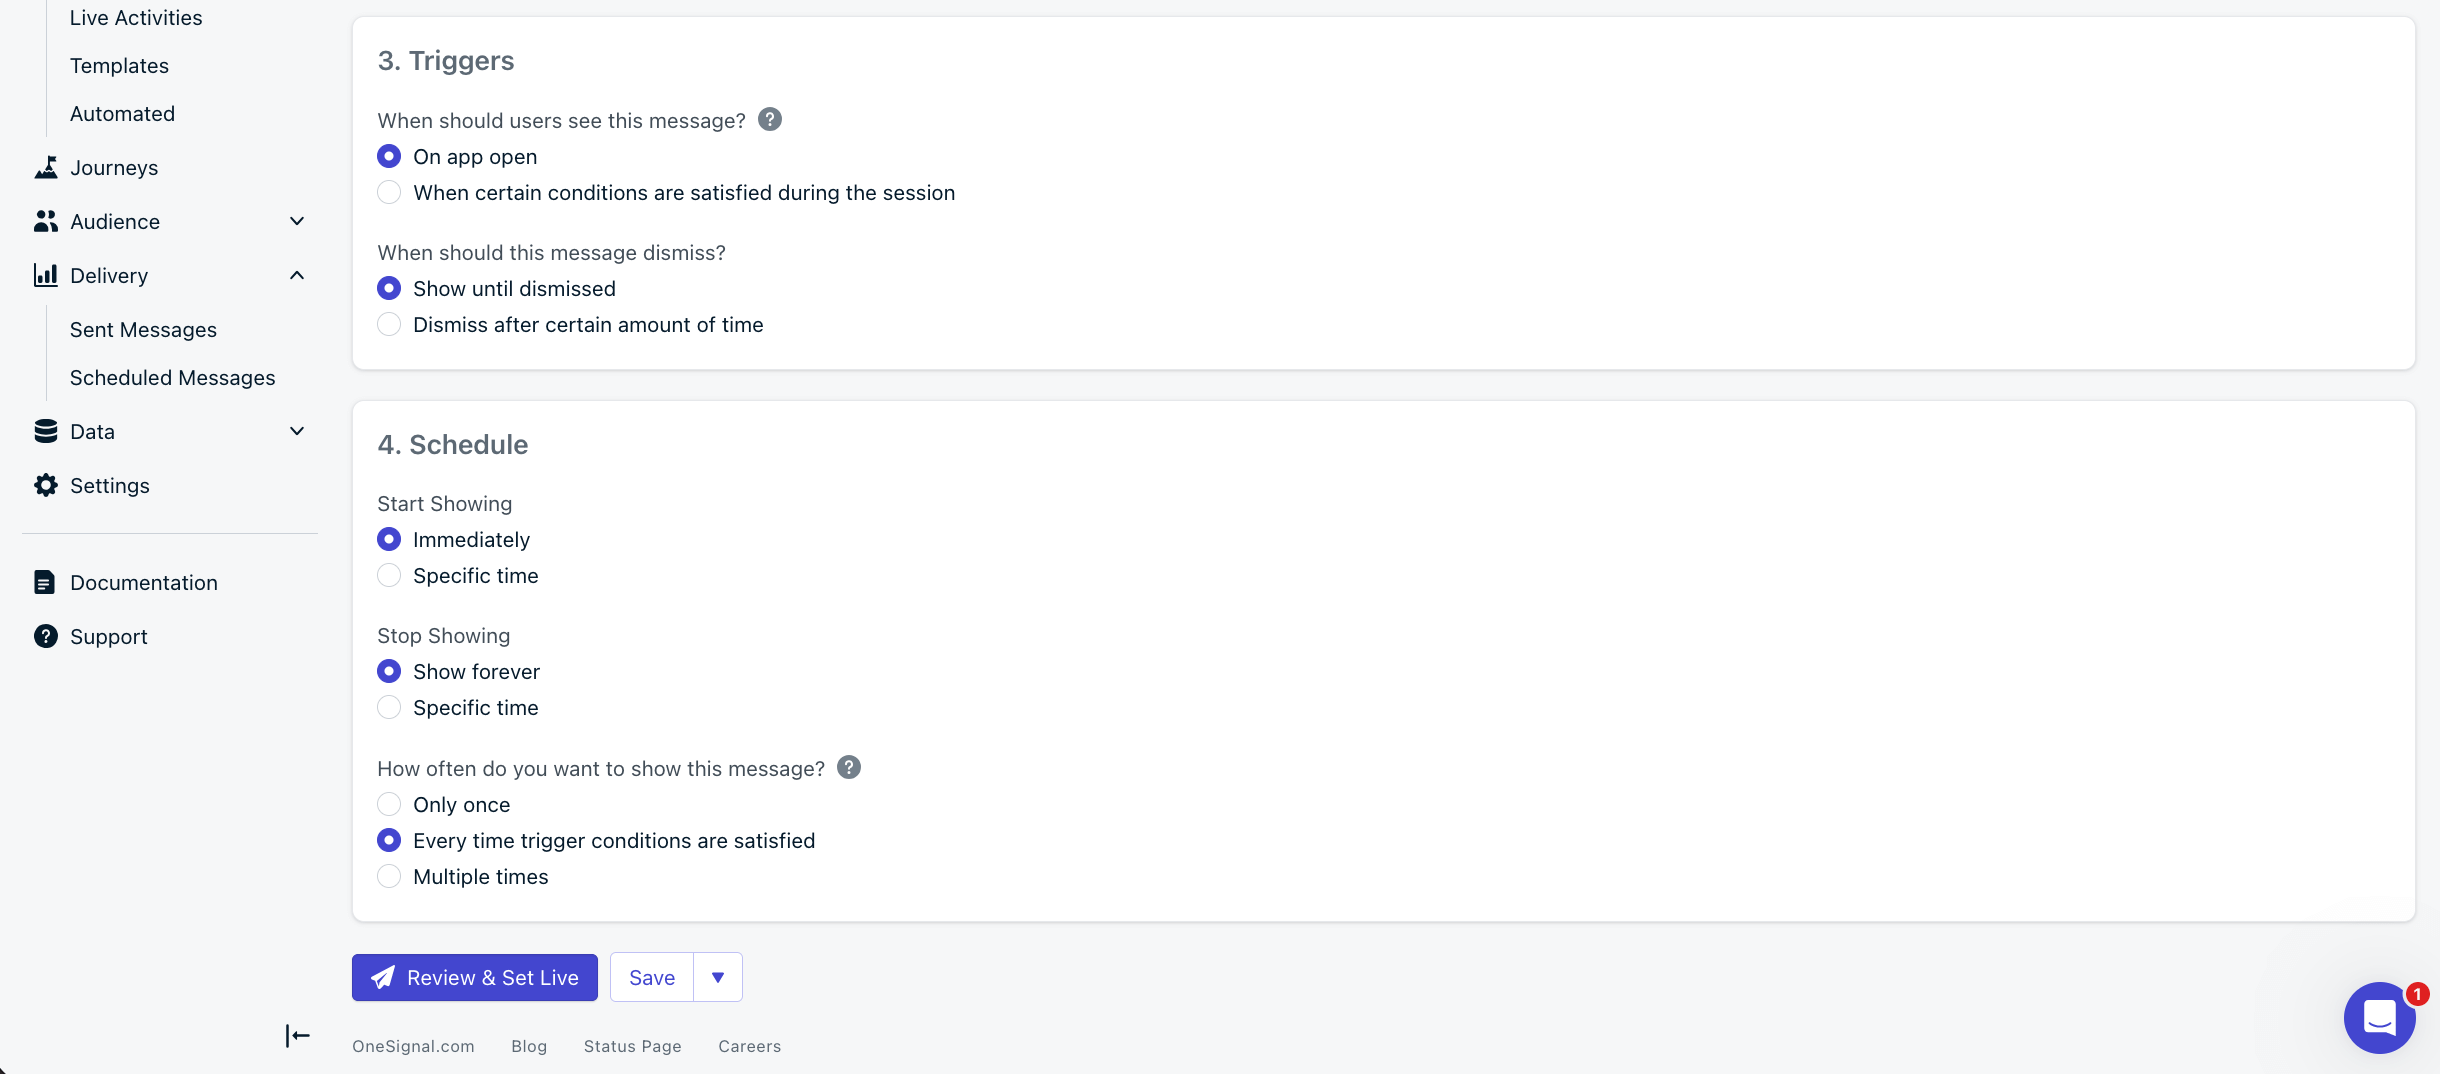
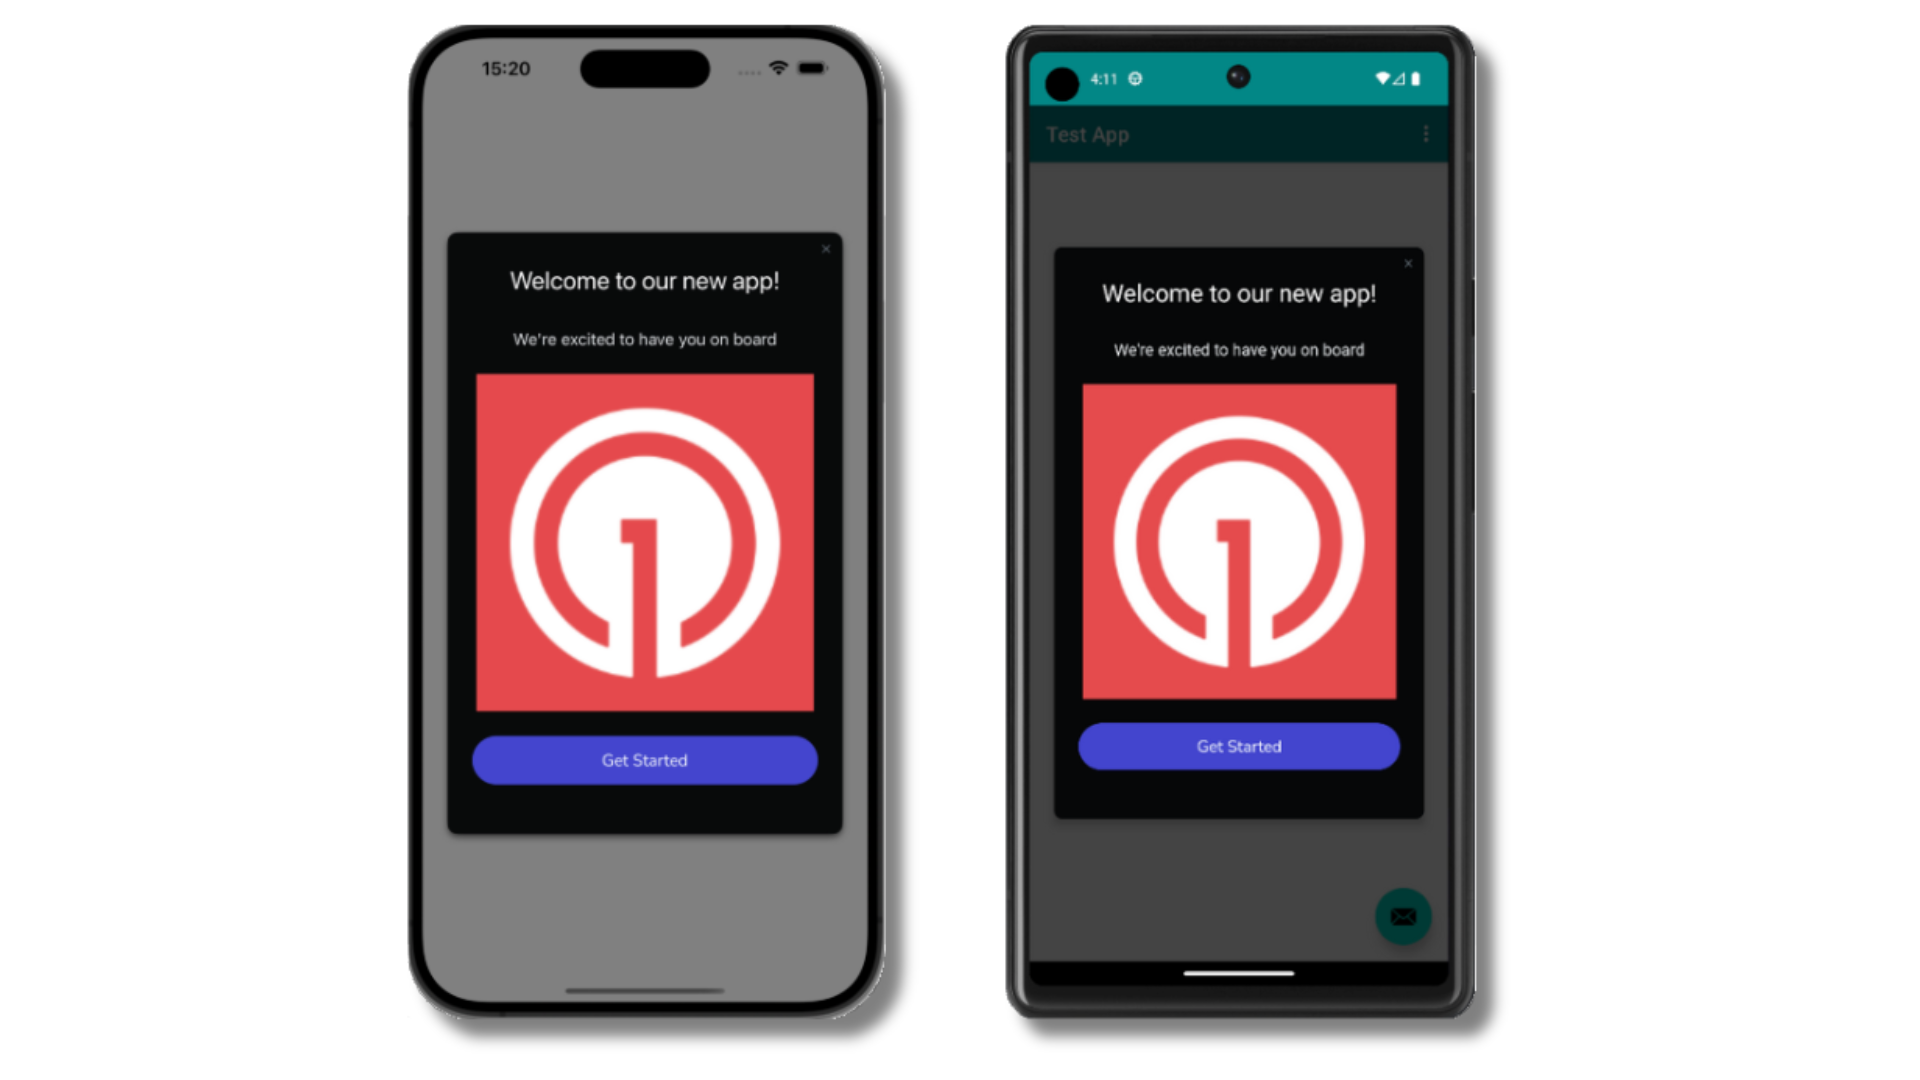 The test device should show the Welcome in-app message. See [In-app messages setup](./in-app-messages-setup) for more details.
Not seeing the message?
* Start a new session
* Force-quit and reopen the app, or close/background it for at least 30 seconds before reopening. Either ensures a new session is started. See [Sessions](./sessions).
* For more, see [how in-app messages are displayed](./in-app-messages-setup#how-are-iams-displayed%3F).
* Still in the `Test Users` segment?
* If you reinstalled or switched devices, re-add the device to [Test Users](./test-users) and confirm it's part of the Test Users segment.
* Having issues?
* Follow [Getting a Debug Log](./capturing-a-debug-log) while reproducing the steps above. This will generate additional logging that you can share with `support@onesignal.com` and we will help investigate what's going on.
You now have [Subscriptions](./subscriptions), [Test Users](./test-users), and a [Segment](./segmentation). You sent [push](./push) with an image via the [Create message](/reference/create-message) API and an [in-app message](./in-app-messages-setup). Continue below to identify users and add more features.
You have successfully set up the OneSignal SDK and learned important concepts like:
* Gathering [Subscriptions](./subscriptions), setting [Test Users](./test-users), and creating [Segments](./segmentation).
* Sending [Push](./push) with images using Segments and our [Create message](/reference/create-message) API.
* Sending [In-app messages](./in-app-messages-setup).
Continue with this guide to identify users in your app and setup additional features.
### Common Errors & Fixes
| Error / Symptom | Cause | Fix |
| - | - | - |
| `Cannot resolve symbol 'OneSignal'` | SDK dependency not added or gradle not synced | Add dependency to build.gradle and sync project |
| `Application class not found` | Application class not registered in manifest | Add `android:name=".ApplicationClass"` to `` tag |
| `Google Play Services not available` | Emulator/device missing Play Services | Use device with Play Store or emulator with Google APIs |
| Push received but default Android icon | Custom icon not configured or wrong name | Create notification icon asset named `ic_stat_onesignal_default` |
| No push notifications received | FCM not configured in OneSignal | Complete Step 0: Configure FCM credentials in OneSignal dashboard |
| In-app messages not showing | Session not started or network issues | Close app 30+ seconds, reopen, check internet connection |
| `Manifest merger failed` | Conflicting manifest attributes | Check for duplicate application names or permissions conflicts |
| `ActivityNotFoundException` for `PermissionsActivity` | `tools:node="replace"` on `` removed the SDK activity from the merged manifest | Remove `tools:node="replace"` from ``. Override a specific attribute with `tools:replace` instead. Confirm `com.onesignal.core.activities.PermissionsActivity` is in `app/build/intermediates/merged_manifests`. |
| Battery optimization blocking notifications | Device power management | Guide users to disable battery optimization for your app |
| Can't diagnose issue | Not enough log info | Add verbose logging and check logcat output for errors |
## User management
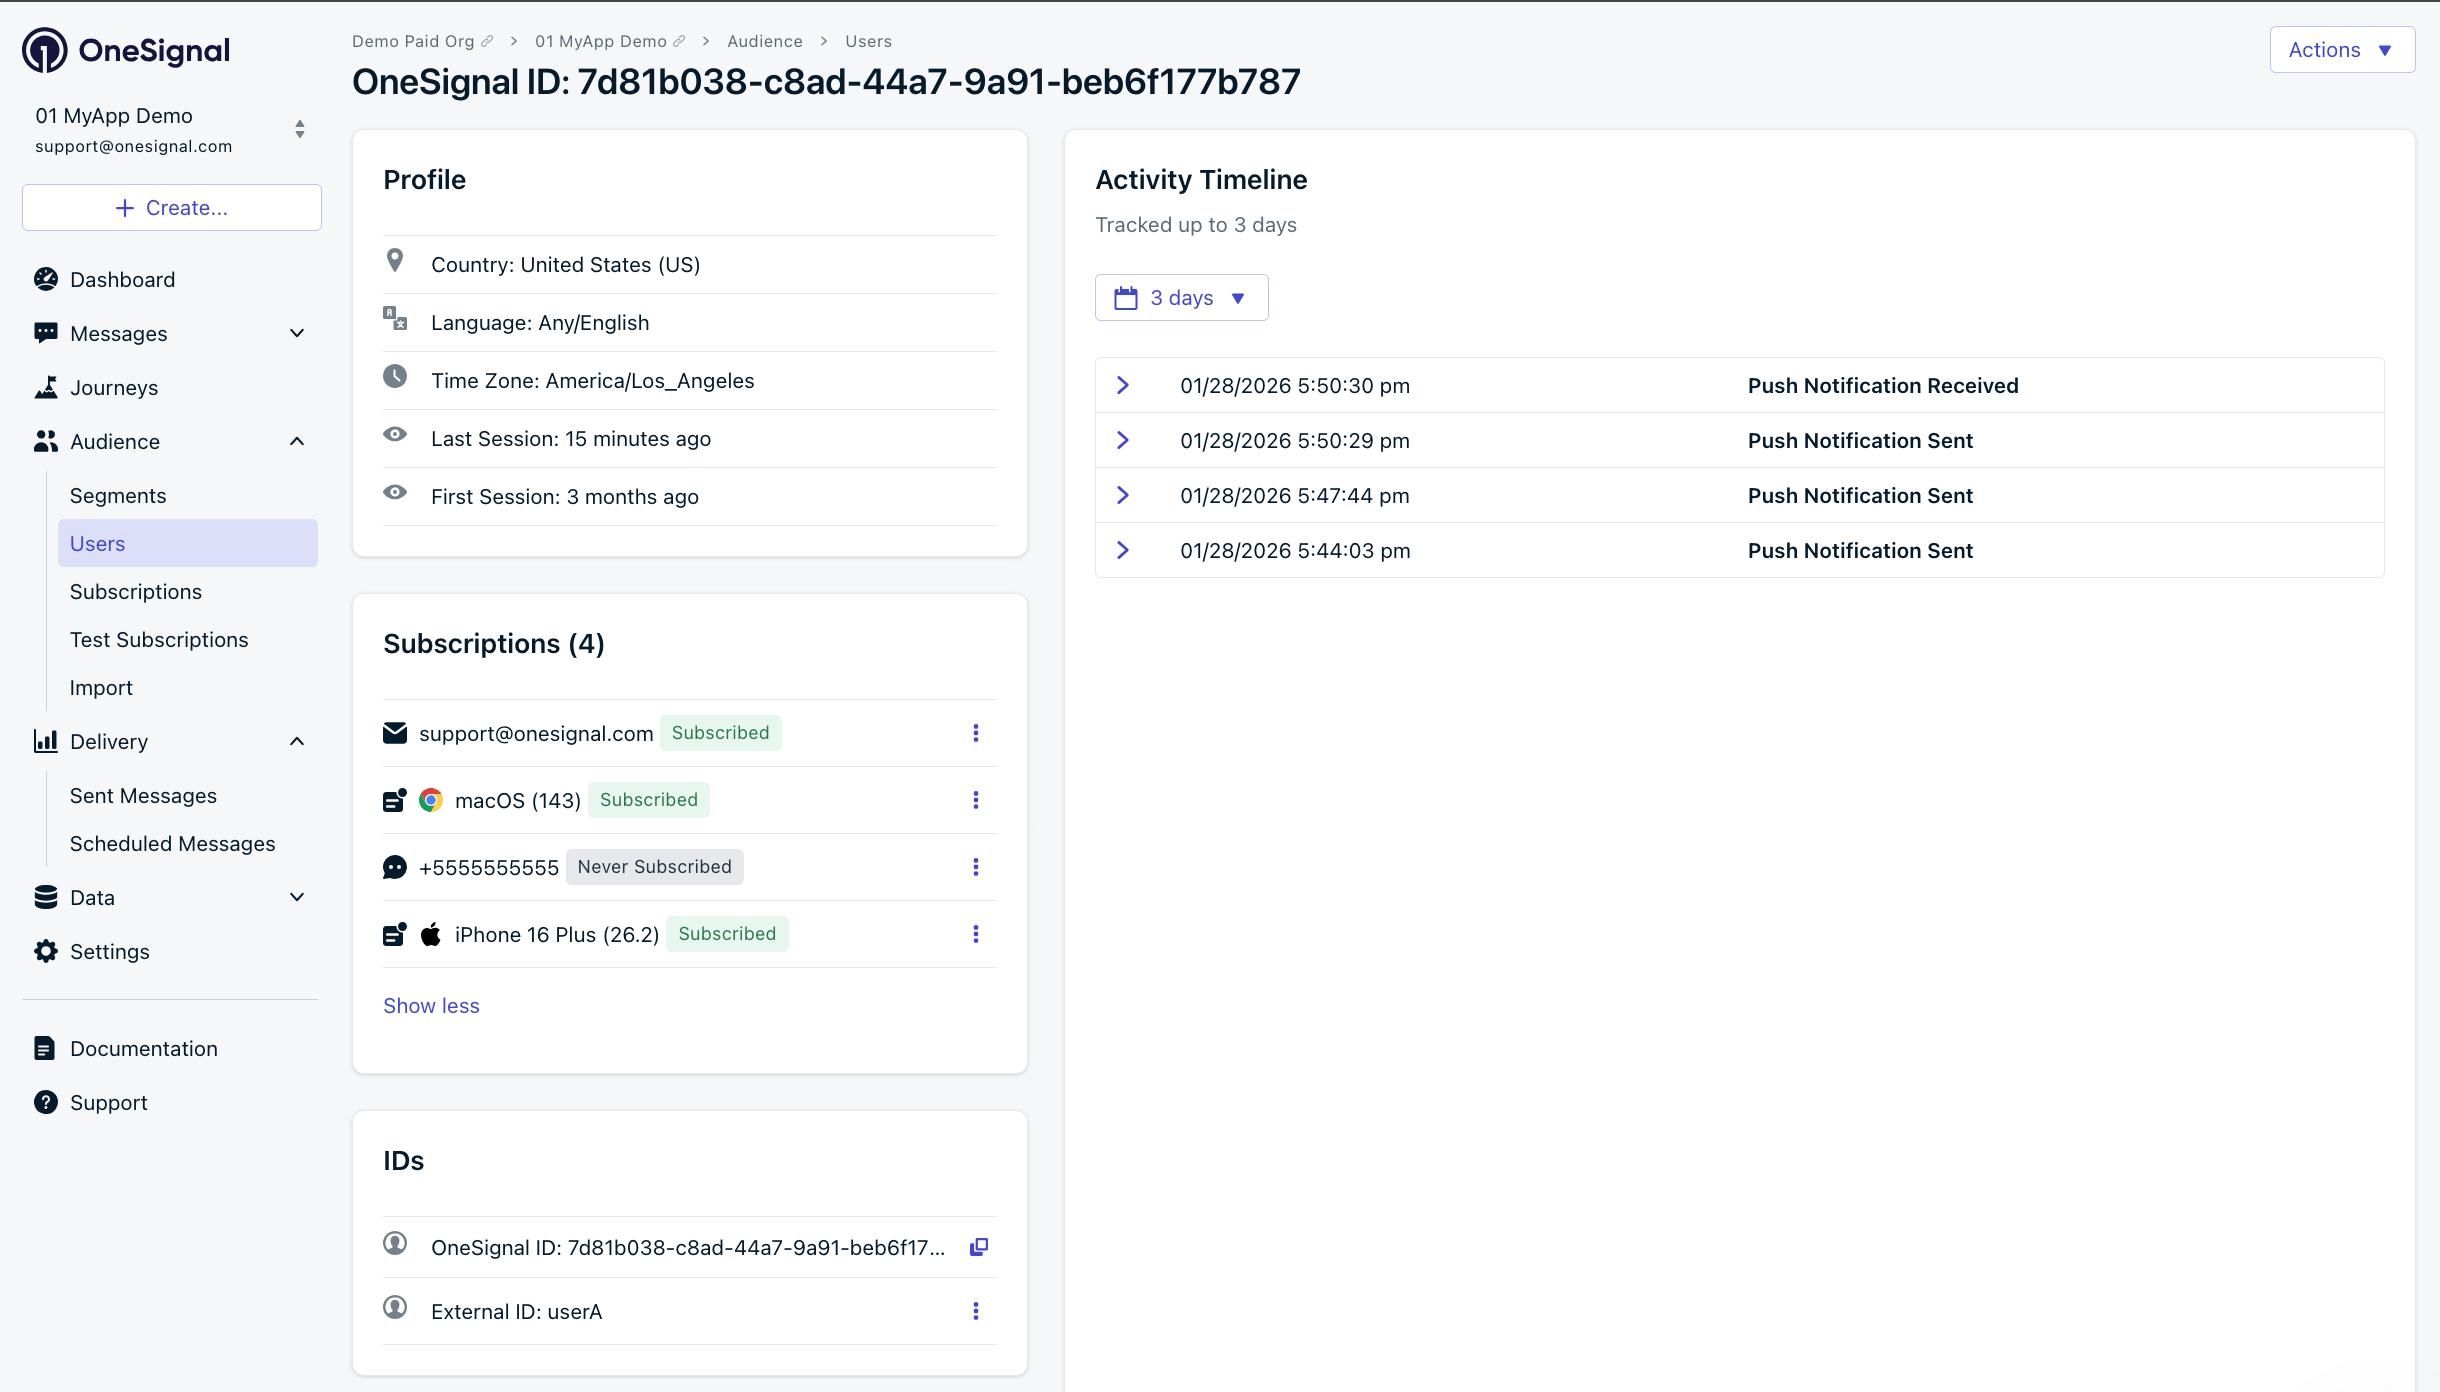
Previously, we demonstrated how to create mobile [Subscriptions](./subscriptions). Now we'll expand to identifying [Users](./users) across all their Subscriptions (including push, email, and SMS) using the OneSignal SDK.
### Assign External ID (recommended)
Use an External ID to identify users consistently across devices, email addresses, and phone numbers using your backend's user identifier. This keeps messaging unified across channels and third-party systems.
```kotlin Kotlin theme={null}
// Call when user logs in or is identified. Safe to call multiple times.
fun onUserAuthenticated(userId: String) {
OneSignal.login(userId)
}
fun onUserLoggedOut() {
OneSignal.logout()
}
```
```java Java theme={null}
// Call when user logs in or is identified. Safe to call multiple times.
public void onUserAuthenticated(String userId) {
OneSignal.login(userId);
}
public void onUserLoggedOut() {
OneSignal.logout();
}
```
OneSignal generates unique read-only IDs for Subscriptions (Subscription ID) and Users (OneSignal ID).
Setting the External ID via our SDK is highly recommended to identify users across all their subscriptions, regardless of how they are created.
Learn more about the [`login` method](./mobile-sdk-reference#login-external-id) in the SDK reference.
### Add Tags & Custom Events
Tags and Custom Events both add data to users. Tags are `key-value` strings for user properties (like `username`, `role`, or `status`). Custom Events use JSON and usually represent actions (like `new_purchase` or `abandoned_cart`). Both can power [Message Personalization](./message-personalization) and Journeys.
```kotlin Kotlin theme={null}
OneSignal.User.addTag("username", "john_doe")
val properties = mapOf(
"product_id" to "123456",
"product_name" to "Product Name",
"product_price" to 100,
"product_quantity" to 1
)
OneSignal.User.trackEvent("abandoned_cart", properties)
```
```java Java theme={null}
import java.util.HashMap;
import java.util.Map;
OneSignal.getUser().addTag("username", "john_doe");
Map properties = new HashMap<>();
properties.put("product_id", "123456");
properties.put("product_name", "Product Name");
properties.put("product_price", 100);
properties.put("product_quantity", 1);
OneSignal.getUser().trackEvent("abandoned_cart", properties);
```
See [Tags](./add-user-data-tags) and [Custom Events](./custom-events) for more detail.
### Add email and/or SMS subscriptions
You can reach users through email and SMS in addition to push. If the email address or phone number already exists in the OneSignal app, the SDK adds it to the existing user and does not create duplicates. Call `login()` first so the address attaches to the identified user.
```kotlin Kotlin theme={null}
OneSignal.User.addEmail("user@example.com")
OneSignal.User.addSms("+15551234567")
```
```java Java theme={null}
OneSignal.getUser().addEmail("user@example.com");
OneSignal.getUser().addSms("+15551234567");
```
The test device should show the Welcome in-app message. See [In-app messages setup](./in-app-messages-setup) for more details.
Not seeing the message?
* Start a new session
* Force-quit and reopen the app, or close/background it for at least 30 seconds before reopening. Either ensures a new session is started. See [Sessions](./sessions).
* For more, see [how in-app messages are displayed](./in-app-messages-setup#how-are-iams-displayed%3F).
* Still in the `Test Users` segment?
* If you reinstalled or switched devices, re-add the device to [Test Users](./test-users) and confirm it's part of the Test Users segment.
* Having issues?
* Follow [Getting a Debug Log](./capturing-a-debug-log) while reproducing the steps above. This will generate additional logging that you can share with `support@onesignal.com` and we will help investigate what's going on.
You now have [Subscriptions](./subscriptions), [Test Users](./test-users), and a [Segment](./segmentation). You sent [push](./push) with an image via the [Create message](/reference/create-message) API and an [in-app message](./in-app-messages-setup). Continue below to identify users and add more features.
You have successfully set up the OneSignal SDK and learned important concepts like:
* Gathering [Subscriptions](./subscriptions), setting [Test Users](./test-users), and creating [Segments](./segmentation).
* Sending [Push](./push) with images using Segments and our [Create message](/reference/create-message) API.
* Sending [In-app messages](./in-app-messages-setup).
Continue with this guide to identify users in your app and setup additional features.
### Common Errors & Fixes
| Error / Symptom | Cause | Fix |
| - | - | - |
| `Cannot resolve symbol 'OneSignal'` | SDK dependency not added or gradle not synced | Add dependency to build.gradle and sync project |
| `Application class not found` | Application class not registered in manifest | Add `android:name=".ApplicationClass"` to `` tag |
| `Google Play Services not available` | Emulator/device missing Play Services | Use device with Play Store or emulator with Google APIs |
| Push received but default Android icon | Custom icon not configured or wrong name | Create notification icon asset named `ic_stat_onesignal_default` |
| No push notifications received | FCM not configured in OneSignal | Complete Step 0: Configure FCM credentials in OneSignal dashboard |
| In-app messages not showing | Session not started or network issues | Close app 30+ seconds, reopen, check internet connection |
| `Manifest merger failed` | Conflicting manifest attributes | Check for duplicate application names or permissions conflicts |
| `ActivityNotFoundException` for `PermissionsActivity` | `tools:node="replace"` on `` removed the SDK activity from the merged manifest | Remove `tools:node="replace"` from ``. Override a specific attribute with `tools:replace` instead. Confirm `com.onesignal.core.activities.PermissionsActivity` is in `app/build/intermediates/merged_manifests`. |
| Battery optimization blocking notifications | Device power management | Guide users to disable battery optimization for your app |
| Can't diagnose issue | Not enough log info | Add verbose logging and check logcat output for errors |
## User management
Previously, we demonstrated how to create mobile [Subscriptions](./subscriptions). Now we'll expand to identifying [Users](./users) across all their Subscriptions (including push, email, and SMS) using the OneSignal SDK.
### Assign External ID (recommended)
Use an External ID to identify users consistently across devices, email addresses, and phone numbers using your backend's user identifier. This keeps messaging unified across channels and third-party systems.
```kotlin Kotlin theme={null}
// Call when user logs in or is identified. Safe to call multiple times.
fun onUserAuthenticated(userId: String) {
OneSignal.login(userId)
}
fun onUserLoggedOut() {
OneSignal.logout()
}
```
```java Java theme={null}
// Call when user logs in or is identified. Safe to call multiple times.
public void onUserAuthenticated(String userId) {
OneSignal.login(userId);
}
public void onUserLoggedOut() {
OneSignal.logout();
}
```
OneSignal generates unique read-only IDs for Subscriptions (Subscription ID) and Users (OneSignal ID).
Setting the External ID via our SDK is highly recommended to identify users across all their subscriptions, regardless of how they are created.
Learn more about the [`login` method](./mobile-sdk-reference#login-external-id) in the SDK reference.
### Add Tags & Custom Events
Tags and Custom Events both add data to users. Tags are `key-value` strings for user properties (like `username`, `role`, or `status`). Custom Events use JSON and usually represent actions (like `new_purchase` or `abandoned_cart`). Both can power [Message Personalization](./message-personalization) and Journeys.
```kotlin Kotlin theme={null}
OneSignal.User.addTag("username", "john_doe")
val properties = mapOf(
"product_id" to "123456",
"product_name" to "Product Name",
"product_price" to 100,
"product_quantity" to 1
)
OneSignal.User.trackEvent("abandoned_cart", properties)
```
```java Java theme={null}
import java.util.HashMap;
import java.util.Map;
OneSignal.getUser().addTag("username", "john_doe");
Map properties = new HashMap<>();
properties.put("product_id", "123456");
properties.put("product_name", "Product Name");
properties.put("product_price", 100);
properties.put("product_quantity", 1);
OneSignal.getUser().trackEvent("abandoned_cart", properties);
```
See [Tags](./add-user-data-tags) and [Custom Events](./custom-events) for more detail.
### Add email and/or SMS subscriptions
You can reach users through email and SMS in addition to push. If the email address or phone number already exists in the OneSignal app, the SDK adds it to the existing user and does not create duplicates. Call `login()` first so the address attaches to the identified user.
```kotlin Kotlin theme={null}
OneSignal.User.addEmail("user@example.com")
OneSignal.User.addSms("+15551234567")
```
```java Java theme={null}
OneSignal.getUser().addEmail("user@example.com");
OneSignal.getUser().addSms("+15551234567");
```
 Best practices for multi-channel communication
* Obtain explicit consent before adding email or SMS subscriptions.
* Explain the benefits of each communication channel to users.
* Provide channel preferences so users can select which channels they prefer.
***
## Privacy and user consent
To control when OneSignal collects user data, use the SDK's consent gating methods. Call `consentRequired` **before** `initWithContext`.
```kotlin Kotlin theme={null}
// In ApplicationClass onCreate(), BEFORE OneSignal.initWithContext()
OneSignal.consentRequired = true
// Later, after the user grants consent
OneSignal.consentGiven = true
```
```java Java theme={null}
// In ApplicationClass onCreate(), BEFORE OneSignal.initWithContext()
OneSignal.setConsentRequired(true);
// Later, after the user grants consent
OneSignal.setConsentGiven(true);
```
See [Data collected by the SDK](./data-collected-by-the-onesignal-sdk) and [Handling personal data](./handling-personal-data).
***
## Prompt for push permissions
Instead of calling `requestPermission()` immediately on app open, take a more strategic approach. Use an in-app message to explain the value of push notifications before requesting permission.
For best practices and implementation details, see our [Prompt for push permissions](./prompt-for-push-permissions) guide.
***
## Listen to push, user, and in-app events
Use SDK listeners to react to user actions and state changes. Add these in your Application class after `OneSignal.initWithContext()`.
### Push notification events
```kotlin Kotlin theme={null}
import android.util.Log
import com.onesignal.OneSignal
import com.onesignal.notifications.INotificationClickEvent
import com.onesignal.notifications.INotificationClickListener
val clickListener = object : INotificationClickListener {
override fun onClick(event: INotificationClickEvent) {
Log.d("OneSignal", "Notification clicked: ${event.notification.title}")
}
}
OneSignal.Notifications.addClickListener(clickListener)
```
```java Java theme={null}
import android.util.Log;
import com.onesignal.OneSignal;
import com.onesignal.notifications.INotificationClickEvent;
import com.onesignal.notifications.INotificationClickListener;
OneSignal.getNotifications().addClickListener(new INotificationClickListener() {
@Override
public void onClick(INotificationClickEvent event) {
Log.d("OneSignal", "Notification clicked: " + event.getNotification().getTitle());
}
});
```
### User state changes
This example uses the push subscription observer. The user state observer and notification permission observer are in the [Mobile SDK reference](./mobile-sdk-reference).
```kotlin Kotlin theme={null}
import com.onesignal.OneSignal
import com.onesignal.user.subscriptions.IPushSubscriptionObserver
import com.onesignal.user.subscriptions.PushSubscriptionChangedState
class MyObserver : IPushSubscriptionObserver {
init {
OneSignal.User.pushSubscription.addObserver(this)
}
override fun onPushSubscriptionChange(state: PushSubscriptionChangedState) {
if (state.current.optedIn) {
println("User is now opted-in with push token: ${state.current.token}")
}
}
}
```
```java Java theme={null}
import com.onesignal.OneSignal;
import com.onesignal.user.subscriptions.IPushSubscriptionObserver;
import com.onesignal.user.subscriptions.PushSubscriptionChangedState;
public class MyObserver implements IPushSubscriptionObserver {
public MyObserver() {
OneSignal.getUser().getPushSubscription().addObserver(this);
}
@Override
public void onPushSubscriptionChange(PushSubscriptionChangedState state) {
if (state.getCurrent().getOptedIn()) {
android.util.Log.d("OneSignal", "User is now opted-in with push token: " + state.getCurrent().getToken());
}
}
}
```
### In-app message events
Additional in-app message methods are in the [Mobile SDK reference](./mobile-sdk-reference).
```kotlin Kotlin theme={null}
import com.onesignal.OneSignal
import com.onesignal.inAppMessages.IInAppMessageClickEvent
import com.onesignal.inAppMessages.IInAppMessageClickListener
val clickListener = object : IInAppMessageClickListener {
override fun onClick(event: IInAppMessageClickEvent) {
println(event.result.actionId)
}
}
OneSignal.InAppMessages.addClickListener(clickListener)
```
```java Java theme={null}
import com.onesignal.OneSignal;
import com.onesignal.inAppMessages.IInAppMessageClickEvent;
import com.onesignal.inAppMessages.IInAppMessageClickListener;
OneSignal.getInAppMessages().addClickListener(new IInAppMessageClickListener() {
@Override
public void onClick(IInAppMessageClickEvent event) {
android.util.Log.d("OneSignal", String.valueOf(event.getResult().getActionId()));
}
});
```
***
## Advanced setup and capabilities
### Android-specific features
* **[Notification channels](./mobile-sdk-reference#notification-channels):** Organize notifications into categories (Android 8.0+)
* **[Service extensions](./service-extensions):** Advanced notification customization
* **[Huawei/HMS](./huawei-sdk-setup):** Alternative to Google Play Services
### Universal features
* [Deep linking](./deep-linking): Navigate users to specific screens from notifications
* [Action buttons](./action-buttons): Add interactive buttons to notifications
* [Identity verification](./identity-verification): Secure user identification
* [Location tracking](./mobile-sdk-reference#location): Location-based targeting
* [Integrations](./integrations): Connect with analytics and data platforms
* [Multi-language messaging](./multi-language-messaging): Localized notifications
For full SDK method documentation, see the [Mobile SDK reference](./mobile-sdk-reference).
***
## FAQ
### Why can't Android Studio resolve `OneSignal`?
The SDK dependency is missing or Gradle has not synced. Add `com.onesignal:OneSignal:[5.6.1, 5.99.99]` to your app module `build.gradle` and use **File > Sync Project with Gradle Files**.
### Why is my Application class not found?
The class is not registered in the manifest. Add `android:name=".ApplicationClass"` (or your class name) to the `` tag in `AndroidManifest.xml`.
### Why does the emulator say Google Play Services is not available?
The emulator image does not include Play Services. Use a device with the Play Store, or an emulator system image that includes Google APIs.
### Why does the notification show the default Android icon?
The small icon is missing or misnamed. Add `ic_stat_onesignal_default` to each `res/drawable-*` density folder. See [Notification icons](./notification-icons).
### Why did my test device not receive a push?
FCM credentials are not configured, or the device is not subscribed. Complete [Step 0](#step-0-configure-fcm-in-onesignal-required-to-deliver-push) and confirm the Subscription status is **Subscribed**. Then see [Mobile push not shown](./notifications-show-successful-but-are-not-being-shown).
### Why aren't in-app messages showing?
In-app messages require a new session. Force-quit the app, or background it for at least 30 seconds, then reopen. Confirm the device is still in the Test Users segment. See [Sessions](./sessions) and [how in-app messages are displayed](./in-app-messages-setup#how-are-iams-displayed%3F).
### What causes `Manifest merger failed`?
Conflicting `` `android:name` values or duplicate permissions. Search your merged manifest for a second Application class and keep a single `android:name`.
### Why do battery optimizations block notifications?
Some OEMs restrict background work. Ask users to disable battery optimization for your app if notifications stop after the device sleeps.
### How do I get more log output?
Set `OneSignal.Debug.logLevel = LogLevel.VERBOSE` (Kotlin) or `OneSignal.getDebug().setLogLevel(LogLevel.VERBOSE)` (Java), reproduce the issue, and capture logcat. See [Getting a debug log](./capturing-a-debug-log).
***
Need help?
Chat with our Support team or email `support@onesignal.com`
Please include:
* Details of the issue you're experiencing and steps to reproduce if available
* Your OneSignal App ID
* The External ID or Subscription ID if applicable
* The URL to the message you tested in the OneSignal Dashboard if applicable
* Any relevant [logs or error messages](/docs/en/capturing-a-debug-log)
We're happy to help!
This documentation is built and hosted on [Mintlify](https://mintlify.com), a developer documentation platform.
Best practices for multi-channel communication
* Obtain explicit consent before adding email or SMS subscriptions.
* Explain the benefits of each communication channel to users.
* Provide channel preferences so users can select which channels they prefer.
***
## Privacy and user consent
To control when OneSignal collects user data, use the SDK's consent gating methods. Call `consentRequired` **before** `initWithContext`.
```kotlin Kotlin theme={null}
// In ApplicationClass onCreate(), BEFORE OneSignal.initWithContext()
OneSignal.consentRequired = true
// Later, after the user grants consent
OneSignal.consentGiven = true
```
```java Java theme={null}
// In ApplicationClass onCreate(), BEFORE OneSignal.initWithContext()
OneSignal.setConsentRequired(true);
// Later, after the user grants consent
OneSignal.setConsentGiven(true);
```
See [Data collected by the SDK](./data-collected-by-the-onesignal-sdk) and [Handling personal data](./handling-personal-data).
***
## Prompt for push permissions
Instead of calling `requestPermission()` immediately on app open, take a more strategic approach. Use an in-app message to explain the value of push notifications before requesting permission.
For best practices and implementation details, see our [Prompt for push permissions](./prompt-for-push-permissions) guide.
***
## Listen to push, user, and in-app events
Use SDK listeners to react to user actions and state changes. Add these in your Application class after `OneSignal.initWithContext()`.
### Push notification events
```kotlin Kotlin theme={null}
import android.util.Log
import com.onesignal.OneSignal
import com.onesignal.notifications.INotificationClickEvent
import com.onesignal.notifications.INotificationClickListener
val clickListener = object : INotificationClickListener {
override fun onClick(event: INotificationClickEvent) {
Log.d("OneSignal", "Notification clicked: ${event.notification.title}")
}
}
OneSignal.Notifications.addClickListener(clickListener)
```
```java Java theme={null}
import android.util.Log;
import com.onesignal.OneSignal;
import com.onesignal.notifications.INotificationClickEvent;
import com.onesignal.notifications.INotificationClickListener;
OneSignal.getNotifications().addClickListener(new INotificationClickListener() {
@Override
public void onClick(INotificationClickEvent event) {
Log.d("OneSignal", "Notification clicked: " + event.getNotification().getTitle());
}
});
```
### User state changes
This example uses the push subscription observer. The user state observer and notification permission observer are in the [Mobile SDK reference](./mobile-sdk-reference).
```kotlin Kotlin theme={null}
import com.onesignal.OneSignal
import com.onesignal.user.subscriptions.IPushSubscriptionObserver
import com.onesignal.user.subscriptions.PushSubscriptionChangedState
class MyObserver : IPushSubscriptionObserver {
init {
OneSignal.User.pushSubscription.addObserver(this)
}
override fun onPushSubscriptionChange(state: PushSubscriptionChangedState) {
if (state.current.optedIn) {
println("User is now opted-in with push token: ${state.current.token}")
}
}
}
```
```java Java theme={null}
import com.onesignal.OneSignal;
import com.onesignal.user.subscriptions.IPushSubscriptionObserver;
import com.onesignal.user.subscriptions.PushSubscriptionChangedState;
public class MyObserver implements IPushSubscriptionObserver {
public MyObserver() {
OneSignal.getUser().getPushSubscription().addObserver(this);
}
@Override
public void onPushSubscriptionChange(PushSubscriptionChangedState state) {
if (state.getCurrent().getOptedIn()) {
android.util.Log.d("OneSignal", "User is now opted-in with push token: " + state.getCurrent().getToken());
}
}
}
```
### In-app message events
Additional in-app message methods are in the [Mobile SDK reference](./mobile-sdk-reference).
```kotlin Kotlin theme={null}
import com.onesignal.OneSignal
import com.onesignal.inAppMessages.IInAppMessageClickEvent
import com.onesignal.inAppMessages.IInAppMessageClickListener
val clickListener = object : IInAppMessageClickListener {
override fun onClick(event: IInAppMessageClickEvent) {
println(event.result.actionId)
}
}
OneSignal.InAppMessages.addClickListener(clickListener)
```
```java Java theme={null}
import com.onesignal.OneSignal;
import com.onesignal.inAppMessages.IInAppMessageClickEvent;
import com.onesignal.inAppMessages.IInAppMessageClickListener;
OneSignal.getInAppMessages().addClickListener(new IInAppMessageClickListener() {
@Override
public void onClick(IInAppMessageClickEvent event) {
android.util.Log.d("OneSignal", String.valueOf(event.getResult().getActionId()));
}
});
```
***
## Advanced setup and capabilities
### Android-specific features
* **[Notification channels](./mobile-sdk-reference#notification-channels):** Organize notifications into categories (Android 8.0+)
* **[Service extensions](./service-extensions):** Advanced notification customization
* **[Huawei/HMS](./huawei-sdk-setup):** Alternative to Google Play Services
### Universal features
* [Deep linking](./deep-linking): Navigate users to specific screens from notifications
* [Action buttons](./action-buttons): Add interactive buttons to notifications
* [Identity verification](./identity-verification): Secure user identification
* [Location tracking](./mobile-sdk-reference#location): Location-based targeting
* [Integrations](./integrations): Connect with analytics and data platforms
* [Multi-language messaging](./multi-language-messaging): Localized notifications
For full SDK method documentation, see the [Mobile SDK reference](./mobile-sdk-reference).
***
## FAQ
### Why can't Android Studio resolve `OneSignal`?
The SDK dependency is missing or Gradle has not synced. Add `com.onesignal:OneSignal:[5.6.1, 5.99.99]` to your app module `build.gradle` and use **File > Sync Project with Gradle Files**.
### Why is my Application class not found?
The class is not registered in the manifest. Add `android:name=".ApplicationClass"` (or your class name) to the `` tag in `AndroidManifest.xml`.
### Why does the emulator say Google Play Services is not available?
The emulator image does not include Play Services. Use a device with the Play Store, or an emulator system image that includes Google APIs.
### Why does the notification show the default Android icon?
The small icon is missing or misnamed. Add `ic_stat_onesignal_default` to each `res/drawable-*` density folder. See [Notification icons](./notification-icons).
### Why did my test device not receive a push?
FCM credentials are not configured, or the device is not subscribed. Complete [Step 0](#step-0-configure-fcm-in-onesignal-required-to-deliver-push) and confirm the Subscription status is **Subscribed**. Then see [Mobile push not shown](./notifications-show-successful-but-are-not-being-shown).
### Why aren't in-app messages showing?
In-app messages require a new session. Force-quit the app, or background it for at least 30 seconds, then reopen. Confirm the device is still in the Test Users segment. See [Sessions](./sessions) and [how in-app messages are displayed](./in-app-messages-setup#how-are-iams-displayed%3F).
### What causes `Manifest merger failed`?
Conflicting `` `android:name` values or duplicate permissions. Search your merged manifest for a second Application class and keep a single `android:name`.
### Why do battery optimizations block notifications?
Some OEMs restrict background work. Ask users to disable battery optimization for your app if notifications stop after the device sleeps.
### How do I get more log output?
Set `OneSignal.Debug.logLevel = LogLevel.VERBOSE` (Kotlin) or `OneSignal.getDebug().setLogLevel(LogLevel.VERBOSE)` (Java), reproduce the issue, and capture logcat. See [Getting a debug log](./capturing-a-debug-log).
***
Need help?
Chat with our Support team or email `support@onesignal.com`
Please include:
* Details of the issue you're experiencing and steps to reproduce if available
* Your OneSignal App ID
* The External ID or Subscription ID if applicable
* The URL to the message you tested in the OneSignal Dashboard if applicable
* Any relevant [logs or error messages](/docs/en/capturing-a-debug-log)
We're happy to help!
This documentation is built and hosted on [Mintlify](https://mintlify.com), a developer documentation platform.