> ## Documentation Index
> Fetch the complete documentation index at: https://documentation.onesignal.com/llms.txt
> Use this file to discover all available pages before exploring further.
# Databricks
> Export OneSignal message events to Databricks and import Databricks behavioral events into OneSignal to trigger Journeys and personalize messaging.
export const PLATFORM_0 = "Databricks"
export const DATA_TYPE_0 = "event table columns"
export const COLUMN_HEADER_0 = "Databricks Column"
export const PROPERTIES_DESCRIPTION_0 = "Additional columns as JSON"
## Overview
The OneSignal + Databricks integration supports **two flows**:
* **Export**: Send OneSignal message events to Databricks for analytics and reporting.
* **Import**: Send custom events from Databricks to OneSignal to trigger Journeys and personalize campaigns.
Export and import are configured separately. You can set up one without the other.
***
## Export OneSignal message events to Databricks
Sync all your message events from OneSignal into your Databricks lakehouse for near real-time analytics and visibility.
**Requirements**
* Access to [Event Streams](/docs/en/event-streams) for outbound message events (Plan limitations and overages apply)
* Access to [Custom Events](/docs/en/custom-events) for inbound event syncing (Plan limitations and overages apply)
* [Updated Account Plan](https://onesignal.com/pricing) (not available on free apps)
- Databricks Platform: AWS, Azure, or GCP
- Databricks Plan: Premium or higher
- Databricks Unity Catalog (recommended for governance)
- Databricks SQL Warehouse for querying
- Delta Lake event tables (for custom event import)
**Setup Steps**
### 1. Collect SQL warehouse details
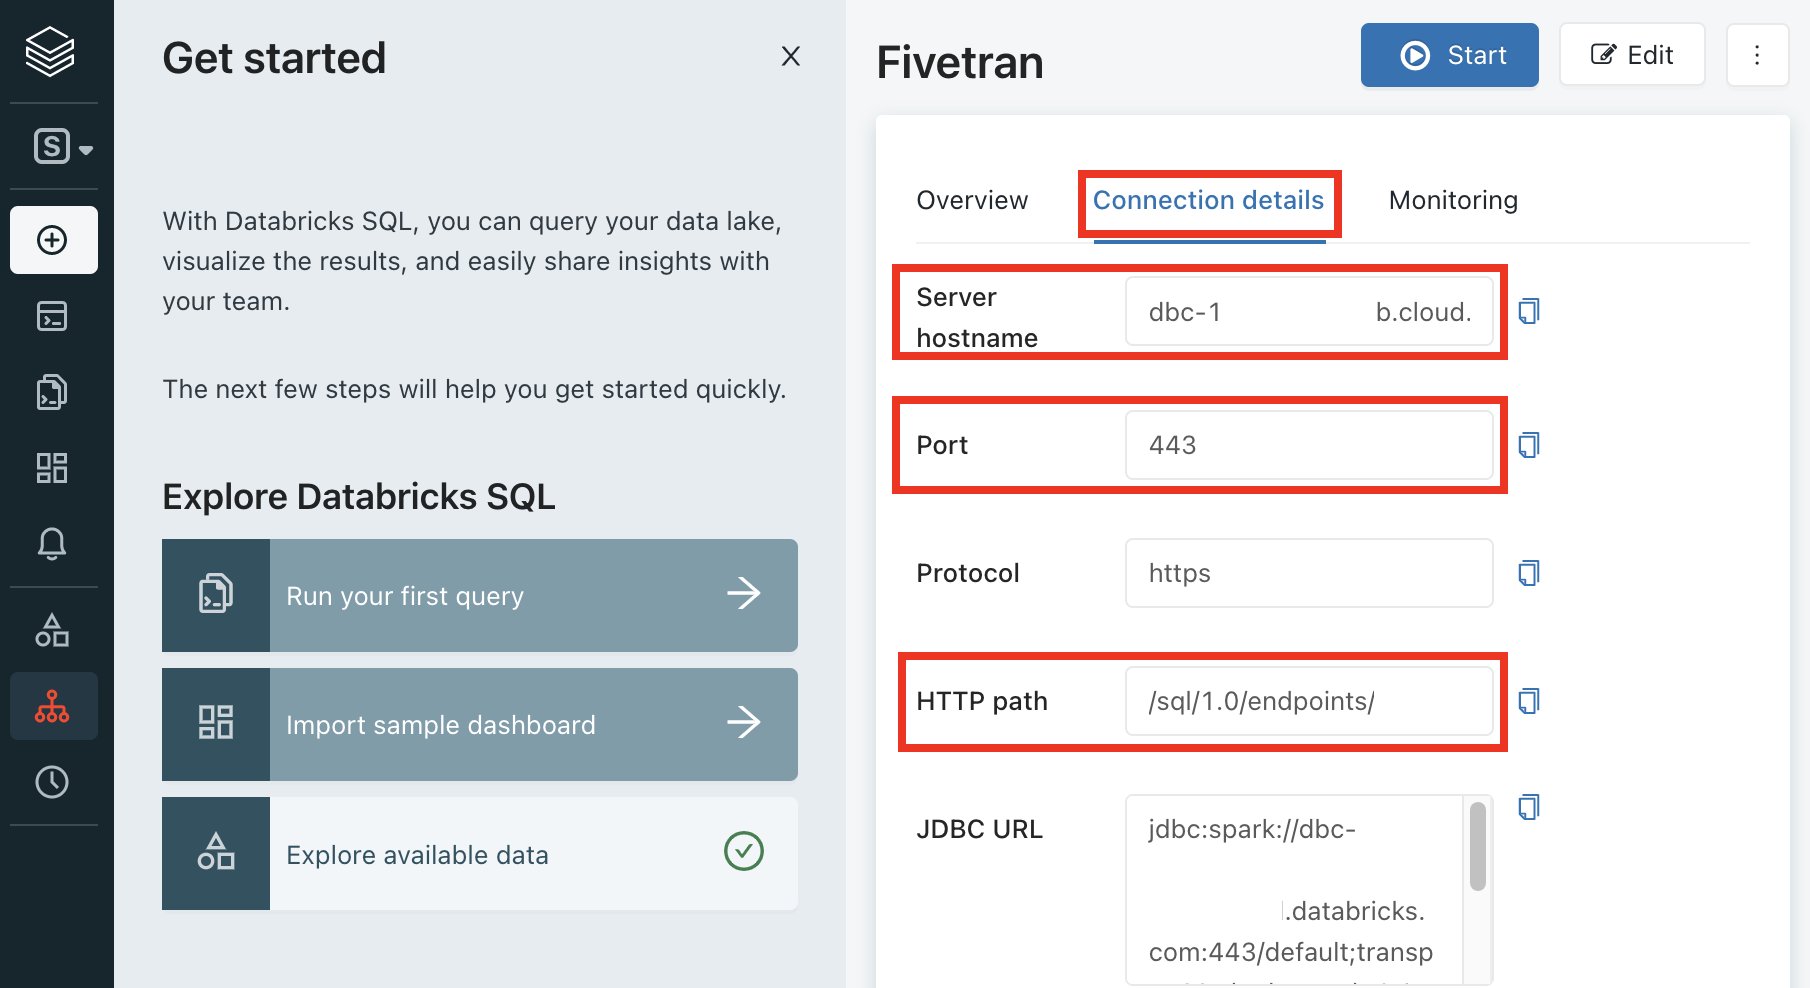
Go to **SQL Warehouses** in your Databricks workspace.
Select your warehouse and open the **Connection details** tab.
* Server Hostname
* Port
* HTTP Path
 ### 2. Choose authentication method
Databricks supports two authentication methods. Choose the method that best fits your deployment and security requirements.
**When to use:**
* Direct connections (not using PrivateLink)
* Organizations with OAuth infrastructure
**Note:** Does not support PrivateLink connections.
#### Create a service principal
Go to **Workspace Settings > Identity and Access > Service Principals**.
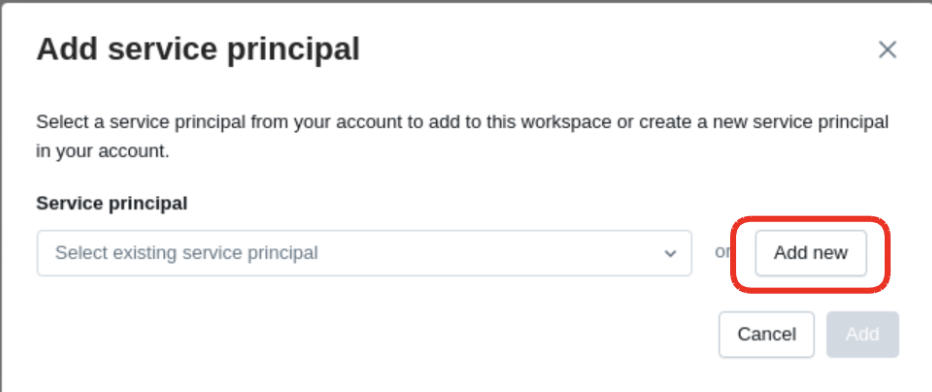
Click **Add Service Principal**, then **Add New**.
Name it (e.g., `onesignal-sync`).
### 2. Choose authentication method
Databricks supports two authentication methods. Choose the method that best fits your deployment and security requirements.
**When to use:**
* Direct connections (not using PrivateLink)
* Organizations with OAuth infrastructure
**Note:** Does not support PrivateLink connections.
#### Create a service principal
Go to **Workspace Settings > Identity and Access > Service Principals**.
Click **Add Service Principal**, then **Add New**.
Name it (e.g., `onesignal-sync`).
 #### Generate a secret
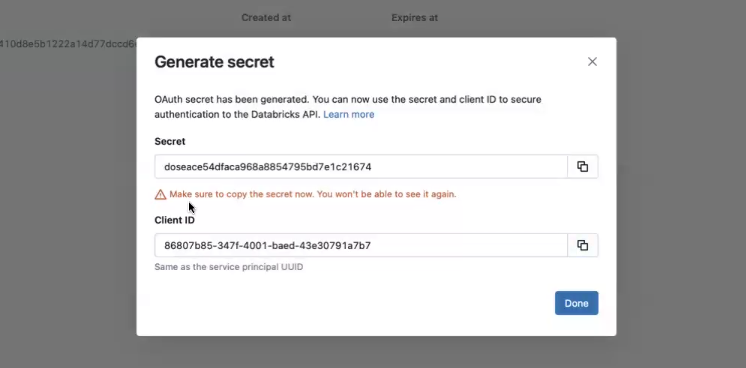
Click **Generate Secret** and save it securely.
The secret is only visible once—store it safely.
#### Generate a secret
Click **Generate Secret** and save it securely.
The secret is only visible once—store it safely.
 **When to use:**
* Using PrivateLink (AWS or Azure)
* Simpler setup
* Maximum compatibility
**Note:** Works with all Databricks deployment types.
#### Create a Personal Access Token
In your Databricks workspace, click your username in the top bar and select **Settings**.
Click **Developer**.
Next to **Access tokens**, click **Manage**.
Click **Generate new token**.
* Enter a comment like "OneSignal Integration" to help identify this token
* Set the token's lifetime in days (check your workspace documentation for maximum allowed duration)
* Click **Generate**
Copy the displayed token to a secure location, then click **Done**.
Save the token securely and don't share it. If you lose it, you must create a new token. Tokens that remain unused for 90 days are automatically revoked by Databricks.
**Recommendation:** If you're using PrivateLink or want the simplest setup, choose Personal Access Token. For direct connections with existing OAuth infrastructure, OAuth M2M works well.
### 3. Assign permissions
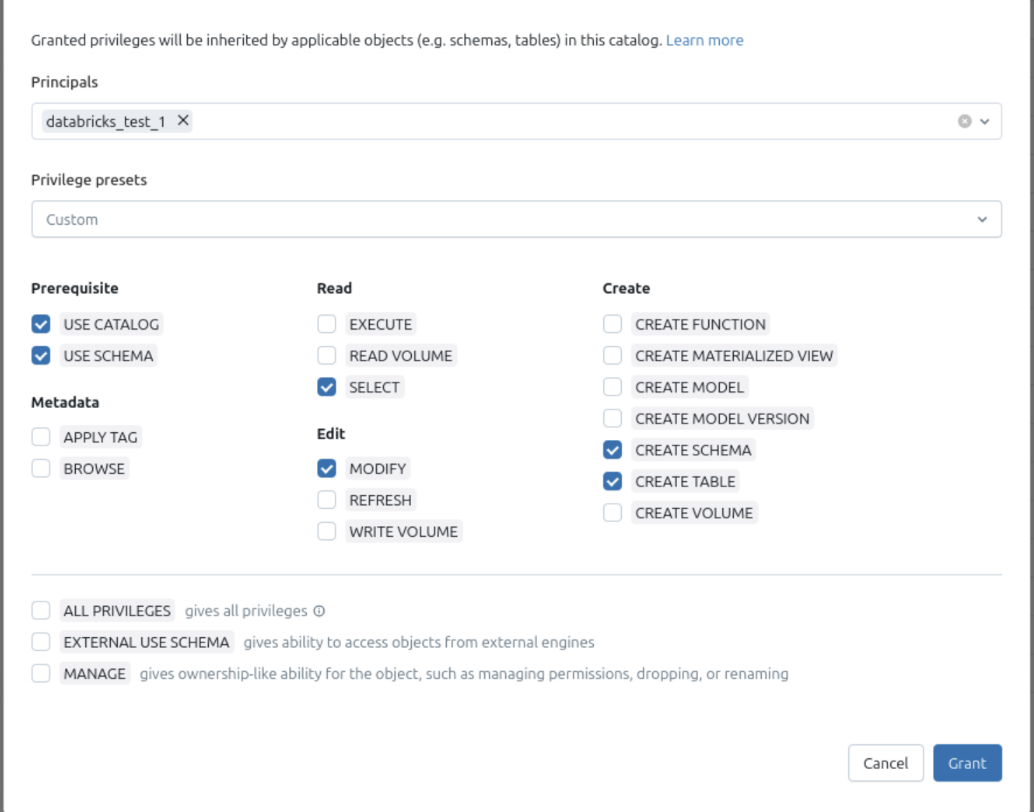
* USE CATALOG
* USE SCHEMA
* SELECT
* MODIFY
* CREATE SCHEMA
* CREATE TABLE
**When to use:**
* Using PrivateLink (AWS or Azure)
* Simpler setup
* Maximum compatibility
**Note:** Works with all Databricks deployment types.
#### Create a Personal Access Token
In your Databricks workspace, click your username in the top bar and select **Settings**.
Click **Developer**.
Next to **Access tokens**, click **Manage**.
Click **Generate new token**.
* Enter a comment like "OneSignal Integration" to help identify this token
* Set the token's lifetime in days (check your workspace documentation for maximum allowed duration)
* Click **Generate**
Copy the displayed token to a secure location, then click **Done**.
Save the token securely and don't share it. If you lose it, you must create a new token. Tokens that remain unused for 90 days are automatically revoked by Databricks.
**Recommendation:** If you're using PrivateLink or want the simplest setup, choose Personal Access Token. For direct connections with existing OAuth infrastructure, OAuth M2M works well.
### 3. Assign permissions
* USE CATALOG
* USE SCHEMA
* SELECT
* MODIFY
* CREATE SCHEMA
* CREATE TABLE
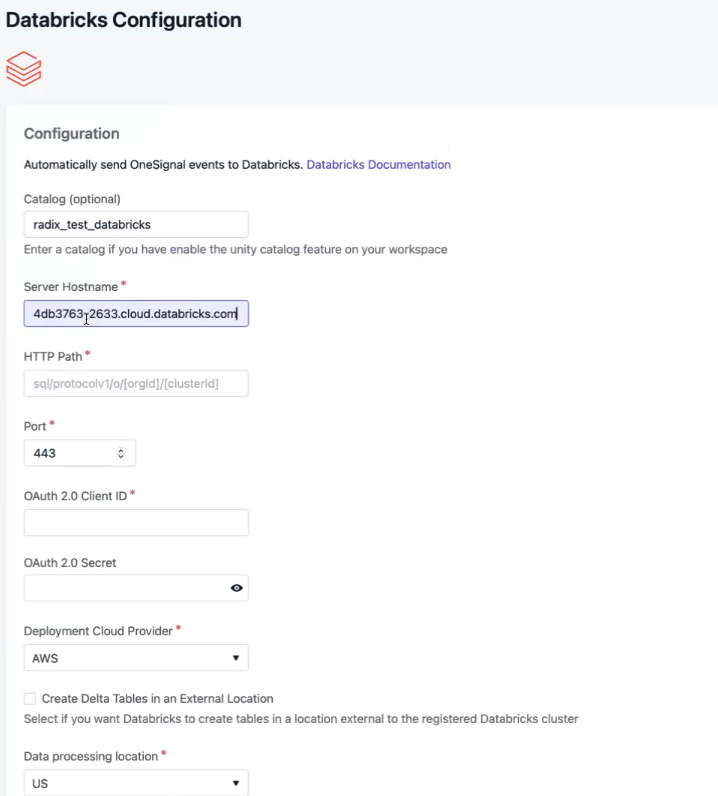
 ### 4. Connect OneSignal
In OneSignal, navigate to **Data > Integrations > Databricks**.
* Server Hostname
* Port
* HTTP Path
* Catalog Name
* Schema Name
* Credentials
### 4. Connect OneSignal
In OneSignal, navigate to **Data > Integrations > Databricks**.
* Server Hostname
* Port
* HTTP Path
* Catalog Name
* Schema Name
* Credentials
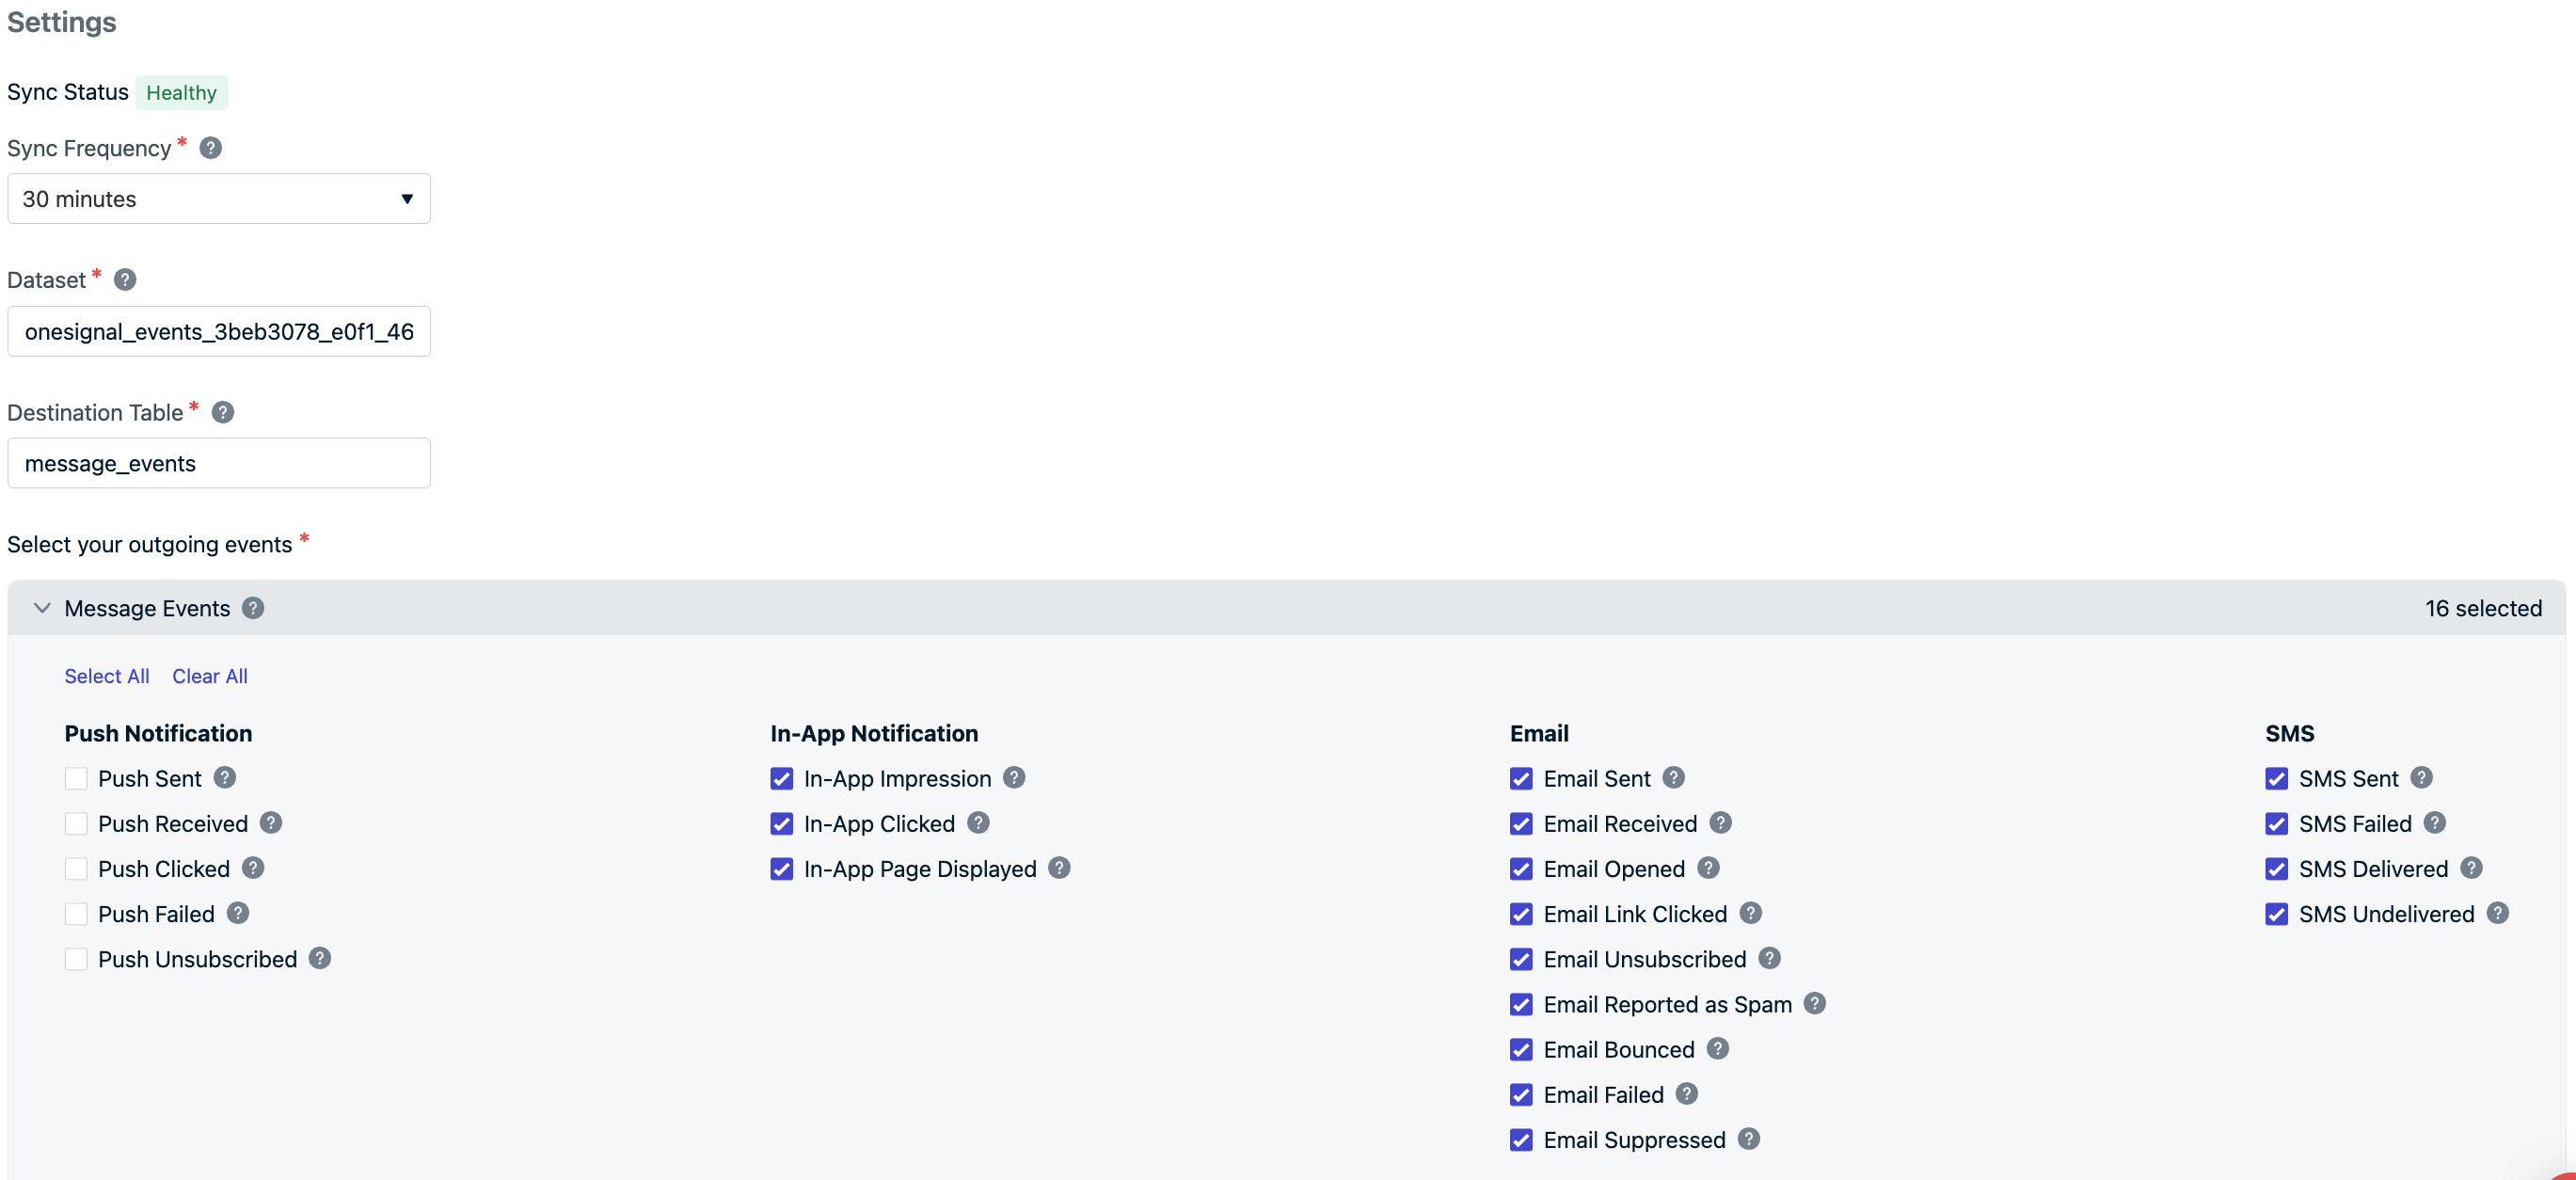
 * **Sync Frequency:** as often as every 15 minutes
* **Dataset/Table Names:** pre-set as `onesignal_events_` and `message_events` (editable)
* **Event Types:** choose which to sync—select all or just what you need
Select the events you care to receive in your Databricks catalog.
* **Sync Frequency:** as often as every 15 minutes
* **Dataset/Table Names:** pre-set as `onesignal_events_` and `message_events` (editable)
* **Event Types:** choose which to sync—select all or just what you need
Select the events you care to receive in your Databricks catalog.
 Click **Save** and wait for the success confirmation
Events go through a processing step that can take up to 30 minutes before they are included in a sync. With a 15-minute sync frequency, expect events to appear in Databricks within 45 minutes.
While you wait, send messages via push, email, in-app, or SMS to trigger the events selected.
### 5. View data in Databricks
1. Open your **Catalog** in Databricks.
2. Once syncing completes, your configured schema will appear.
3. Access and query the `message_events` table.
Click **Save** and wait for the success confirmation
Events go through a processing step that can take up to 30 minutes before they are included in a sync. With a 15-minute sync frequency, expect events to appear in Databricks within 45 minutes.
While you wait, send messages via push, email, in-app, or SMS to trigger the events selected.
### 5. View data in Databricks
1. Open your **Catalog** in Databricks.
2. Once syncing completes, your configured schema will appear.
3. Access and query the `message_events` table.
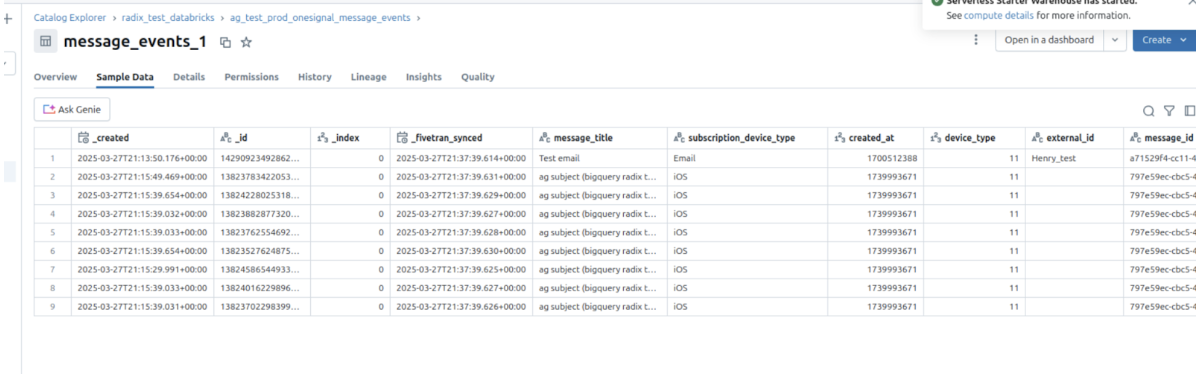
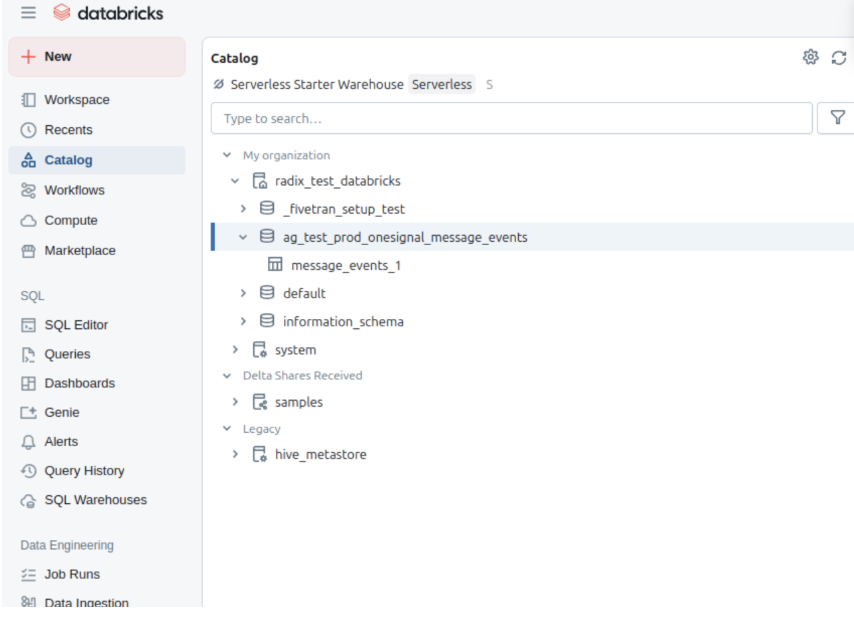 4. Click into tables for sample data preview.
 If you run into issues like missing schemas, permission errors, or malformed events, contact `support@onesignal.com`.
## Message events and properties
### Message event kinds
**Property:** `event_kind`
**Type:** `String`
The kind of message and event (e.g. `message.push.received`, `message.push.sent`).
| Message Event (OneSignal) | `event_kind` | Description |
| :-: | :-: | - |
| Push Delivered | `message.push.sent` | Push notification successfully delivered to the push services (FCM, APNs). |
| Push Received | `message.push.received` | Delivered push (see [Confirmed receipt](/docs/en/confirmed-delivery)). |
| Push Clicked | `message.push.clicked` | User clicked the push. |
| Push Failed | `message.push.failed` | Delivery failure. See message reports. |
| Push Unsubscribed | `message.push.unsubscribed` | User unsubscribed from push. |
| In-App Impression | `message.iam.impression` | In-App message shown. |
| In-App Clicked | `message.iam.clicked` | In-App message clicked. |
| In-App Page Viewed | `message.iam.page_displayed` | In-App page shown. |
| Email Received | `message.email.received` | Email accepted by recipient's mail server. |
| Email Opened | `message.email.opened` | Email opened. See [Email Reports](/docs/en/email-message-reports). |
| Email Link Clicked | `message.email.clicked` | Link in email clicked. |
| Email Unsubscribed | `message.email.unsubscribed` | Recipient unsubscribed. |
| Email Reported As Spam | `message.email.reported_as_spam` | Marked as spam. See [Email Deliverability](/docs/en/email-deliverability). |
| Email Bounced | `message.email.bounced` | Bounce due to permanent delivery failure. |
| Email Failed | `message.email.failed` | Delivery failed. |
| Email Suppressed | `message.email.suppressed` | Suppressed due to suppression list. |
| SMS Delivered | `message.sms.delivered` | SMS successfully delivered. |
| SMS Failed | `message.sms.failed` | SMS failed to deliver. |
| SMS Undelivered | `message.sms.undelivered` | SMS rejected or unreachable. |
`message.email.sent` and `message.sms.sent` are deprecated. They can't be added to new exports, but exports that already include them keep receiving them. Use `message.email.received` and `message.sms.delivered` instead.
### Event data schema
For each message event generated by a user, the following metadata will be attached to the record.
| Column Name | Type | Description |
| :-: | :-: | - |
| `event_id` | UUID | Unique identifier for the event |
| `event_timestamp` | Timestamp | Time of event occurrence |
| `event_kind` | String | The [Event Kind](#message-event-kinds) |
| `subscription_device_type` | String | Device type (e.g., iOS, Android, Web, Email, SMS) |
| `language` | String | Subscription language code |
| `version` | String | Integration version |
| `device_os` | String | Device operating system version |
| `device_type` | Number | Numeric device type |
| `token` | String | Push token, phone number, or email |
| `subscription_id` | UUID | Subscription ID |
| `subscribed` | Boolean | Subscription status |
| `onesignal_id` | UUID | OneSignal user ID |
| `last_active` | String | Last active timestamp |
| `sdk` | String | OneSignal SDK version |
| `external_id` | String | External user ID that should match the integration user ID |
| `app_id` | UUID | App ID from OneSignal |
| `template_id` | UUID | Template ID (if applicable) |
| `message_id` | UUID | Message batch/request ID |
| `message_name` | String | Name of the message |
| `message_title` | String | Message title (English only) |
| `message_contents` | String | Truncated message body (English only) |
| `failure_reason` | String | Reason for failure (for push failed and email failed events) |
| `_created`, `_id`, `_index`, `_fivetran_synced` | *Internal use* | Fivetran sync metadata |
### Notes
* Events go through a processing step that can take up to 30 minutes before they are included in a sync. With a 15-minute sync frequency, expect events to appear in your warehouse within 45 minutes.
* Deactivating may still result in one final sync after deactivation.
* To ensure efficient data synchronization, our system automatically creates and manages staging datasets. These datasets, named with a pattern like `fivetran_{two random words}_staging`, temporarily store data during processing before it's integrated into your main schema. These staging datasets are essential for maintaining a streamlined workflow and should not be deleted, as they will be automatically recreated.
***
## Import events from Databricks
Send behavioral event data from Databricks to OneSignal to:
* Trigger Journeys based on user activity
* Personalize messaging based on behavioral data
**Requirements**
* Access to [Event Streams](/docs/en/event-streams) for outbound message events (Plan limitations and overages apply)
* Access to [Custom Events](/docs/en/custom-events) for inbound event syncing (Plan limitations and overages apply)
* [Updated Account Plan](https://onesignal.com/pricing) (not available on free apps)
- **Databricks workspace** with SQL Warehouse or compute cluster
- **Personal Access Token** with appropriate permissions
- **Event data tables** containing behavioral data in Delta Lake format
- **Unity Catalog** (recommended for data governance)
**Setup Steps**
Generate a Personal Access Token for OneSignal to access your Databricks workspace:
1. Navigate to **User Settings** in your Databricks workspace
2. Click **Developer** tab and then **Access tokens**
3. Click **Generate new token**
4. Enter a comment like "OneSignal Integration" and set expiration (recommend 90 days)
5. Save the generated token (you'll need this for OneSignal)
Ensure OneSignal can query your event data via SQL Warehouse:
1. Navigate to **SQL Warehouses** in your Databricks workspace
2. Select or create a SQL Warehouse for OneSignal access
3. Note the **Server Hostname** and **HTTP Path** from the connection details
4. Ensure the warehouse has access to your event data tables
Grant OneSignal read access to tables containing event data:
```sql theme={null}
-- For Unity Catalog enabled workspaces
GRANT SELECT ON TABLE catalog.schema.event_table TO `onesignal@yourdomain.com`;
-- For Hive metastore tables
GRANT SELECT ON TABLE database.event_table TO `onesignal@yourdomain.com`;
```
In OneSignal, go to **Data > Integrations** and click **Add Integration**.
Select **Databricks** and provide:
* **Server Hostname**: Your Databricks SQL Warehouse hostname
* **HTTP Path**: SQL Warehouse HTTP path
* **Personal Access Token**: Token created in step 1
* **Catalog** (optional): Unity Catalog name if using Unity Catalog
Specify the Databricks table containing your event data:
* **Database/Schema**: Database or schema name containing event tables
* **Table**: Table name with event records (e.g., `user_events`)
* **Event Query**: Optional SQL query to filter or transform event data
Your event table should contain columns for:
* Event name/type (String)
* User identifier (String)
* Event timestamp (Timestamp)
* Additional event properties
Click **Test Connection** to verify OneSignal can access your Databricks workspace and read event data.
### Event data mapping
Map your {PLATFORM_0} {DATA_TYPE_0} to OneSignal's custom events format:
| OneSignal Field | {COLUMN_HEADER_0} | Description | Required |
| - | - | - | - |
| `name` | `event_name` | Event identifier | Yes |
| `external_id` | `user_id` | User identifier | Yes |
| `timestamp` | `event_timestamp` | When event occurred | No |
| `properties` | `event_data` | {PROPERTIES_DESCRIPTION_0} | No |
The **Sync Key** is the column you designate as the unique identifier for each row during sync. OneSignal uses it to detect whether a row has already been processed, so re-syncing your data doesn't create duplicate events. Choose a column with a unique text value per row. Don't use a boolean or a value that repeats across rows.
### Advanced configuration
#### Unity Catalog Integration
Leverage Unity Catalog for governed data access:
```sql theme={null}
SELECT
event_name,
user_id,
event_timestamp,
to_json(
named_struct(
'product_id', product_id,
'purchase_amount', purchase_amount,
'category', category
)
) as payload
FROM catalog.schema.user_events
WHERE event_timestamp >= current_timestamp() - INTERVAL 7 DAYS
```
### Delta Lake Optimization
Optimize event tables for better query performance:
* **Partitioning**: Partition by date (`event_date`) for faster time-based queries
* **Z-Ordering**: Z-order by `user_id` and `event_name` for better filtering
* **Delta Lake Features**: Use liquid clustering for automatic optimization
#### Streaming Event Processing
For real-time event processing, consider:
* **Structured Streaming**: Process events as they arrive
* **Delta Live Tables**: Build robust event processing pipelines
* **Auto Loader**: Continuously ingest new event files
Ensure your SQL Warehouse has sufficient compute resources to handle OneSignal's queries without affecting other workloads.
***
## FAQ
### Why do I see different message IDs with the same content?
This happens when the same message is sent more than once, likely via a transactional flow or message template reused across multiple sends.
### How often does OneSignal sync events from Databricks?
OneSignal syncs event data based on your configured schedule, with a minimum interval of 15 minutes.
### Can I use Databricks notebooks for event processing?
Yes, you can use notebooks to process and prepare event data, then expose it via tables that OneSignal can query.
### What about cost optimization for event queries?
Consider using serverless SQL Warehouses for cost-effective, on-demand compute that automatically scales based on query load.
***
This documentation is built and hosted on [Mintlify](https://mintlify.com), a developer documentation platform.
If you run into issues like missing schemas, permission errors, or malformed events, contact `support@onesignal.com`.
## Message events and properties
### Message event kinds
**Property:** `event_kind`
**Type:** `String`
The kind of message and event (e.g. `message.push.received`, `message.push.sent`).
| Message Event (OneSignal) | `event_kind` | Description |
| :-: | :-: | - |
| Push Delivered | `message.push.sent` | Push notification successfully delivered to the push services (FCM, APNs). |
| Push Received | `message.push.received` | Delivered push (see [Confirmed receipt](/docs/en/confirmed-delivery)). |
| Push Clicked | `message.push.clicked` | User clicked the push. |
| Push Failed | `message.push.failed` | Delivery failure. See message reports. |
| Push Unsubscribed | `message.push.unsubscribed` | User unsubscribed from push. |
| In-App Impression | `message.iam.impression` | In-App message shown. |
| In-App Clicked | `message.iam.clicked` | In-App message clicked. |
| In-App Page Viewed | `message.iam.page_displayed` | In-App page shown. |
| Email Received | `message.email.received` | Email accepted by recipient's mail server. |
| Email Opened | `message.email.opened` | Email opened. See [Email Reports](/docs/en/email-message-reports). |
| Email Link Clicked | `message.email.clicked` | Link in email clicked. |
| Email Unsubscribed | `message.email.unsubscribed` | Recipient unsubscribed. |
| Email Reported As Spam | `message.email.reported_as_spam` | Marked as spam. See [Email Deliverability](/docs/en/email-deliverability). |
| Email Bounced | `message.email.bounced` | Bounce due to permanent delivery failure. |
| Email Failed | `message.email.failed` | Delivery failed. |
| Email Suppressed | `message.email.suppressed` | Suppressed due to suppression list. |
| SMS Delivered | `message.sms.delivered` | SMS successfully delivered. |
| SMS Failed | `message.sms.failed` | SMS failed to deliver. |
| SMS Undelivered | `message.sms.undelivered` | SMS rejected or unreachable. |
`message.email.sent` and `message.sms.sent` are deprecated. They can't be added to new exports, but exports that already include them keep receiving them. Use `message.email.received` and `message.sms.delivered` instead.
### Event data schema
For each message event generated by a user, the following metadata will be attached to the record.
| Column Name | Type | Description |
| :-: | :-: | - |
| `event_id` | UUID | Unique identifier for the event |
| `event_timestamp` | Timestamp | Time of event occurrence |
| `event_kind` | String | The [Event Kind](#message-event-kinds) |
| `subscription_device_type` | String | Device type (e.g., iOS, Android, Web, Email, SMS) |
| `language` | String | Subscription language code |
| `version` | String | Integration version |
| `device_os` | String | Device operating system version |
| `device_type` | Number | Numeric device type |
| `token` | String | Push token, phone number, or email |
| `subscription_id` | UUID | Subscription ID |
| `subscribed` | Boolean | Subscription status |
| `onesignal_id` | UUID | OneSignal user ID |
| `last_active` | String | Last active timestamp |
| `sdk` | String | OneSignal SDK version |
| `external_id` | String | External user ID that should match the integration user ID |
| `app_id` | UUID | App ID from OneSignal |
| `template_id` | UUID | Template ID (if applicable) |
| `message_id` | UUID | Message batch/request ID |
| `message_name` | String | Name of the message |
| `message_title` | String | Message title (English only) |
| `message_contents` | String | Truncated message body (English only) |
| `failure_reason` | String | Reason for failure (for push failed and email failed events) |
| `_created`, `_id`, `_index`, `_fivetran_synced` | *Internal use* | Fivetran sync metadata |
### Notes
* Events go through a processing step that can take up to 30 minutes before they are included in a sync. With a 15-minute sync frequency, expect events to appear in your warehouse within 45 minutes.
* Deactivating may still result in one final sync after deactivation.
* To ensure efficient data synchronization, our system automatically creates and manages staging datasets. These datasets, named with a pattern like `fivetran_{two random words}_staging`, temporarily store data during processing before it's integrated into your main schema. These staging datasets are essential for maintaining a streamlined workflow and should not be deleted, as they will be automatically recreated.
***
## Import events from Databricks
Send behavioral event data from Databricks to OneSignal to:
* Trigger Journeys based on user activity
* Personalize messaging based on behavioral data
**Requirements**
* Access to [Event Streams](/docs/en/event-streams) for outbound message events (Plan limitations and overages apply)
* Access to [Custom Events](/docs/en/custom-events) for inbound event syncing (Plan limitations and overages apply)
* [Updated Account Plan](https://onesignal.com/pricing) (not available on free apps)
- **Databricks workspace** with SQL Warehouse or compute cluster
- **Personal Access Token** with appropriate permissions
- **Event data tables** containing behavioral data in Delta Lake format
- **Unity Catalog** (recommended for data governance)
**Setup Steps**
Generate a Personal Access Token for OneSignal to access your Databricks workspace:
1. Navigate to **User Settings** in your Databricks workspace
2. Click **Developer** tab and then **Access tokens**
3. Click **Generate new token**
4. Enter a comment like "OneSignal Integration" and set expiration (recommend 90 days)
5. Save the generated token (you'll need this for OneSignal)
Ensure OneSignal can query your event data via SQL Warehouse:
1. Navigate to **SQL Warehouses** in your Databricks workspace
2. Select or create a SQL Warehouse for OneSignal access
3. Note the **Server Hostname** and **HTTP Path** from the connection details
4. Ensure the warehouse has access to your event data tables
Grant OneSignal read access to tables containing event data:
```sql theme={null}
-- For Unity Catalog enabled workspaces
GRANT SELECT ON TABLE catalog.schema.event_table TO `onesignal@yourdomain.com`;
-- For Hive metastore tables
GRANT SELECT ON TABLE database.event_table TO `onesignal@yourdomain.com`;
```
In OneSignal, go to **Data > Integrations** and click **Add Integration**.
Select **Databricks** and provide:
* **Server Hostname**: Your Databricks SQL Warehouse hostname
* **HTTP Path**: SQL Warehouse HTTP path
* **Personal Access Token**: Token created in step 1
* **Catalog** (optional): Unity Catalog name if using Unity Catalog
Specify the Databricks table containing your event data:
* **Database/Schema**: Database or schema name containing event tables
* **Table**: Table name with event records (e.g., `user_events`)
* **Event Query**: Optional SQL query to filter or transform event data
Your event table should contain columns for:
* Event name/type (String)
* User identifier (String)
* Event timestamp (Timestamp)
* Additional event properties
Click **Test Connection** to verify OneSignal can access your Databricks workspace and read event data.
### Event data mapping
Map your {PLATFORM_0} {DATA_TYPE_0} to OneSignal's custom events format:
| OneSignal Field | {COLUMN_HEADER_0} | Description | Required |
| - | - | - | - |
| `name` | `event_name` | Event identifier | Yes |
| `external_id` | `user_id` | User identifier | Yes |
| `timestamp` | `event_timestamp` | When event occurred | No |
| `properties` | `event_data` | {PROPERTIES_DESCRIPTION_0} | No |
The **Sync Key** is the column you designate as the unique identifier for each row during sync. OneSignal uses it to detect whether a row has already been processed, so re-syncing your data doesn't create duplicate events. Choose a column with a unique text value per row. Don't use a boolean or a value that repeats across rows.
### Advanced configuration
#### Unity Catalog Integration
Leverage Unity Catalog for governed data access:
```sql theme={null}
SELECT
event_name,
user_id,
event_timestamp,
to_json(
named_struct(
'product_id', product_id,
'purchase_amount', purchase_amount,
'category', category
)
) as payload
FROM catalog.schema.user_events
WHERE event_timestamp >= current_timestamp() - INTERVAL 7 DAYS
```
### Delta Lake Optimization
Optimize event tables for better query performance:
* **Partitioning**: Partition by date (`event_date`) for faster time-based queries
* **Z-Ordering**: Z-order by `user_id` and `event_name` for better filtering
* **Delta Lake Features**: Use liquid clustering for automatic optimization
#### Streaming Event Processing
For real-time event processing, consider:
* **Structured Streaming**: Process events as they arrive
* **Delta Live Tables**: Build robust event processing pipelines
* **Auto Loader**: Continuously ingest new event files
Ensure your SQL Warehouse has sufficient compute resources to handle OneSignal's queries without affecting other workloads.
***
## FAQ
### Why do I see different message IDs with the same content?
This happens when the same message is sent more than once, likely via a transactional flow or message template reused across multiple sends.
### How often does OneSignal sync events from Databricks?
OneSignal syncs event data based on your configured schedule, with a minimum interval of 15 minutes.
### Can I use Databricks notebooks for event processing?
Yes, you can use notebooks to process and prepare event data, then expose it via tables that OneSignal can query.
### What about cost optimization for event queries?
Consider using serverless SQL Warehouses for cost-effective, on-demand compute that automatically scales based on query load.
***
This documentation is built and hosted on [Mintlify](https://mintlify.com), a developer documentation platform.