> ## Documentation Index
> Fetch the complete documentation index at: https://documentation.onesignal.com/llms.txt
> Use this file to discover all available pages before exploring further.
# HubSpot
> Automate push notifications, emails, SMS, and in-app messaging from HubSpot Workflows using the native OneSignal integration.
The OneSignal HubSpot integration connects your HubSpot CRM to OneSignal through native workflow actions. No third-party middleware required. You can:
* **Send messages:** trigger push notifications, emails, and SMS/RCS from HubSpot Workflows.
* **Create users:** create OneSignal users from HubSpot contacts, including email and SMS/RCS subscriptions, when a contact passes through a workflow.
* **Manage tags:** set or delete OneSignal [Tags](./add-user-data-tags) based on HubSpot contact properties.
* **Associate contacts:** store the HubSpot Contact ID on the matching OneSignal user so message activity can appear on that contact's HubSpot timeline.
* **See message activity in HubSpot:** send OneSignal message events (sent, delivered, opened, clicked, and related outcomes) to the contact timeline.
* **Target in-app messages:** use tags set by HubSpot to build segments that control in-app message delivery.
The integration does not import HubSpot lists, deals, or company records automatically. Use workflow actions to pass the data you need.
For capabilities like A/B testing, intelligent delivery, throttling, and retargeting, use the OneSignal dashboard or API directly alongside HubSpot.
Read [Four Ways to Use the OneSignal Integration with HubSpot](https://onesignal.com/blog/four-ways-to-use-the-onesignal-integration-with-hubspot-to-boost-engagement-across-channels/) for real-world examples.
***
## Prerequisites
* HubSpot Super Admin role or [App Marketplace Permissions](https://knowledge.hubspot.com/settings/hubspot-user-permissions-guide#admin)
* A [paid OneSignal plan](https://onesignal.com/pricing) (not available on free plans)
HubSpot deprecated the original third-party OneSignal app in December 2024. OneSignal now provides its own HubSpot app with expanded functionality. If you used the previous integration, see the migration steps below.
**Install the new integration**
Activate the HubSpot integration from the OneSignal dashboard under **Data > Integrations** as described in [Connect HubSpot to OneSignal](#connect-hubspot-to-onesignal) below.
**Migrate your workflows**
We recommend creating a new workflow to test the new integration before replacing actions in your existing workflows.
1. **Clone your workflow:** On the HubSpot **Workflows** page, click **Clone** next to your existing workflow.
2. **Remove triggers:** In the cloned workflow, remove all enrollment triggers so it does not fire automatically when published.
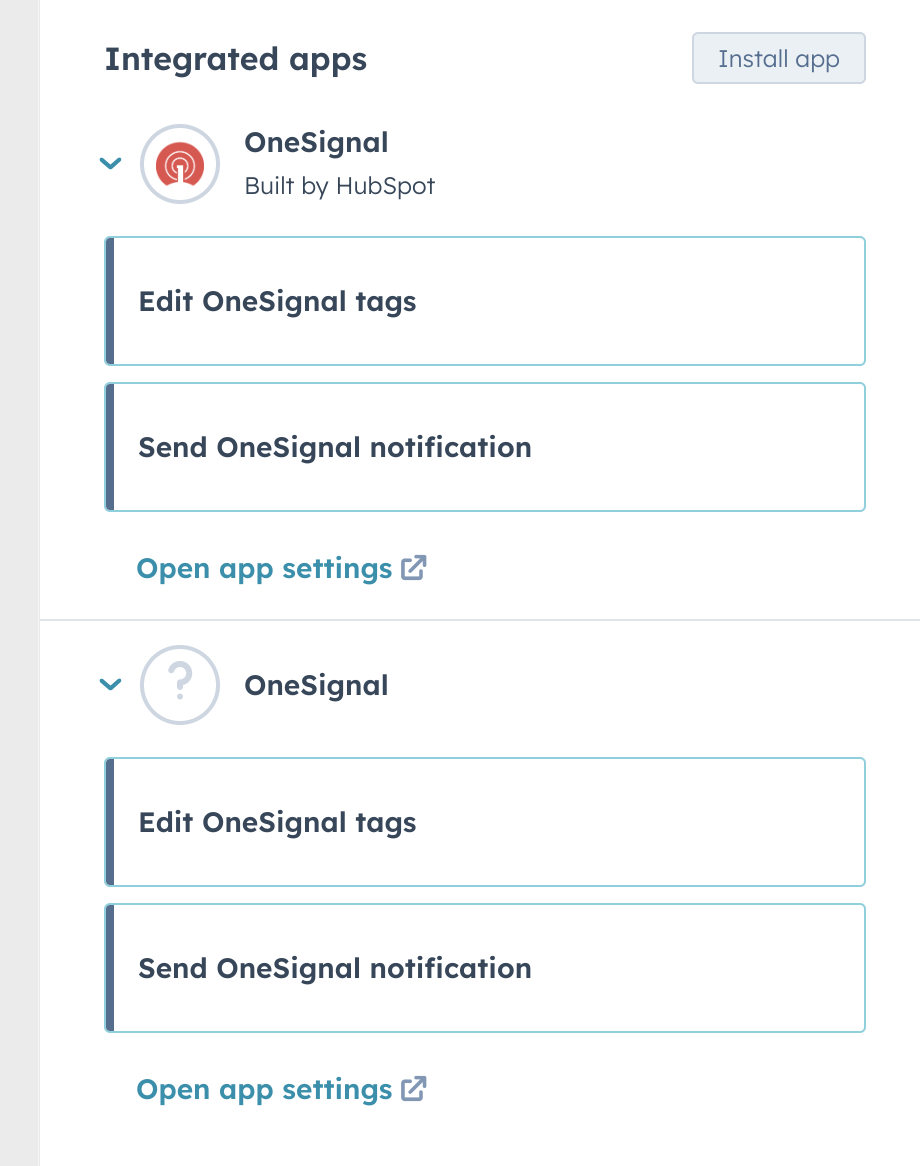
3. **Replace legacy actions:** Remove each legacy OneSignal action and replace it with the new version. If both apps are installed, the legacy app shows "Built by HubSpot". Use the one that does not.
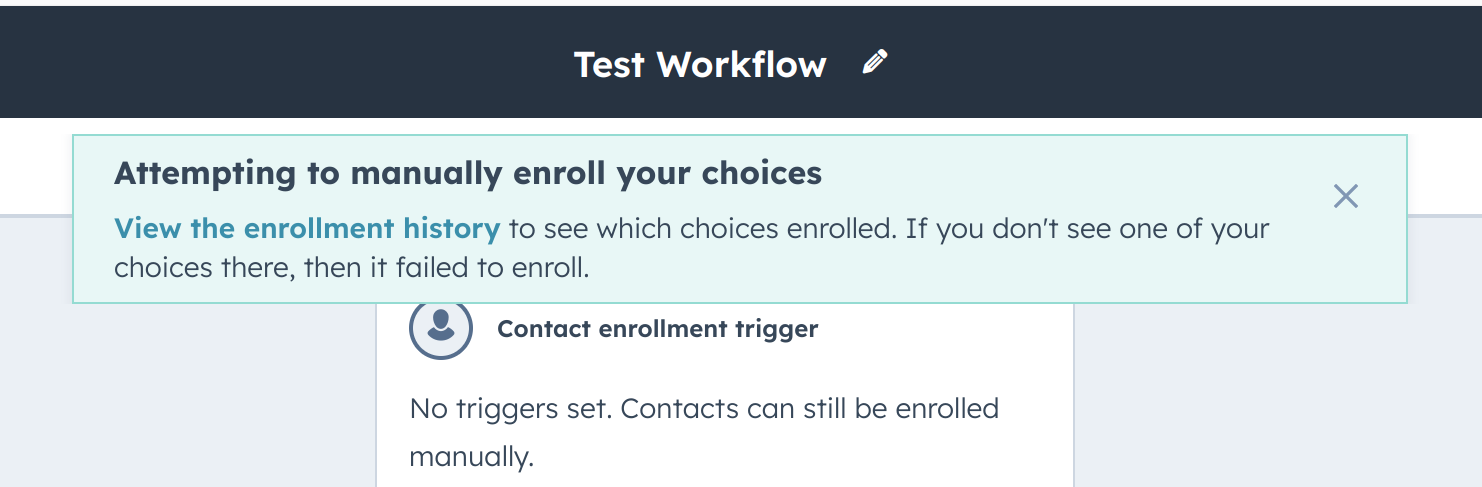
4. **Test with a single contact:** Save and publish the workflow, then manually enroll one test contact. Check the enrollment history to verify actions completed successfully.
5. **Replace or update:** After confirming the workflow works correctly, either replace the original workflow with the clone or apply the same changes to the original.
If you encounter errors during migration, contact `support@onesignal.com`.
***
## Connect HubSpot to OneSignal
### Activate the integration
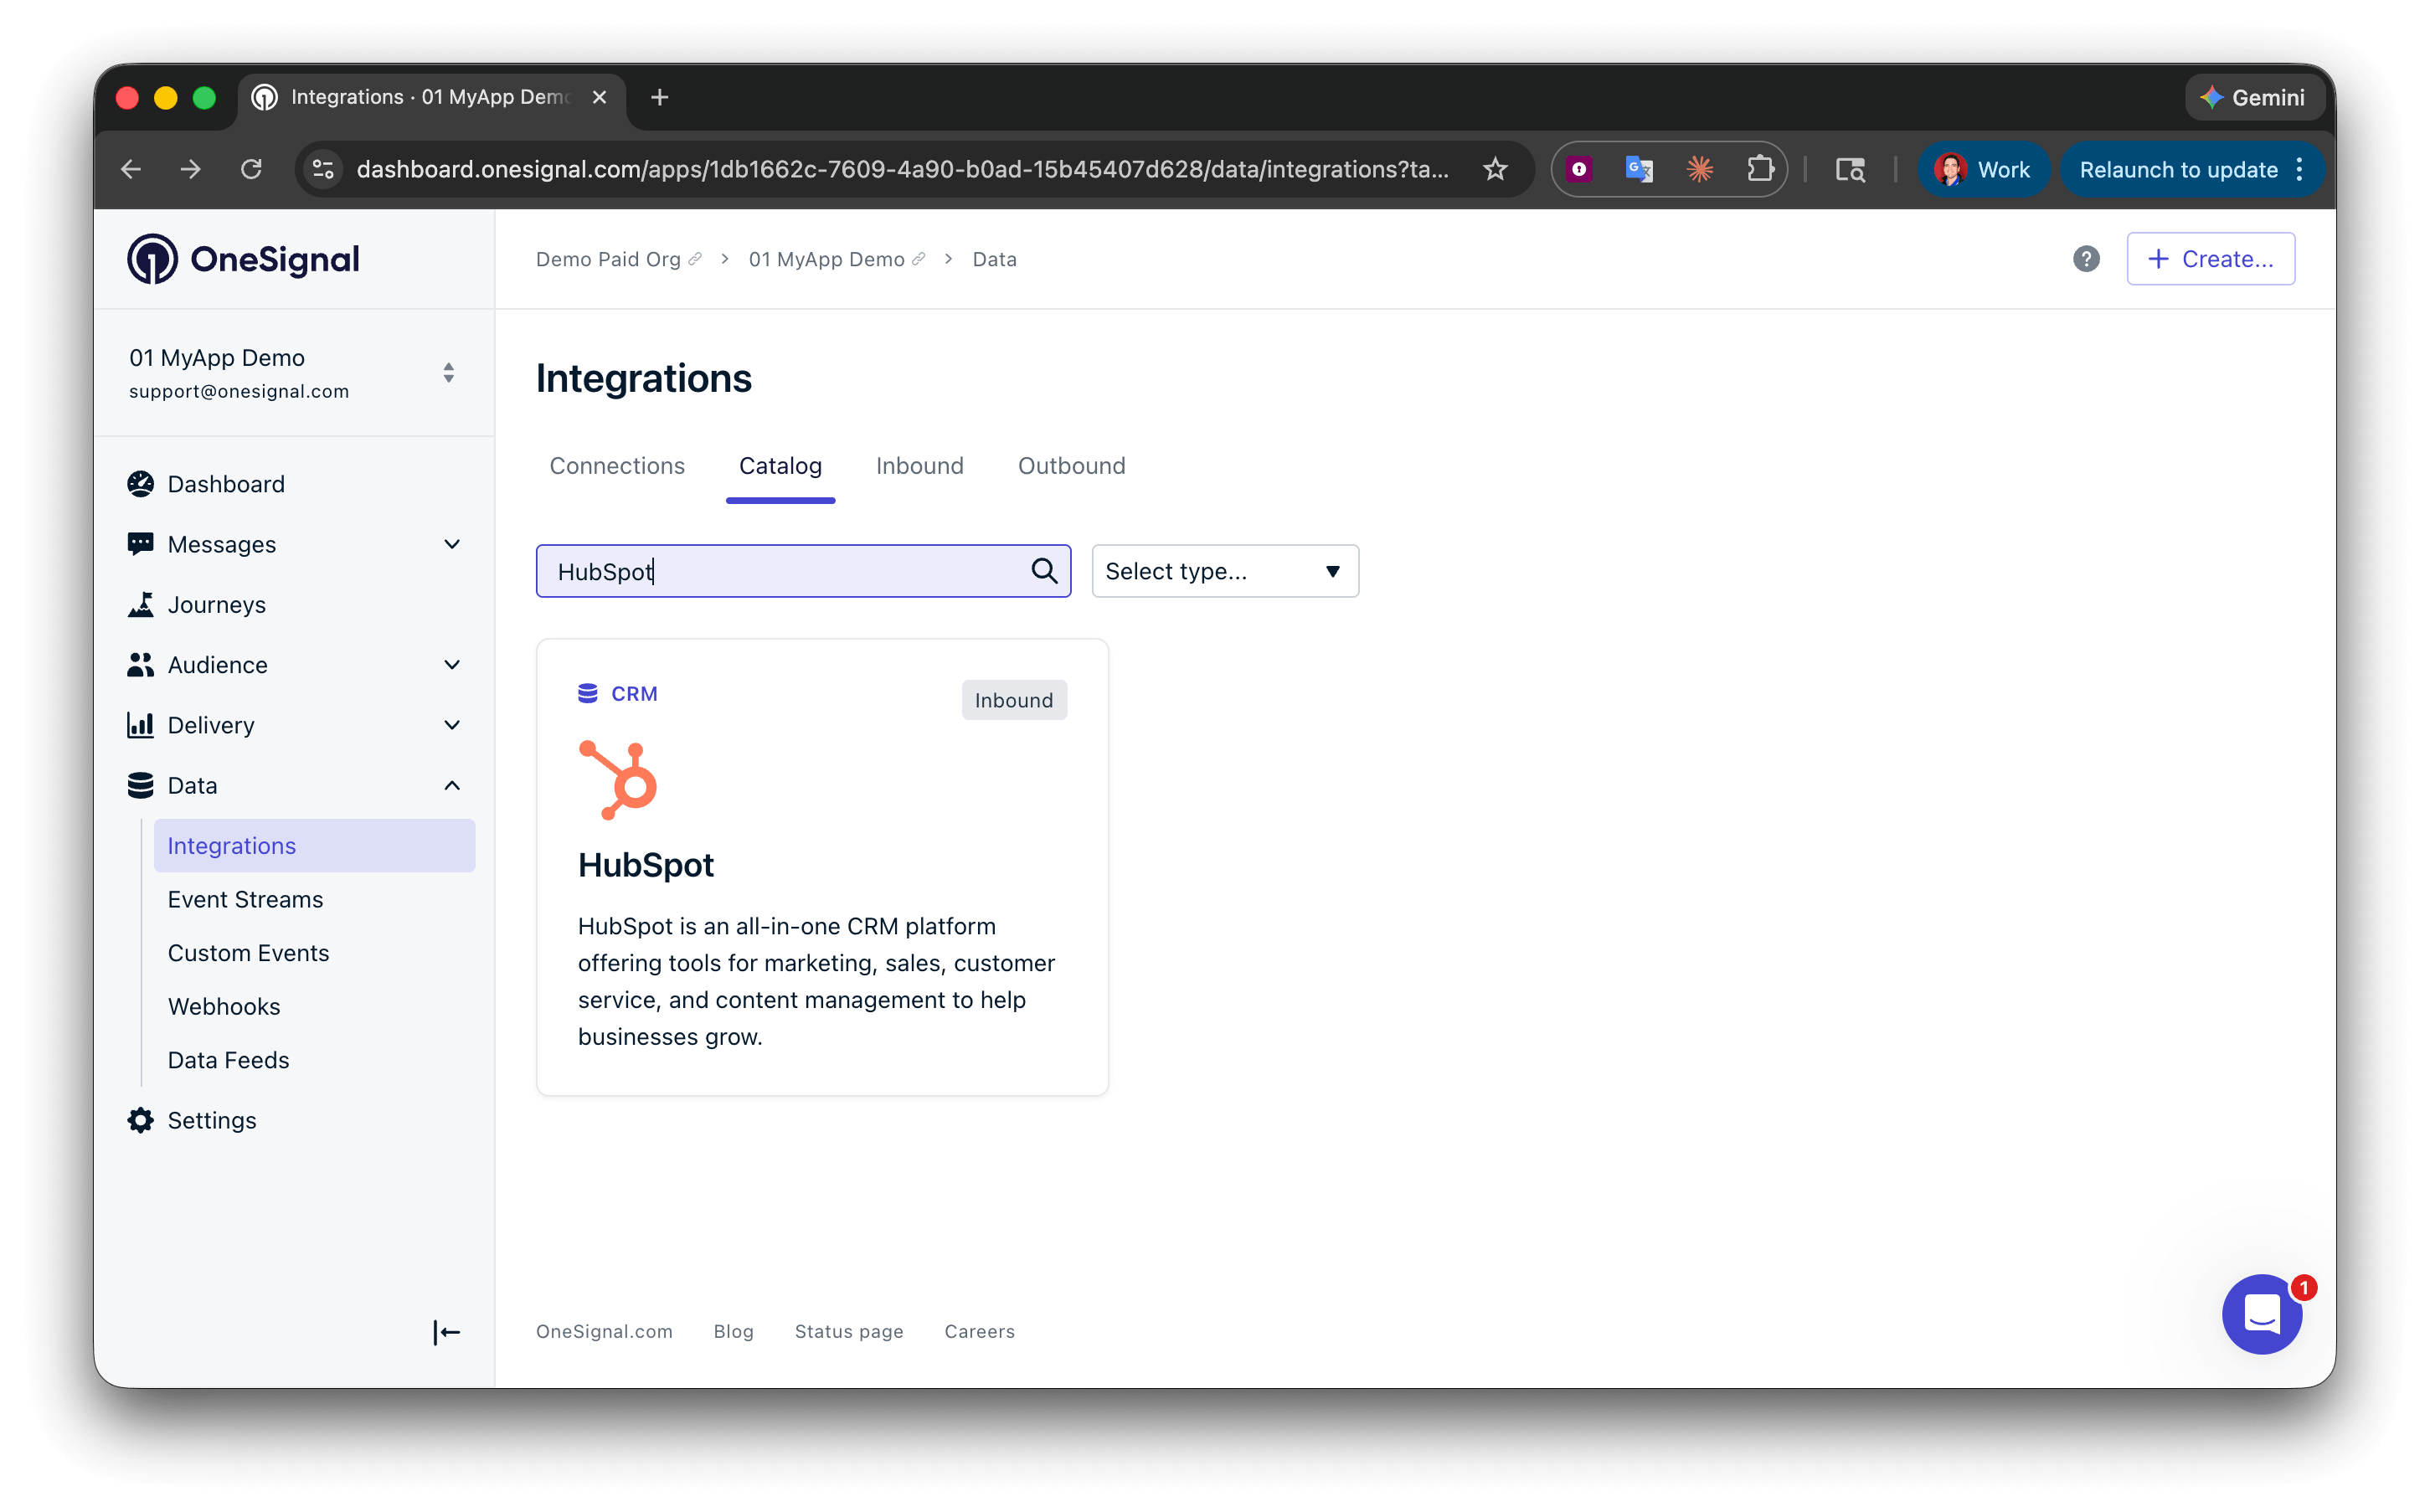
In OneSignal, go to **Data > Integrations > Catalog** and select **HubSpot**.
Click **Settings > Authenticate**, then select your HubSpot account and log in.
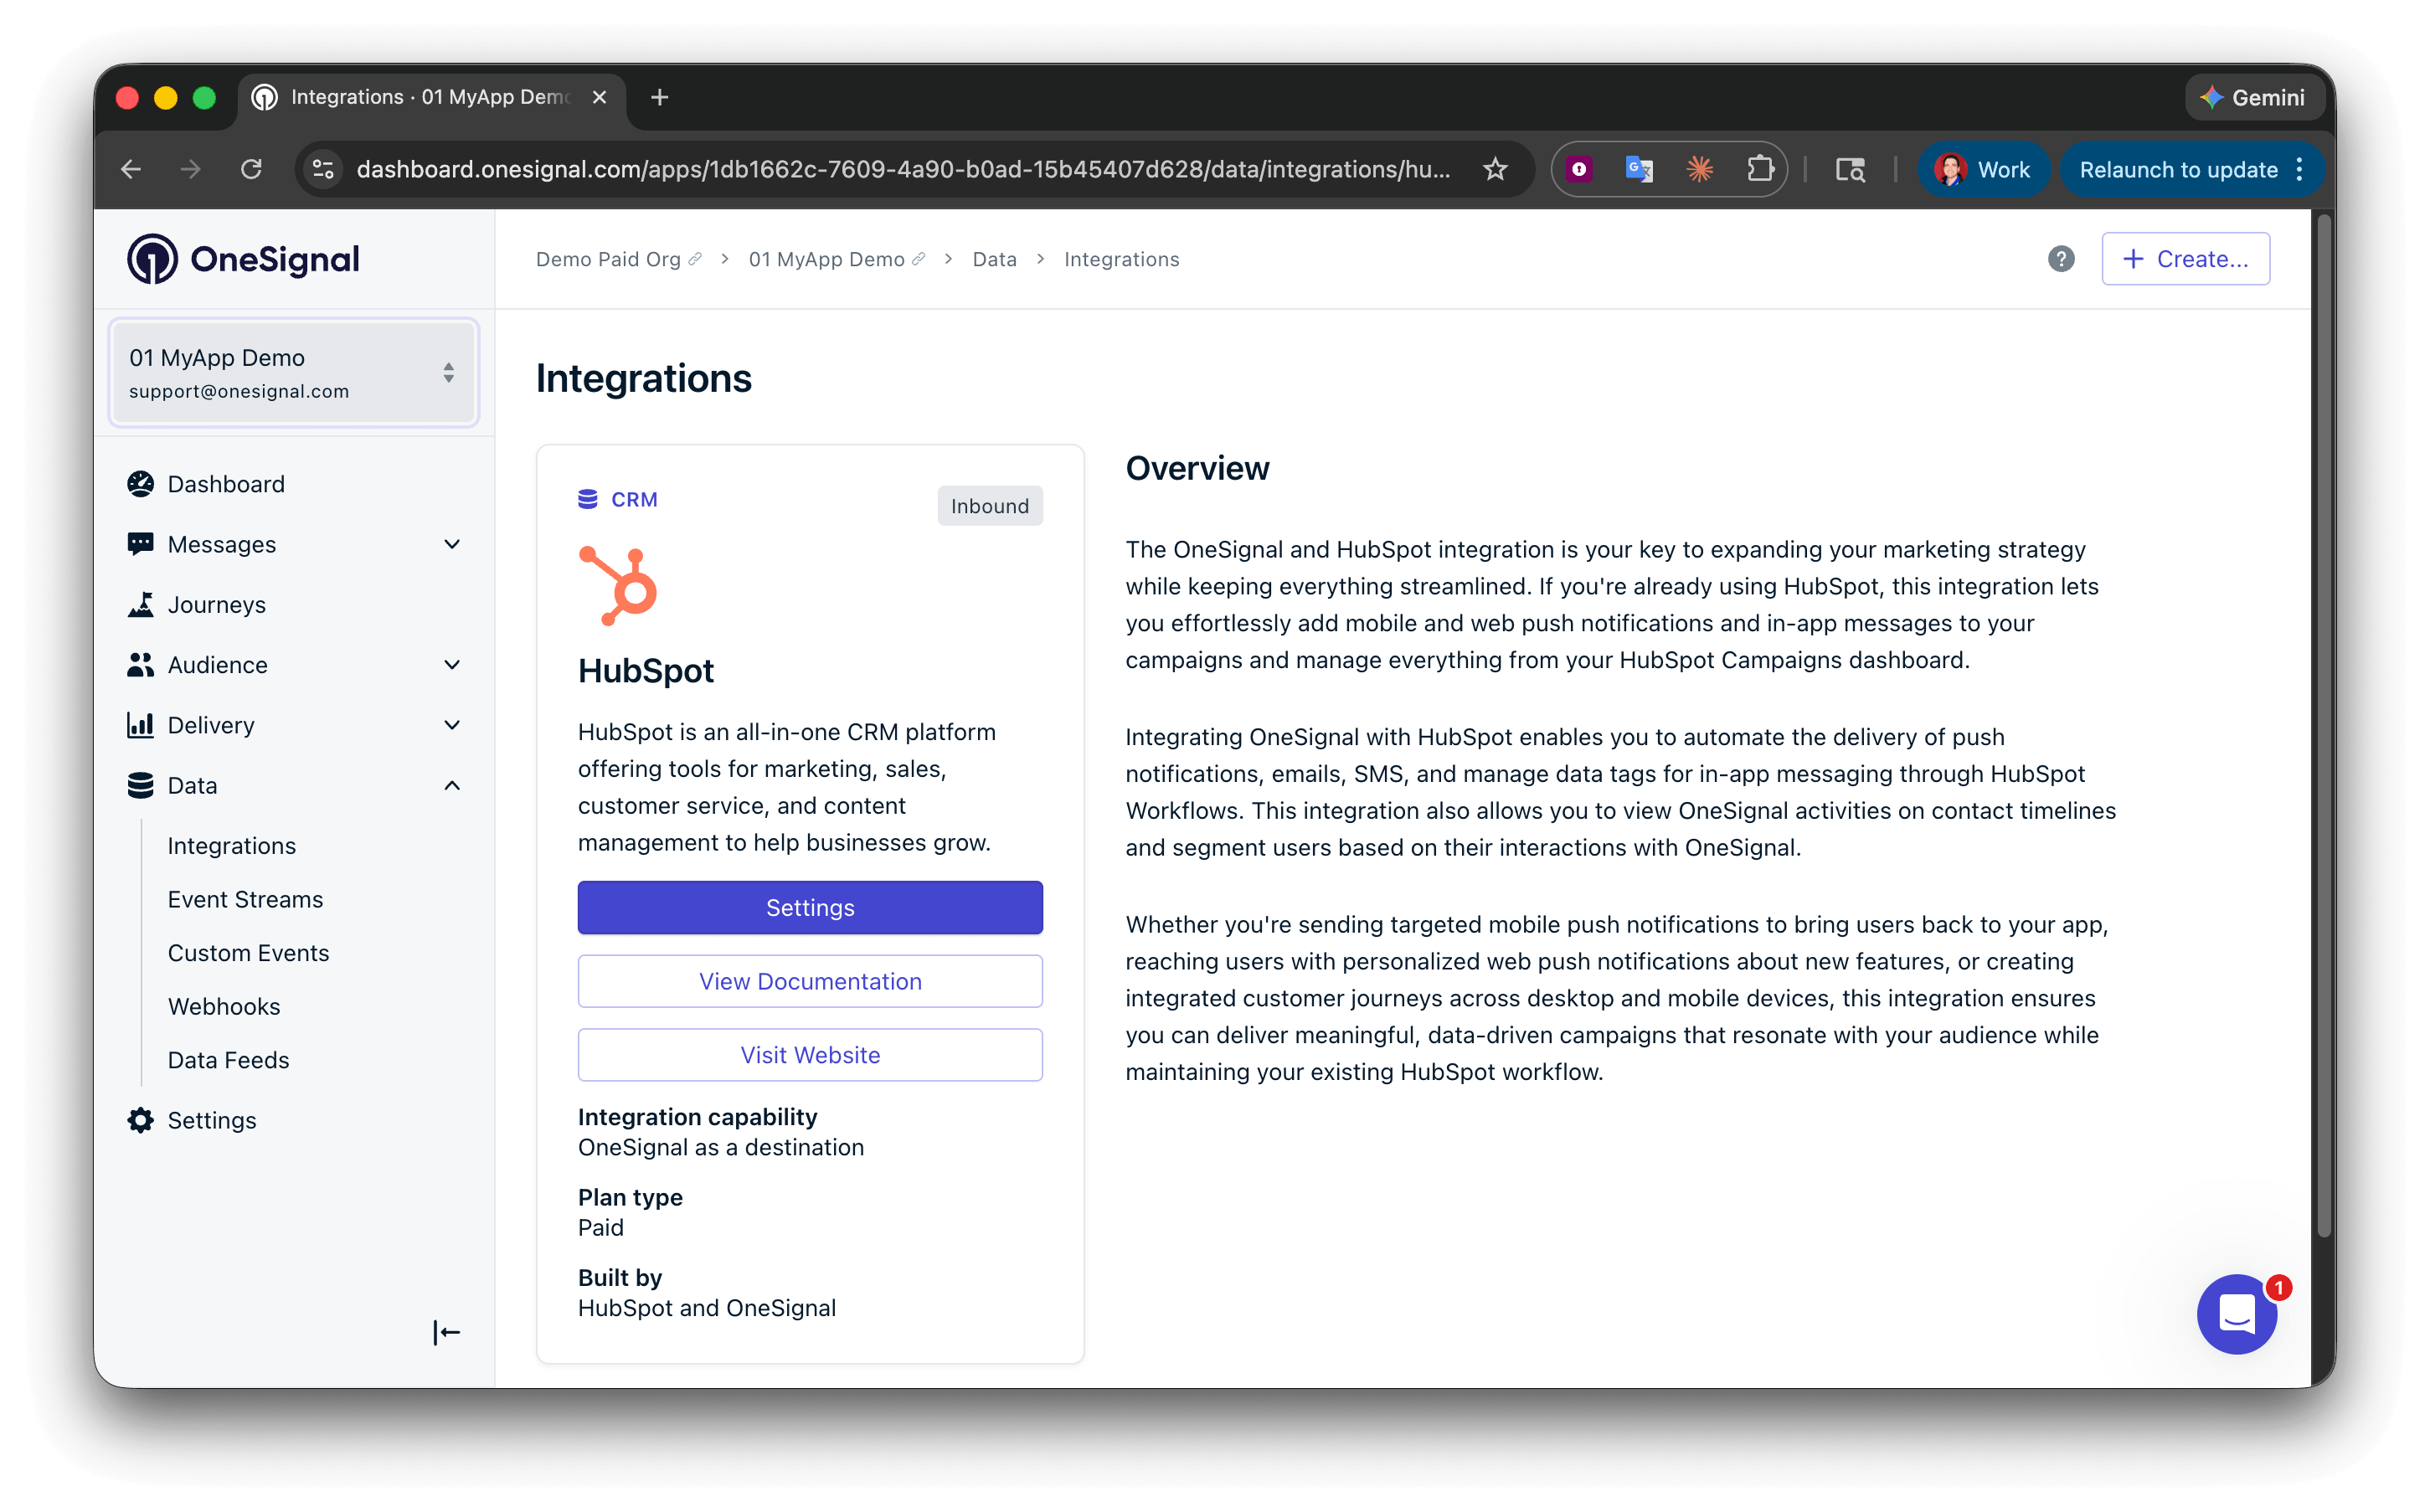
After agreeing to the terms and selecting **Connect app**, you are redirected back to OneSignal. The HubSpot integration in **Data > Integrations** now shows your connected account.
### Install from the HubSpot Marketplace
You can also start from HubSpot. In the HubSpot Marketplace, install **OneSignal | Mobile & Web Push, SMS and RCS Messaging**, sign in to OneSignal, and select the OneSignal app to connect. After you agree to the terms, HubSpot returns you to your portal.
Use this path when a teammate is installing from HubSpot. Use **Data > Integrations** in OneSignal when you are already in the OneSignal dashboard, or when you need to [reconnect](#reconnect-an-existing-hubspot-install).
You can only connect one HubSpot account to each OneSignal app. If you have a testing environment, set up another OneSignal app for testing.
### Reconnect an existing HubSpot install
If **Data > Integrations > HubSpot** shows a reconnect prompt, the connection is missing permissions needed to send OneSignal message events to HubSpot timelines. Click **Reconnect HubSpot**, select the same HubSpot account, and accept the updated permissions (including timeline access).
Workflow actions keep working while the prompt is visible. Timeline events do not appear on HubSpot contacts until you reconnect.
### Match users with External ID
To link HubSpot contacts to OneSignal users, set the [External ID](./users) in OneSignal to a value that matches a unique property in HubSpot (e.g., a user ID or email address).
Set External ID using the SDK `login` method in your app or website. Choose a property that is readily available in both your app and HubSpot so matching is reliable.
See [Users](./users) and [Subscriptions](./subscriptions) for details on identity and subscription management.
### Create a HubSpot workflow
In HubSpot, go to **Automation > Workflows** and click **Create workflow**. Select **Contact-based** and configure your enrollment triggers.
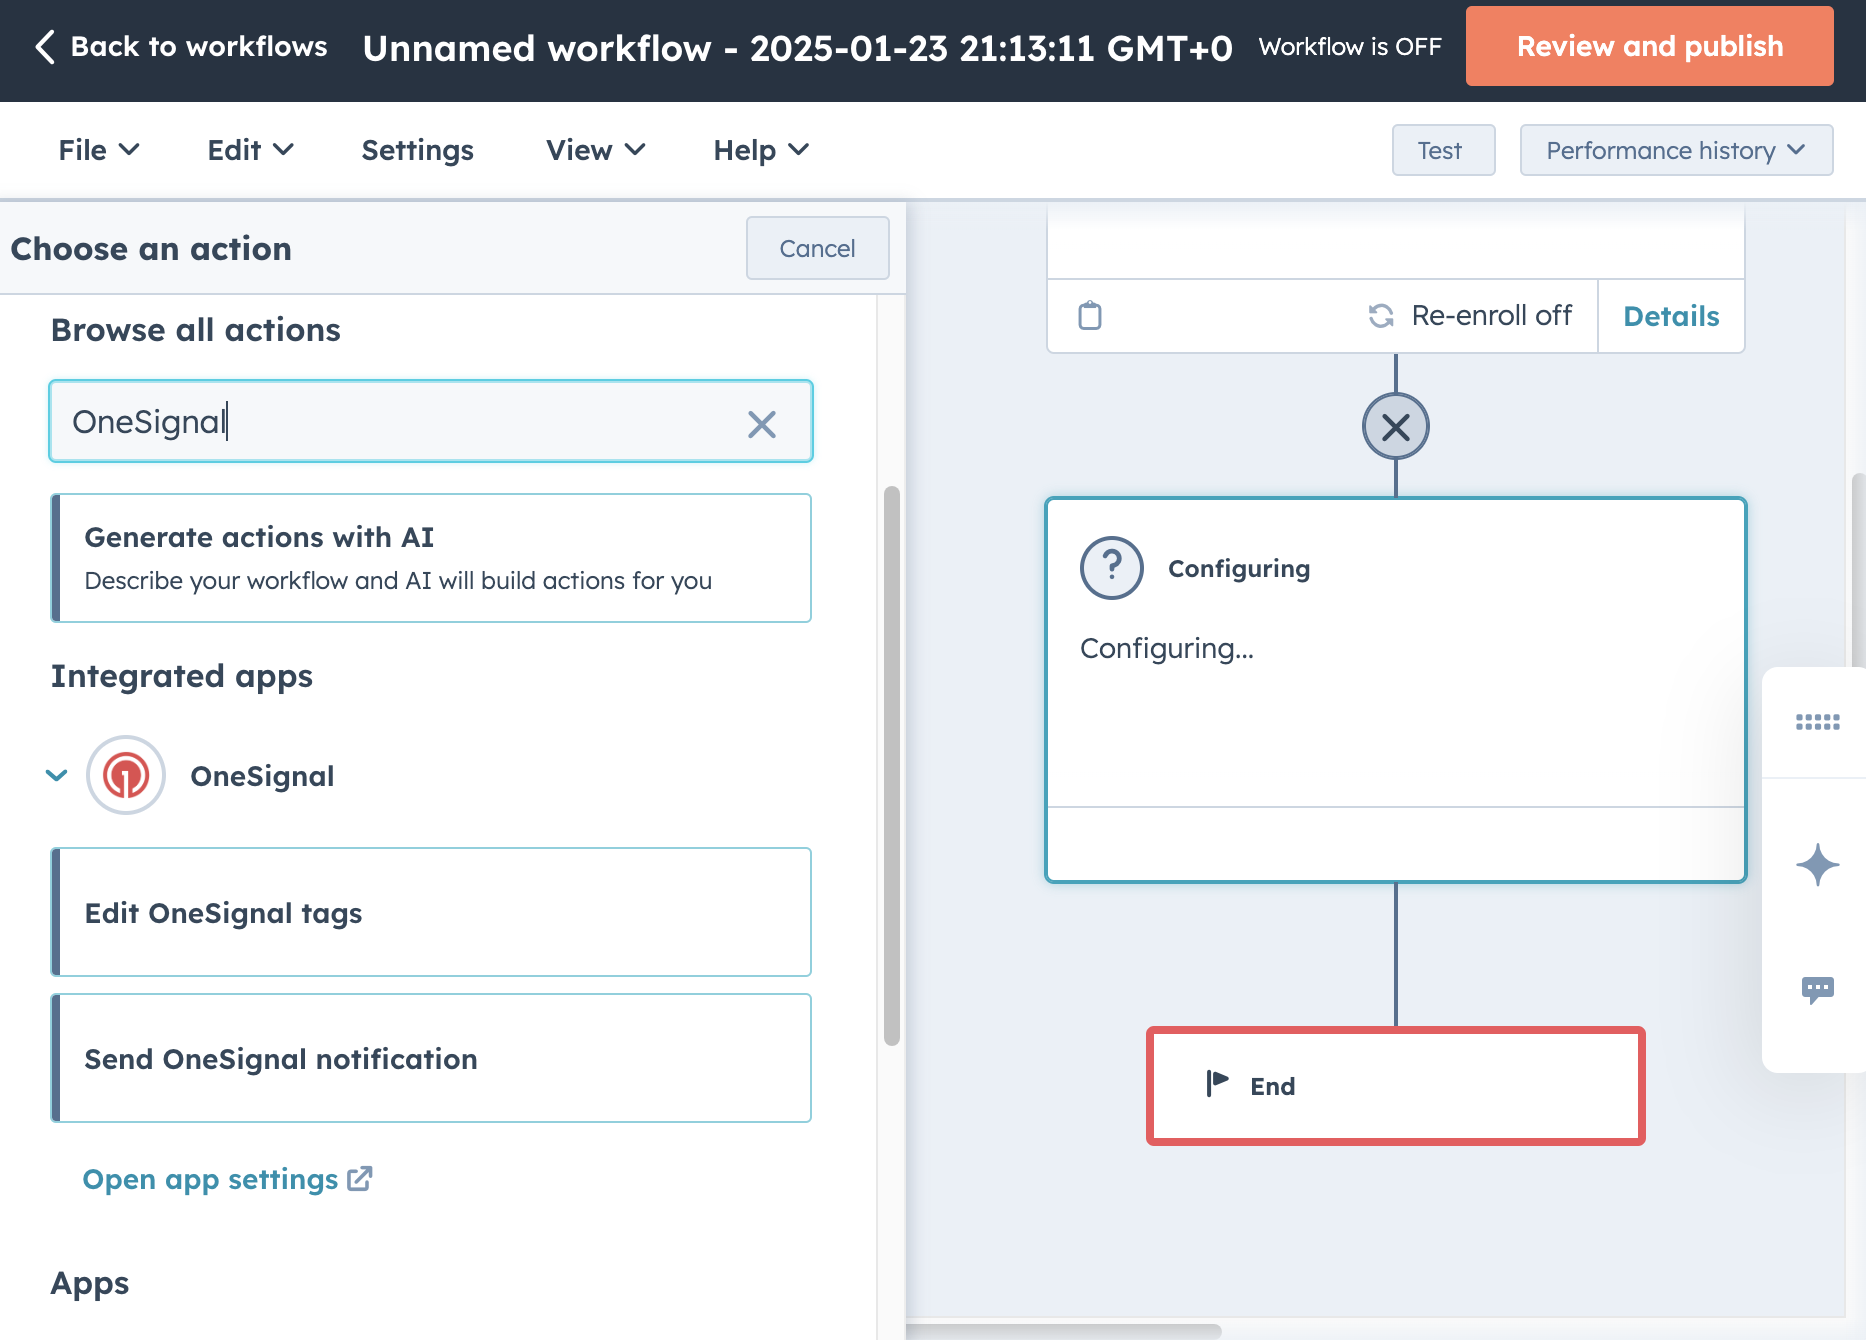
To add a OneSignal action, click **+** in the workflow editor and search for "OneSignal".
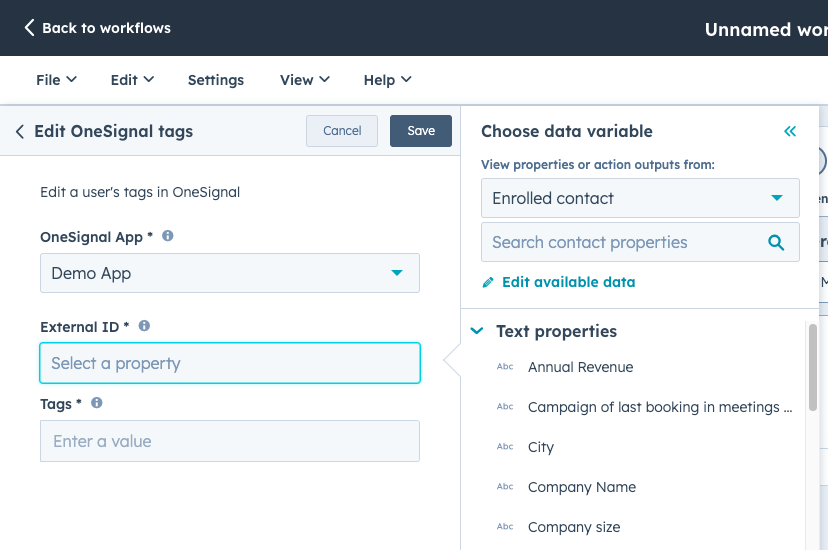
Most OneSignal actions ask for:
* **OneSignal App:** the app you connected during setup.
* **External ID:** the HubSpot contact property whose value matches the OneSignal user's External ID (set via the SDK `login` method).
**Send OneSignal message** can match by External ID or by email. If you choose email matching, the External ID field is hidden. Email matching is a legacy option for customers who set email using the `addEmail` SDK method.
Prefer External ID matching. It is required for [associating the HubSpot contact](#associate-hubspot-contact-id) and for [timeline events](#see-onesignal-message-events-on-the-hubspot-timeline).
***
## OneSignal actions
### Create OneSignal user
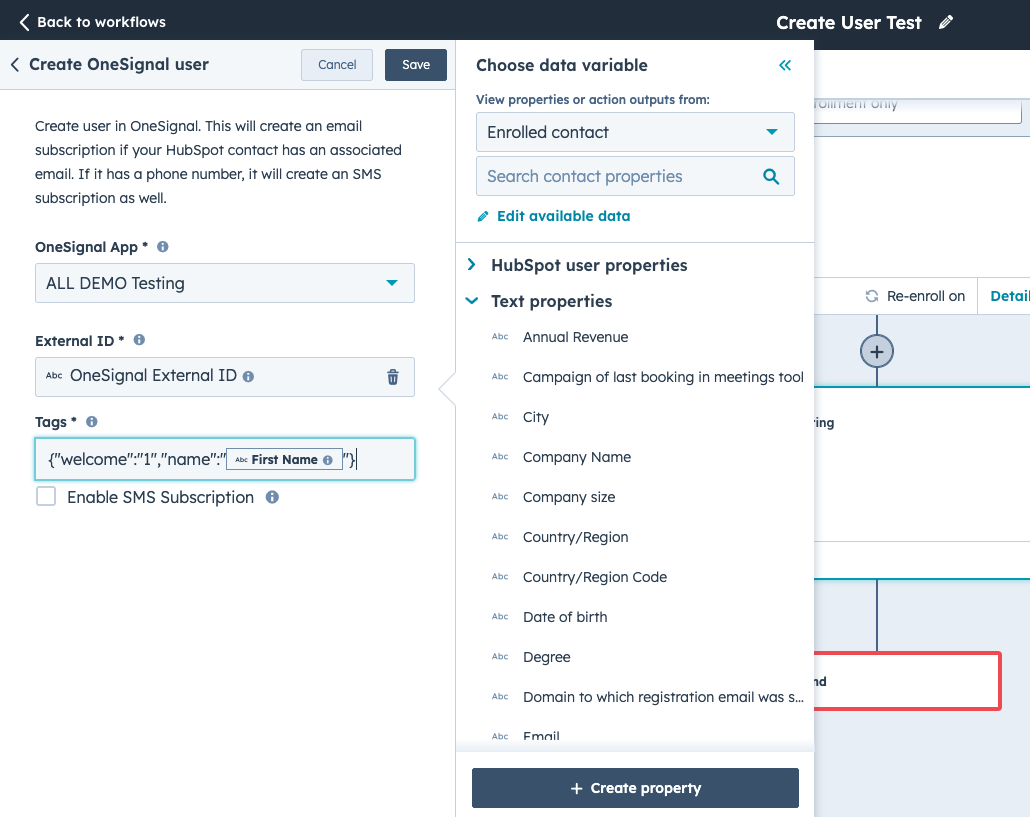
The **Create OneSignal user** action creates a [User](./users) in OneSignal when a contact passes through the workflow. Use this to add HubSpot contacts to OneSignal as they are enrolled.
The contact must have an **email** or a **phone number**. If neither is present, the action fails.
If those HubSpot properties are set, OneSignal creates corresponding [Subscriptions](./subscriptions):
* **Email** → creates an email Subscription
* **Mobile phone**, or **Phone** if mobile phone is empty → creates an SMS Subscription
You can also set the External ID and tags in this action. When External ID is set, OneSignal stores the HubSpot Contact ID on that user so later message events can appear on the contact timeline.
If your OneSignal app has [Double Opt-in](./sms-opt-in-and-collection#promotional-double-opt-in-form) enabled, a new SMS Subscription that is **enabled** receives an opt-in message. Leave **Enable SMS Subscription** unchecked to create the SMS Subscription without sending that message. The user stays unsubscribed until they opt in separately.
***
### Add or edit OneSignal tags
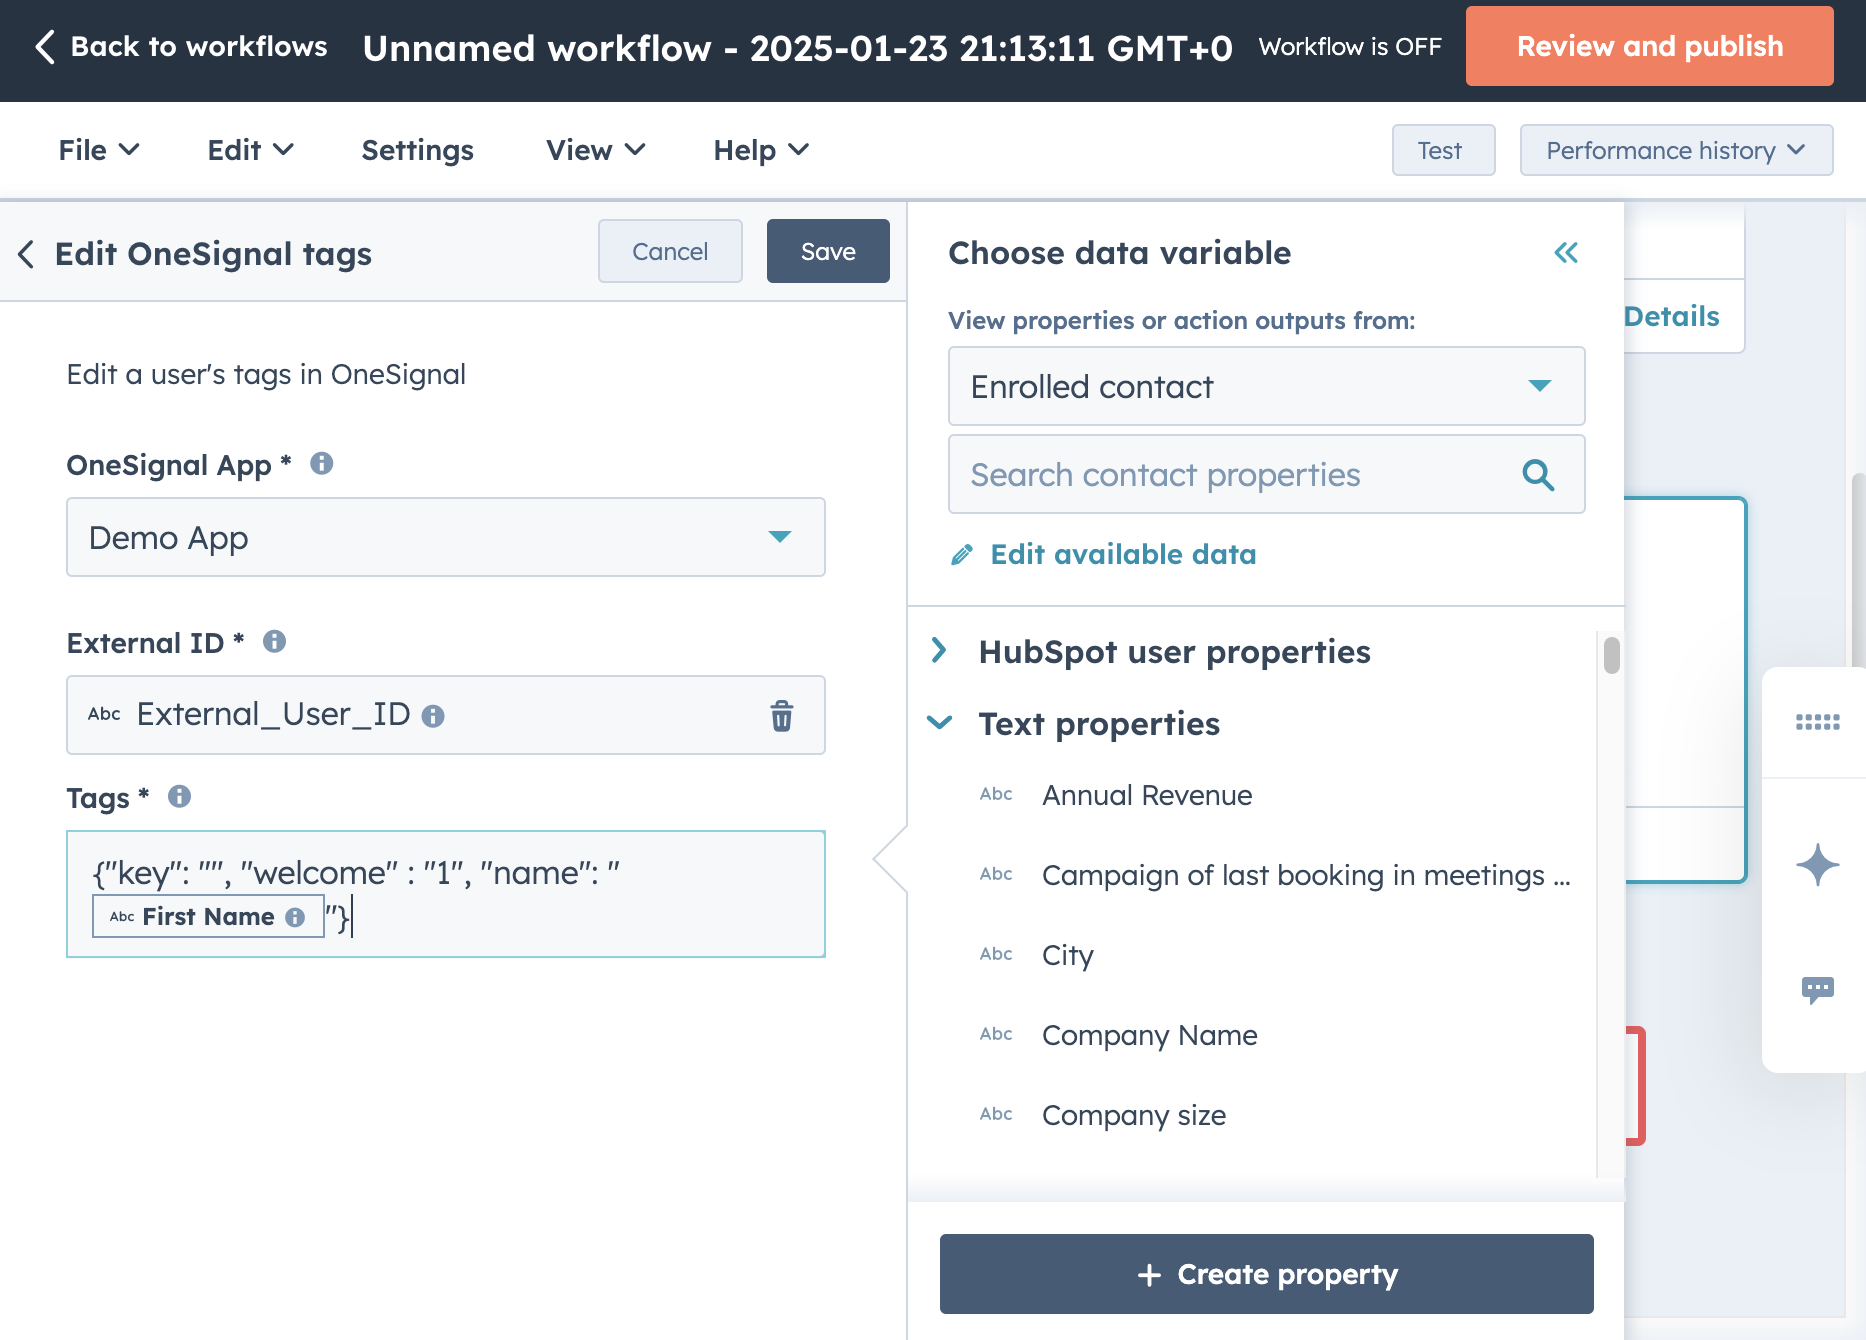
The **Add or edit OneSignal tags** action sets or deletes [Tags](./add-user-data-tags) on the matched OneSignal user. Tags enable [Message Personalization](./message-personalization) and [Segmentation](./segmentation), and are the mechanism for [targeting in-app messages from HubSpot](#send-in-app-messages).
#### Set tags
Enter a JSON object in the Tags field:
```json theme={null}
{ "welcome": "1", "name": "" }
```
You can inject any HubSpot contact property as a tag value by using HubSpot's property token inserter in the workflow editor. For example, add a user's first name as a tag so you can personalize messages in OneSignal.
#### Delete tags
Set the value to an empty string to remove a tag:
```json theme={null}
{ "old_tag": "" }
```
If the tag does not exist on the user, it is ignored.
***
### Send OneSignal message
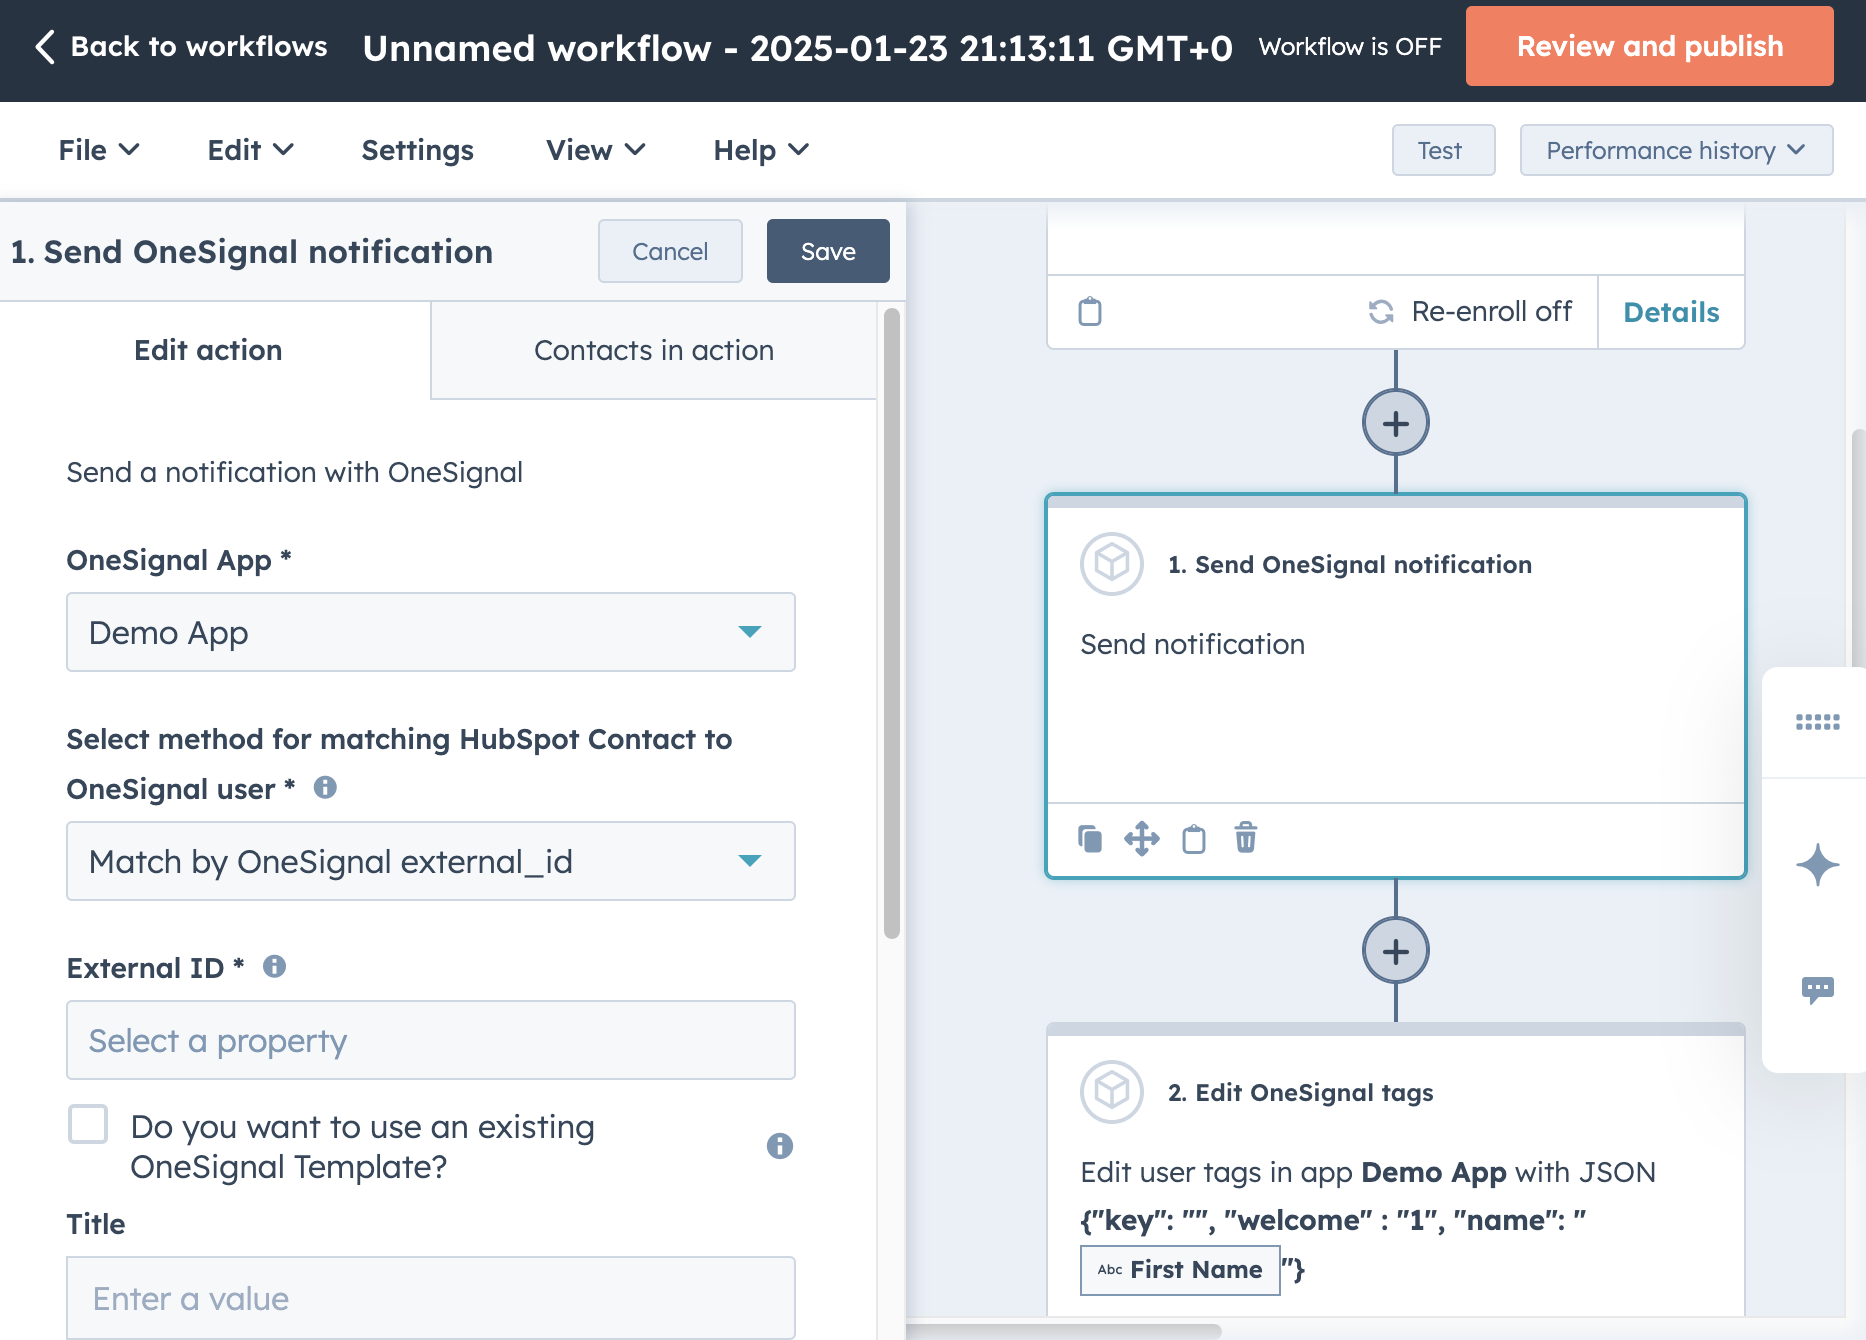
The **Send OneSignal message** action delivers a push notification, email, or SMS/RCS message to the matched OneSignal user.
Match users by **OneSignal External ID** rather than email. Email matching is a legacy option for customers who set email using the `addEmail` SDK method.
#### Using a template
Select a predefined [Template](./templates) created in the OneSignal dashboard or API. Templates support push notifications, email, and SMS/RCS messages.
#### Using form fields
If you do not select a template, you can compose a push notification directly in the workflow action using the Title, Subtitle, Message, Image URL, and Launch URL fields. Email and SMS/RCS messages are only available via templates.
The form fields option allows you to inject HubSpot contact properties (e.g., `First Name`) to personalize the notification content.
When you match by External ID, OneSignal also stores the HubSpot Contact ID on that user so the send can appear on the contact timeline.
***
### Associate HubSpot Contact ID
The **Associate HubSpot Contact ID** action stores the HubSpot Contact ID on the matching OneSignal user (the `hubspot_contact_id` alias). Timeline events can only attach to a HubSpot contact when this ID is present.
Use this action when:
* The OneSignal user already exists (created in your app or API) and has not passed through **Create OneSignal user**.
* You want to force the association onto the current OneSignal user if the Contact ID was previously tied to a different user.
**Create OneSignal user**, **Add or edit OneSignal tags**, and **Send OneSignal message** (when matching by External ID) also set this association automatically. Those updates are best-effort and will not fail the action if the alias cannot be saved. Use **Associate HubSpot Contact ID** when the association itself is the step you need to succeed or fail.
This action requires **OneSignal App** and **External ID**. The OneSignal user must already exist.
***
### Send in-app messages
In-app messages cannot be sent directly from a HubSpot workflow. Instead, use HubSpot to tag users, then target those users with a segment-based in-app message in OneSignal.
In your HubSpot workflow, use the [Add or edit OneSignal tags](#add-or-edit-onesignal-tags) action to set a tag on contacts. For example: `{ "hubspot_campaign": "spring_promo" }`.
In the OneSignal dashboard, go to **Audience > Segments** and click **New Segment**. Add a **User Tag** filter matching the tag key and value set by HubSpot (e.g., `hubspot_campaign` is `spring_promo`).
Go to **Messages > In-App** and create a new in-app message. Under **Audience**, select **Show to Particular Segment(s)** and choose the segment you created.
As users pass through the HubSpot workflow and receive the tag, they are added to the segment immediately.
Tags do not trigger in-app messages on their own. If the tag is set while the user is actively using the app, the in-app message does not display until the next session (a new session starts after the app is in the background for 30+ seconds). See [Sessions](./sessions).
Available triggers:
* **On app open:** displays the next time the user opens the app.
* **Session duration:** displays after a set number of seconds in-session.
* **Time since last in-app message:** prevents back-to-back messages.
* **Programmatic:** trigger from your app code using the OneSignal SDK.
See [In-App Message Triggers](./iam-triggers) for details on combining triggers with AND/OR operators.
***
## See OneSignal message events on the HubSpot timeline
OneSignal can write message activity onto the HubSpot contact timeline. This covers messages sent from HubSpot workflows and from OneSignal (dashboard, API, Journeys), as long as the OneSignal user has a HubSpot Contact ID.
### Before events appear
1. Connect HubSpot, or [reconnect](#reconnect-an-existing-hubspot-install) if OneSignal asks you to.
2. In OneSignal, go to **Data > Integrations > HubSpot > Outbound** and choose which events to send.
3. Make sure the OneSignal user is associated with the HubSpot contact (see [Associate HubSpot Contact ID](#associate-hubspot-contact-id)).
Events for users without a HubSpot Contact ID are skipped.
### Event types
OneSignal can send these timeline events:
| Timeline event | Typical OneSignal activity |
| - | - |
| Message sent | Push, email, SMS, or Live Activity sent |
| Message delivered | Push received, email received, SMS delivered, Live Activity delivered |
| Message displayed | In-app impression or page displayed |
| Message opened | Email opened |
| Message clicked | Push, email, in-app, or Live Activity clicked |
| Message failed | Send or delivery failed, including SMS undelivered |
| Message bounced | Email bounced |
| Message suppressed | Email suppressed |
| Message unsubscribed | Push, email, or Live Activity unsubscribe |
| Message reported as spam | Email marked as spam |
### What this does not do
Timeline events do not update HubSpot contact properties or import HubSpot lists. Depending on your HubSpot plan, app events on the contact timeline can be used in HubSpot reports, lists, and workflow enrollment.
Use [Event Streams](./event-streams) if you need a custom webhook payload, want to update HubSpot contact properties, or want to send events somewhere other than the contact timeline.
***
## Common workflow patterns
HubSpot workflows combine **enrollment triggers** (the event that starts the workflow) with **OneSignal actions** (what happens to the user in OneSignal). Below are recommended patterns for common use cases.
Every workflow pattern below assumes you have already [connected HubSpot to OneSignal](#connect-hubspot-to-onesignal) and are [matching users via External ID](#match-users-with-external-id).
### Welcome and onboarding
Send a welcome message when a new user signs up, and tag them for onboarding in-app messages.
| Step | Type | Configuration |
| - | - | - |
| **Enrollment trigger** | HubSpot | Contact property `Became a customer date` is known |
| **Action 1** | OneSignal: Create OneSignal user | Set External ID to the HubSpot contact property that matches your app (e.g., a user ID or email address) |
| **Action 2** | OneSignal: Add or edit OneSignal tags | `{ "onboarding": "active", "name": "" }`. Insert the HubSpot First Name property token for the name value. |
| **Action 3** | OneSignal: Send OneSignal message | Use a welcome push template, or compose inline with a personalized greeting |
Pair this with an [in-app message](#send-in-app-messages) that targets the `onboarding` = `active` segment to guide new users through your app on first launch.
### Re-engagement
Reach out to users who have not visited your app recently.
| Step | Type | Configuration |
| - | - | - |
| **Enrollment trigger** | HubSpot | Contact property `Last activity date` is more than 14 days ago |
| **Action 1** | OneSignal: Send OneSignal message | Use a re-engagement push template (e.g., "We miss you, here's what's new") |
| **Delay** | HubSpot: Wait 3 days | N/A |
| **If/then branch** | HubSpot | Check if contact has visited your site since enrollment |
| **Yes branch** | OneSignal: Add or edit OneSignal tags | `{ "reengaged": "true" }` |
| **No branch** | OneSignal: Send OneSignal message | Use an email template with a stronger incentive |
### Lifecycle stage change
Sync lifecycle stage changes in HubSpot with OneSignal tags so you can target different user segments.
| Step | Type | Configuration |
| - | - | - |
| **Enrollment trigger** | HubSpot | Contact property `Lifecycle stage` changes to any value |
| **Action 1** | OneSignal: Add or edit OneSignal tags | `{ "lifecycle_stage": "" }`. Insert the HubSpot Lifecycle Stage property token for the value. |
| **If/then branch** | HubSpot | Check if lifecycle stage = `Customer` |
| **Yes branch** | OneSignal: Send OneSignal message | Use a "Welcome to the family" push or email template |
### Deal closed / post-purchase
Trigger a thank-you message and tag users for upsell campaigns after a deal closes.
| Step | Type | Configuration |
| - | - | - |
| **Enrollment trigger** | HubSpot | Deal property `Deal stage` = `Closed Won` |
| **Action 1** | OneSignal: Add or edit OneSignal tags | `{ "customer": "true", "deal_value": "" }`. Insert the HubSpot Deal Amount property token for the value. |
| **Action 2** | OneSignal: Send OneSignal message | Use a thank-you email template |
| **Delay** | HubSpot: Wait 7 days | N/A |
| **Action 3** | OneSignal: Send OneSignal message | Use an upsell/cross-sell push template |
Deal-based workflows require a **Deal-based** workflow type in HubSpot. Use the associated contact's External ID to match the OneSignal user.
### Promotional campaign via in-app message
Target a specific audience with an in-app message triggered by a HubSpot list or form.
| Step | Type | Configuration |
| - | - | - |
| **Enrollment trigger** | HubSpot | Contact becomes a member of a static or active list (e.g., "Spring Sale Eligible") |
| **Action 1** | OneSignal: Add or edit OneSignal tags | `{ "promo": "spring_2025" }` |
Then follow the [Send in-app messages](#send-in-app-messages) steps to create a OneSignal segment matching `promo` = `spring_2025` and configure an in-app message for that segment.
To remove users from the campaign after it ends, create a second workflow that deletes the tag:
| Step | Type | Configuration |
| - | - | - |
| **Enrollment trigger** | HubSpot | Date-based, set to the campaign end date |
| **Action 1** | OneSignal: Add or edit OneSignal tags | `{ "promo": "" }` |
***
## Troubleshooting
### Workflow action shows "Failed" in HubSpot
1. **Check the error message:** Expand the failed action in the HubSpot workflow enrollment history. The error message often indicates the cause (e.g., "User not found," "Invalid app ID").
2. **Verify the External ID:** Confirm the HubSpot contact property used as the External ID matches a user in OneSignal. Check the user's profile in **OneSignal > Audience > Users & subscriptions** and search by External ID.
3. **Confirm the integration is active:** Go to **OneSignal > Data > Integrations > HubSpot** and verify the connection status is active.
### Message sent but user did not receive it
1. **Check subscriptions:** The user must have an active subscription for the channel you're sending on (push, email, or SMS/RCS). Verify this in the user's profile in OneSignal under **Subscriptions**.
2. **Check segment membership:** If you're using a template with segment targeting, confirm the user belongs to the targeted segment.
3. **Review message reports:** In the OneSignal dashboard, go to **Messages**, find the message, and check its delivery report to see if the message was delivered, dropped, or errored.
### Tags not appearing on the OneSignal user
1. **Verify External ID matching:** If the External ID in the workflow does not match an existing OneSignal user, **Add or edit OneSignal tags** fails the HubSpot workflow step. Use **Create OneSignal user** first to ensure the user exists.
2. **Check JSON format:** Tags must be a valid JSON object. Common mistakes include missing quotes around keys or values, trailing commas, or using single quotes instead of double quotes.
3. **Check for empty values:** Setting a tag value to `""` deletes the tag. Verify that HubSpot contact properties being injected are not blank.
### Timeline events not appearing on the HubSpot contact
1. **Reconnect if prompted:** Open **OneSignal > Data > Integrations > HubSpot** and complete Reconnect HubSpot so timeline permissions are granted.
2. **Check Outbound events:** Confirm the event types you expect are selected on the HubSpot **Outbound** tab.
3. **Confirm the contact association:** Search the OneSignal user by External ID and confirm a `hubspot_contact_id` alias. If it is missing, run **Associate HubSpot Contact ID** (or **Create OneSignal user**) for that contact.
4. **Confirm you matched by External ID:** Sends matched only by email do not store the HubSpot Contact ID, so those sends cannot be written to the timeline.
### In-app message not displaying
See [Why didn't my in-app message display after the tag was set?](#why-didnt-my-in-app-message-display-after-the-tag-was-set) in the FAQ below.
***
## FAQ
### What data is shared between HubSpot and OneSignal?
| HubSpot | Direction | OneSignal | Description |
| - | - | - | - |
| Contact properties | → | External ID, Tags, email, phone | Workflow actions match users and can create subscriptions and tags from the enrolled contact. |
| Contact ID | → | `hubspot_contact_id` alias | Stored so OneSignal can attach message events to that contact. |
| Workflows | ← | Message Templates | OneSignal [Templates](./templates) appear in **Send OneSignal message**. |
| Contact timeline | ← | Message events | Sent, delivered, opened, clicked, and related outcomes, when Outbound is enabled and the contact is associated. |
The integration does not sync HubSpot lists, deals, or company records to OneSignal automatically. Use workflow actions to explicitly pass the data you need.
### What happens if the External ID doesn't match a OneSignal user?
* **Add or edit OneSignal tags** and **Associate HubSpot Contact ID** fail the HubSpot workflow step. No tags or association are saved.
* **Send OneSignal message** may show as successful in HubSpot even when no OneSignal user matches. No one receives the message.
* **Create OneSignal user** creates the user (when email or phone is present). Put this action first if the contact might not exist in OneSignal yet.
### Can I use HubSpot lists to target OneSignal segments?
Not directly. HubSpot lists and OneSignal segments are independent systems. To bridge them, create a workflow that enrolls contacts from a HubSpot list and uses the **Add or edit OneSignal tags** action to set a tag. Then build a OneSignal segment based on that tag. See [Promotional campaign via in-app message](#promotional-campaign-via-in-app-message) for a worked example.
### Which OneSignal channels can I send from HubSpot?
Push notifications can be sent using templates or form fields. Email and SMS/RCS can only be sent using [Templates](./templates) created in OneSignal. In-app messages cannot be sent from HubSpot workflows. Use the [tag-and-segment pattern](#send-in-app-messages) instead.
### Why didn't my in-app message display after the tag was set?
Tags alone do not trigger in-app messages. The tag adds the user to a segment, but the in-app message still requires a **trigger** to display. If the tag is set while the user is actively using the app, the message will not appear until the next session (30+ seconds in background). Set the in-app message trigger to **On app open** for the most reliable behavior. See [In-App Message Triggers](./iam-triggers) for all trigger options.
### Can I use HubSpot webhooks to call the OneSignal API directly?
Yes. HubSpot's **Custom Code** workflow action lets you make HTTP requests to external APIs. You can call the [OneSignal REST API](/reference/push-notification) to send messages, create users, or update tags outside the native integration. This is useful for use cases the native actions do not cover, such as sending to a segment rather than an individual user.
### Can I send OneSignal message events back to HubSpot?
Yes. After you connect (or reconnect) HubSpot, enable **Outbound** events on the HubSpot integration. OneSignal writes those events to the contact timeline. See [See OneSignal message events on the HubSpot timeline](#see-onesignal-message-events-on-the-hubspot-timeline).
Use [Event Streams](./event-streams) instead if you need a custom webhook payload, want to update HubSpot contact properties, or want to send events somewhere other than the contact timeline.
### Can I trigger a OneSignal Journey from HubSpot?
There are two options for getting HubSpot users into a OneSignal [Journey](./journeys-overview):
1. **Tags:** Use the [Add or edit OneSignal tags](#add-or-edit-onesignal-tags) action to set a tag on the user. Create a segment in OneSignal based on that tag and use the segment as a Journey entry condition.
2. **Custom Events:** Use HubSpot's **Custom Code** action to call the [OneSignal Custom Events API](/reference/create-custom-events), which can serve as a Journey entry trigger.
### Can I send custom events from HubSpot to OneSignal?
Not through the native workflow actions. The native integration supports **Create OneSignal user**, **Add or edit OneSignal tags**, **Send OneSignal message**, and **Associate HubSpot Contact ID**. To send custom events, use HubSpot's **Custom Code** action to call the [OneSignal Custom Events API](/reference/create-custom-events) directly.
### What HubSpot enrollment triggers work with OneSignal?
Any HubSpot enrollment trigger works. The OneSignal actions are standard workflow actions that execute regardless of how the contact was enrolled. Common triggers include:
* **Contact property changes** (lifecycle stage, lead status, last activity date)
* **Form submissions** (signup forms, demo requests, event registrations)
* **List membership** (added to a static or active list)
* **Deal stage changes** (pipeline progression, closed won/lost)
* **Date-based** (scheduled campaigns, time since an event)
* **Manual enrollment** (for one-off sends or testing)
### How do I test a workflow before going live?
1. Create the workflow and remove all automatic enrollment triggers.
2. Save and publish the workflow.
3. Manually enroll a single test contact.
4. Check the enrollment history in HubSpot for action success/failure.
5. Verify the user, tags, or message in the OneSignal dashboard.
6. Once confirmed, add your enrollment triggers and re-publish.
***
## Related pages
Add custom properties to users for personalization and segmentation.
Create reusable message templates for push, email, and SMS/RCS.
Build automated multichannel messaging flows triggered by user behavior.
Export real-time message events to external platforms via webhooks.
Build audience segments based on tags, behavior, and user properties.
Control when and how in-app messages display to users.
This documentation is built and hosted on [Mintlify](https://mintlify.com), a developer documentation platform.
 4. **Test with a single contact:** Save and publish the workflow, then manually enroll one test contact. Check the enrollment history to verify actions completed successfully.
 5. **Replace or update:** After confirming the workflow works correctly, either replace the original workflow with the clone or apply the same changes to the original.
If you encounter errors during migration, contact `support@onesignal.com`.
5. **Replace or update:** After confirming the workflow works correctly, either replace the original workflow with the clone or apply the same changes to the original.
If you encounter errors during migration, contact `support@onesignal.com`.
 Click **Settings > Authenticate**, then select your HubSpot account and log in.
 After agreeing to the terms and selecting **Connect app**, you are redirected back to OneSignal. The HubSpot integration in **Data > Integrations** now shows your connected account.
### Install from the HubSpot Marketplace
You can also start from HubSpot. In the HubSpot Marketplace, install **OneSignal | Mobile & Web Push, SMS and RCS Messaging**, sign in to OneSignal, and select the OneSignal app to connect. After you agree to the terms, HubSpot returns you to your portal.
Use this path when a teammate is installing from HubSpot. Use **Data > Integrations** in OneSignal when you are already in the OneSignal dashboard, or when you need to [reconnect](#reconnect-an-existing-hubspot-install).
After agreeing to the terms and selecting **Connect app**, you are redirected back to OneSignal. The HubSpot integration in **Data > Integrations** now shows your connected account.
### Install from the HubSpot Marketplace
You can also start from HubSpot. In the HubSpot Marketplace, install **OneSignal | Mobile & Web Push, SMS and RCS Messaging**, sign in to OneSignal, and select the OneSignal app to connect. After you agree to the terms, HubSpot returns you to your portal.
Use this path when a teammate is installing from HubSpot. Use **Data > Integrations** in OneSignal when you are already in the OneSignal dashboard, or when you need to [reconnect](#reconnect-an-existing-hubspot-install).
 Most OneSignal actions ask for:
 * **OneSignal App:** the app you connected during setup.
* **External ID:** the HubSpot contact property whose value matches the OneSignal user's External ID (set via the SDK `login` method).
**Send OneSignal message** can match by External ID or by email. If you choose email matching, the External ID field is hidden. Email matching is a legacy option for customers who set email using the `addEmail` SDK method.
Prefer External ID matching. It is required for [associating the HubSpot contact](#associate-hubspot-contact-id) and for [timeline events](#see-onesignal-message-events-on-the-hubspot-timeline).
***
## OneSignal actions
### Create OneSignal user
The **Create OneSignal user** action creates a [User](./users) in OneSignal when a contact passes through the workflow. Use this to add HubSpot contacts to OneSignal as they are enrolled.
The contact must have an **email** or a **phone number**. If neither is present, the action fails.
If those HubSpot properties are set, OneSignal creates corresponding [Subscriptions](./subscriptions):
* **Email** → creates an email Subscription
* **Mobile phone**, or **Phone** if mobile phone is empty → creates an SMS Subscription
You can also set the External ID and tags in this action. When External ID is set, OneSignal stores the HubSpot Contact ID on that user so later message events can appear on the contact timeline.
* **OneSignal App:** the app you connected during setup.
* **External ID:** the HubSpot contact property whose value matches the OneSignal user's External ID (set via the SDK `login` method).
**Send OneSignal message** can match by External ID or by email. If you choose email matching, the External ID field is hidden. Email matching is a legacy option for customers who set email using the `addEmail` SDK method.
Prefer External ID matching. It is required for [associating the HubSpot contact](#associate-hubspot-contact-id) and for [timeline events](#see-onesignal-message-events-on-the-hubspot-timeline).
***
## OneSignal actions
### Create OneSignal user
The **Create OneSignal user** action creates a [User](./users) in OneSignal when a contact passes through the workflow. Use this to add HubSpot contacts to OneSignal as they are enrolled.
The contact must have an **email** or a **phone number**. If neither is present, the action fails.
If those HubSpot properties are set, OneSignal creates corresponding [Subscriptions](./subscriptions):
* **Email** → creates an email Subscription
* **Mobile phone**, or **Phone** if mobile phone is empty → creates an SMS Subscription
You can also set the External ID and tags in this action. When External ID is set, OneSignal stores the HubSpot Contact ID on that user so later message events can appear on the contact timeline.
 ***
### Send OneSignal message
The **Send OneSignal message** action delivers a push notification, email, or SMS/RCS message to the matched OneSignal user.
***
### Send OneSignal message
The **Send OneSignal message** action delivers a push notification, email, or SMS/RCS message to the matched OneSignal user.
 #### Using a template
Select a predefined [Template](./templates) created in the OneSignal dashboard or API. Templates support push notifications, email, and SMS/RCS messages.
#### Using form fields
If you do not select a template, you can compose a push notification directly in the workflow action using the Title, Subtitle, Message, Image URL, and Launch URL fields. Email and SMS/RCS messages are only available via templates.
The form fields option allows you to inject HubSpot contact properties (e.g., `First Name`) to personalize the notification content.
When you match by External ID, OneSignal also stores the HubSpot Contact ID on that user so the send can appear on the contact timeline.
***
### Associate HubSpot Contact ID
The **Associate HubSpot Contact ID** action stores the HubSpot Contact ID on the matching OneSignal user (the `hubspot_contact_id` alias). Timeline events can only attach to a HubSpot contact when this ID is present.
Use this action when:
* The OneSignal user already exists (created in your app or API) and has not passed through **Create OneSignal user**.
* You want to force the association onto the current OneSignal user if the Contact ID was previously tied to a different user.
**Create OneSignal user**, **Add or edit OneSignal tags**, and **Send OneSignal message** (when matching by External ID) also set this association automatically. Those updates are best-effort and will not fail the action if the alias cannot be saved. Use **Associate HubSpot Contact ID** when the association itself is the step you need to succeed or fail.
This action requires **OneSignal App** and **External ID**. The OneSignal user must already exist.
***
### Send in-app messages
In-app messages cannot be sent directly from a HubSpot workflow. Instead, use HubSpot to tag users, then target those users with a segment-based in-app message in OneSignal.
#### Using a template
Select a predefined [Template](./templates) created in the OneSignal dashboard or API. Templates support push notifications, email, and SMS/RCS messages.
#### Using form fields
If you do not select a template, you can compose a push notification directly in the workflow action using the Title, Subtitle, Message, Image URL, and Launch URL fields. Email and SMS/RCS messages are only available via templates.
The form fields option allows you to inject HubSpot contact properties (e.g., `First Name`) to personalize the notification content.
When you match by External ID, OneSignal also stores the HubSpot Contact ID on that user so the send can appear on the contact timeline.
***
### Associate HubSpot Contact ID
The **Associate HubSpot Contact ID** action stores the HubSpot Contact ID on the matching OneSignal user (the `hubspot_contact_id` alias). Timeline events can only attach to a HubSpot contact when this ID is present.
Use this action when:
* The OneSignal user already exists (created in your app or API) and has not passed through **Create OneSignal user**.
* You want to force the association onto the current OneSignal user if the Contact ID was previously tied to a different user.
**Create OneSignal user**, **Add or edit OneSignal tags**, and **Send OneSignal message** (when matching by External ID) also set this association automatically. Those updates are best-effort and will not fail the action if the alias cannot be saved. Use **Associate HubSpot Contact ID** when the association itself is the step you need to succeed or fail.
This action requires **OneSignal App** and **External ID**. The OneSignal user must already exist.
***
### Send in-app messages
In-app messages cannot be sent directly from a HubSpot workflow. Instead, use HubSpot to tag users, then target those users with a segment-based in-app message in OneSignal.