> ## Documentation Index
> Fetch the complete documentation index at: https://documentation.onesignal.com/llms.txt
> Use this file to discover all available pages before exploring further.
# Journey examples
> Step-by-step Journey configurations for onboarding, re-engagement, abandoned cart, A/B testing, recurring sends, and event-driven workflows.
Each example below includes the recommended Journey settings and step-by-step configuration. Start with the simpler patterns (onboarding, re-engagement) and work up to more advanced workflows (recurring sends, event-driven progression, action button branching).
***
## Onboarding
Use this pattern to send a welcome or onboarding sequence to new subscribers. It is also commonly referred to as a welcome campaign, welcome series, or new user campaign. The goal is to guide users toward completing a key action (finishing their profile, making their first purchase, or discovering a core feature) rather than messaging them the moment they sign up.
| Journey setting | Description |
| - | - |
| **Entry rules** | **Event-based (recommended):** Use a [Custom Event](./custom-events) trigger (for example, `signup_completed`) so the sequence starts at a meaningful moment: when the user finishes registration.
**Segment-based fallback:** "User matches the segment criteria" using the "Subscribed Users" [segment](./segmentation), future additions only. Use this if you don't have a signup event set up. |
| **Exit rules** | They moved through the entire journey, or when the user completes the key action (for example, they exit a "has not completed onboarding" segment). |
| **Re-entry rules** | No |
| **Content** | A short sequence over the user's first week: a welcome email on day 0, a push nudge on day 2 if they haven't acted, and a follow-up email on day 7 as a last touch. |
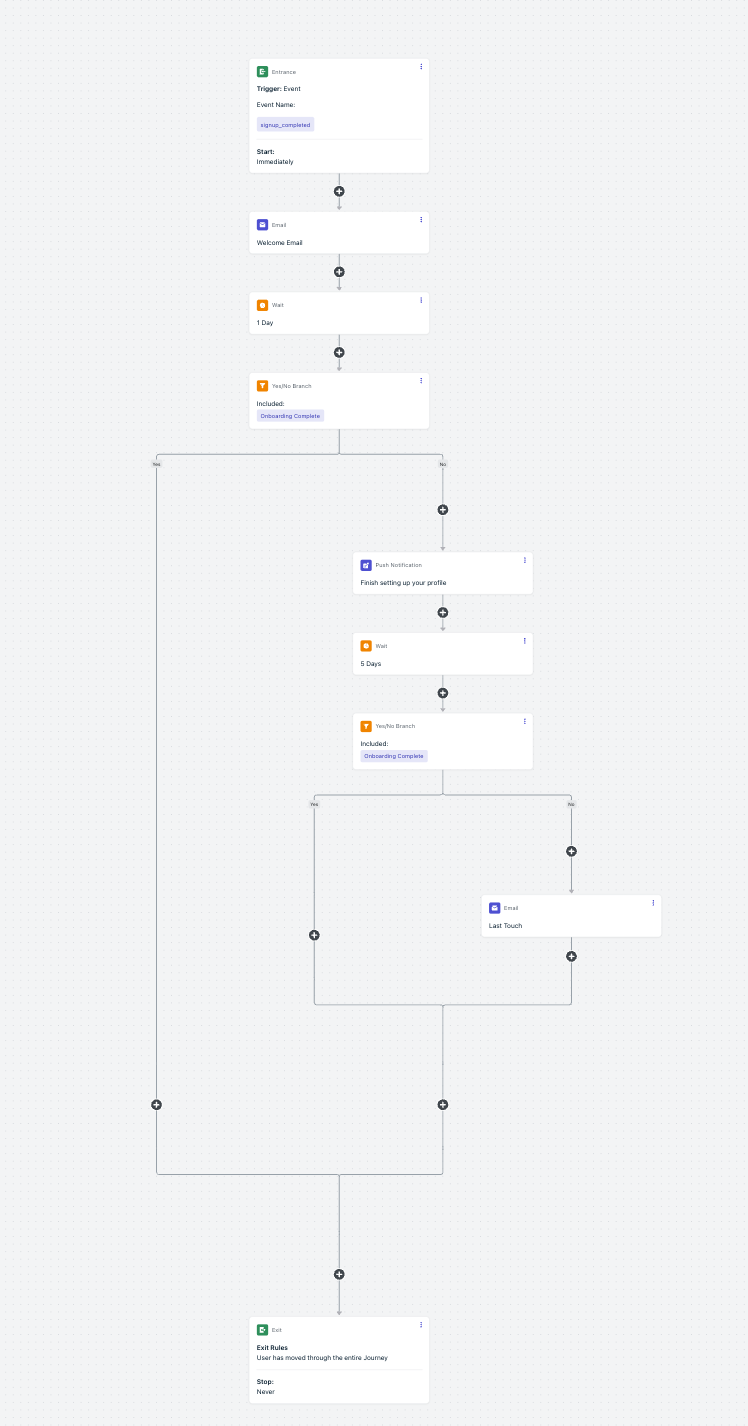
**Journey steps**
The user just signed up and is likely still in your app. An email is the right first touch: it's expected, non-intrusive, and can include more detail than a push notification. Save push for when they've left.
Give the user time to explore on their own before following up.
Add a yes/no branch based on whether the user has completed your onboarding goal. Track this with a [tag](./add-user-data-tags) (for example, `onboarding_complete = true`) or segment membership.
* **Yes branch:** Exit the journey. The user doesn't need a nudge.
* **No branch:** Send a push notification with a specific, actionable prompt. For example: "Finish setting up your profile" or "Make your first \[action]."
Allow time for the push to land before sending a final message.
* **Yes branch:** Exit the journey.
* **No branch:** Send a follow-up email as a last touch. Avoid messaging further. Users who haven't engaged after a week are better candidates for a [re-engagement campaign](#re-engagement-campaign).
***
## Re-engagement campaign
Use this pattern to win back users who haven't opened your app or visited your site recently. The journey sends a series of increasingly compelling messages and exits the user as soon as they return.
| Journey setting | Description |
| - | - |
| **Entry rules** | **User's last session is greater than 7 days;** subscribed users. Consider excluding segments like paid customers if the goal is to re-engage free users. |
| **Exit rules** | **They moved through the entire journey or meet certain conditions** — exit when the user becomes active in your app or website. |
| **Re-entry rules** | **Yes, after a certain amount of time: 7 days.** Users re-enter whenever they go inactive again. |
| **Content** | Remind users to come back to your app when they haven't opened it in a while, and entice them with rewards or discounts. |
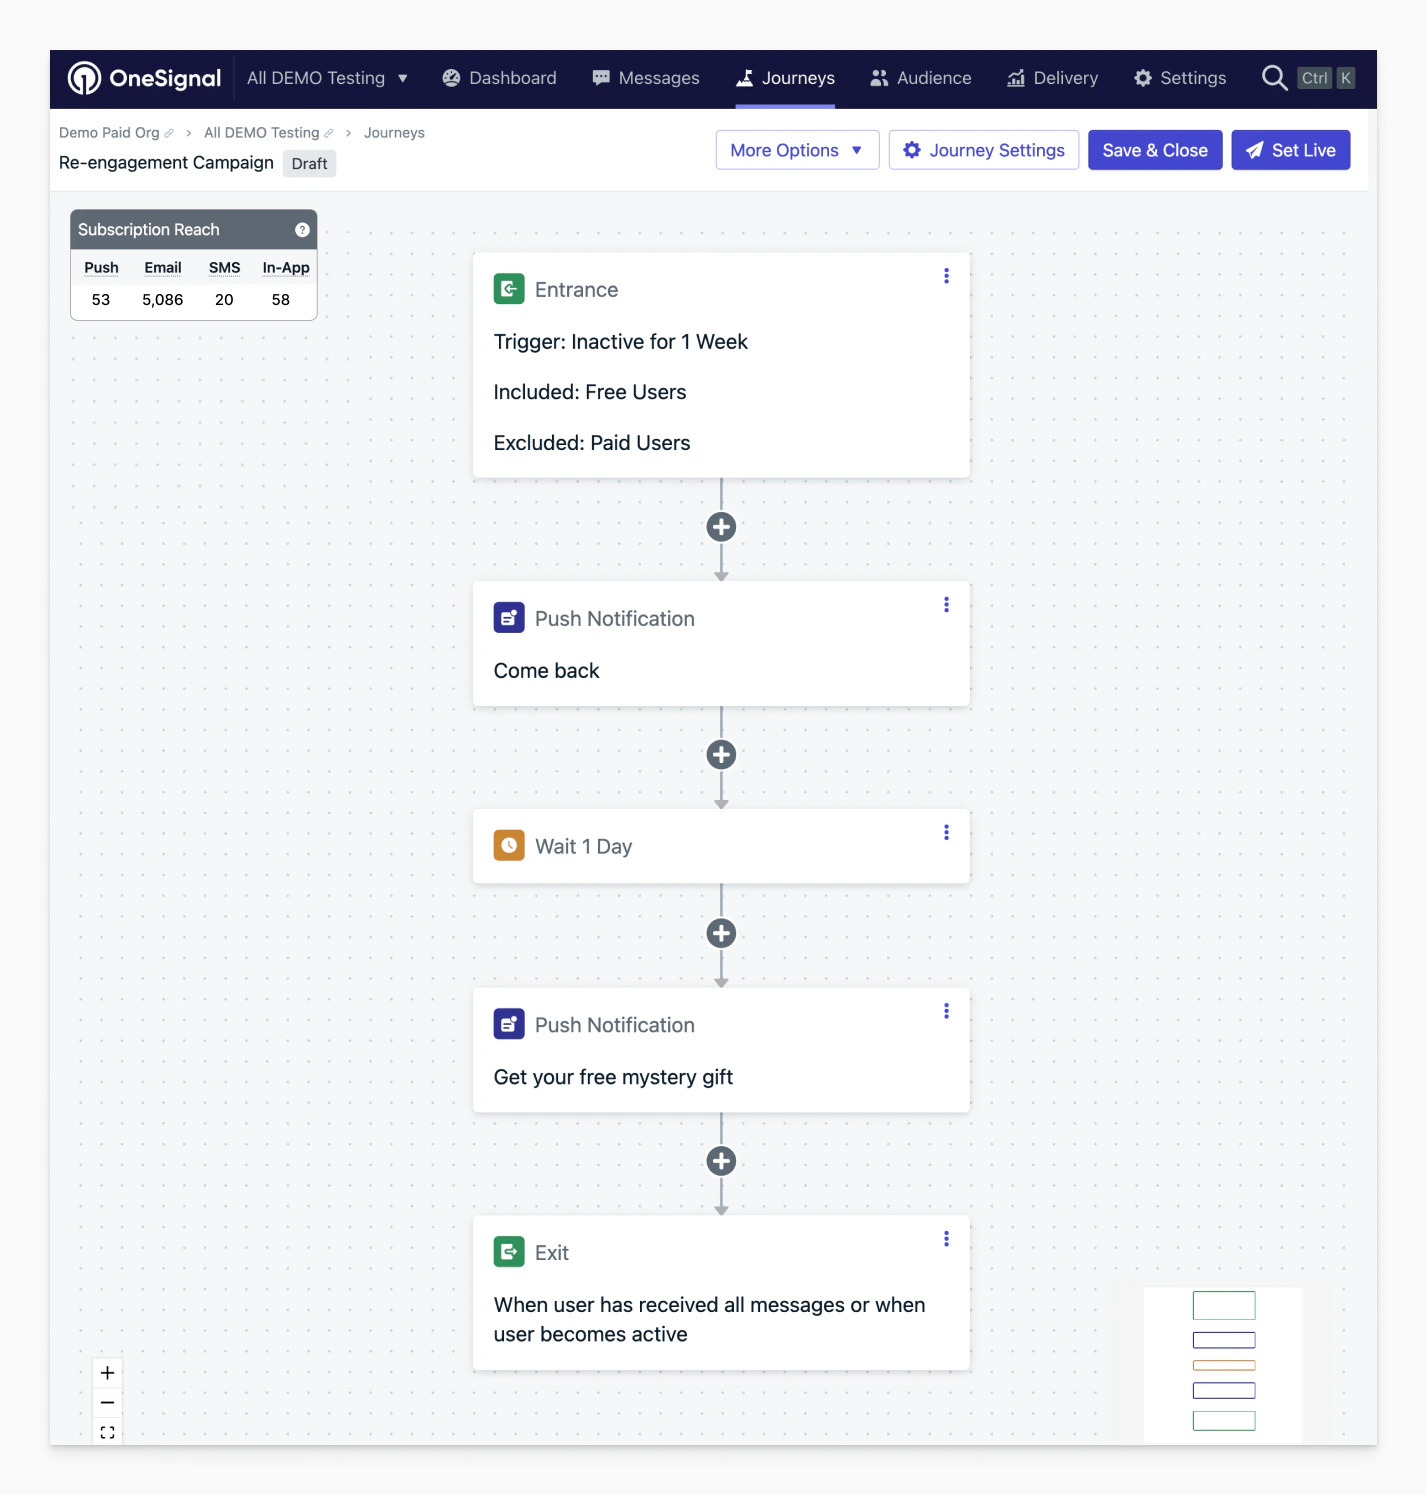
**Journey steps**
Start with a push — it's the most visible channel for re-engaging lapsed users. Use a clear, action-oriented message like "We miss you! Here's what's new."
Give the user time to respond to the push before escalating.
Add a yes/no branch to check if the user has returned (for example, last session within 2 days).
* **Yes branch:** Exit the journey. The user is re-engaged.
* **No branch:** Send an email with a stronger incentive (for example, a discount, new content, or feature highlight).
Allow time for the email to drive the user back.
* **Active:** Exit the journey.
* **Still inactive:** Optionally send a final SMS or exit. Avoid further messaging — users who haven't responded after multiple touches are unlikely to convert from more messages.
***
## Abandoned cart
Use Custom Events or Tags to track cart activity and send abandoned cart messages.
***
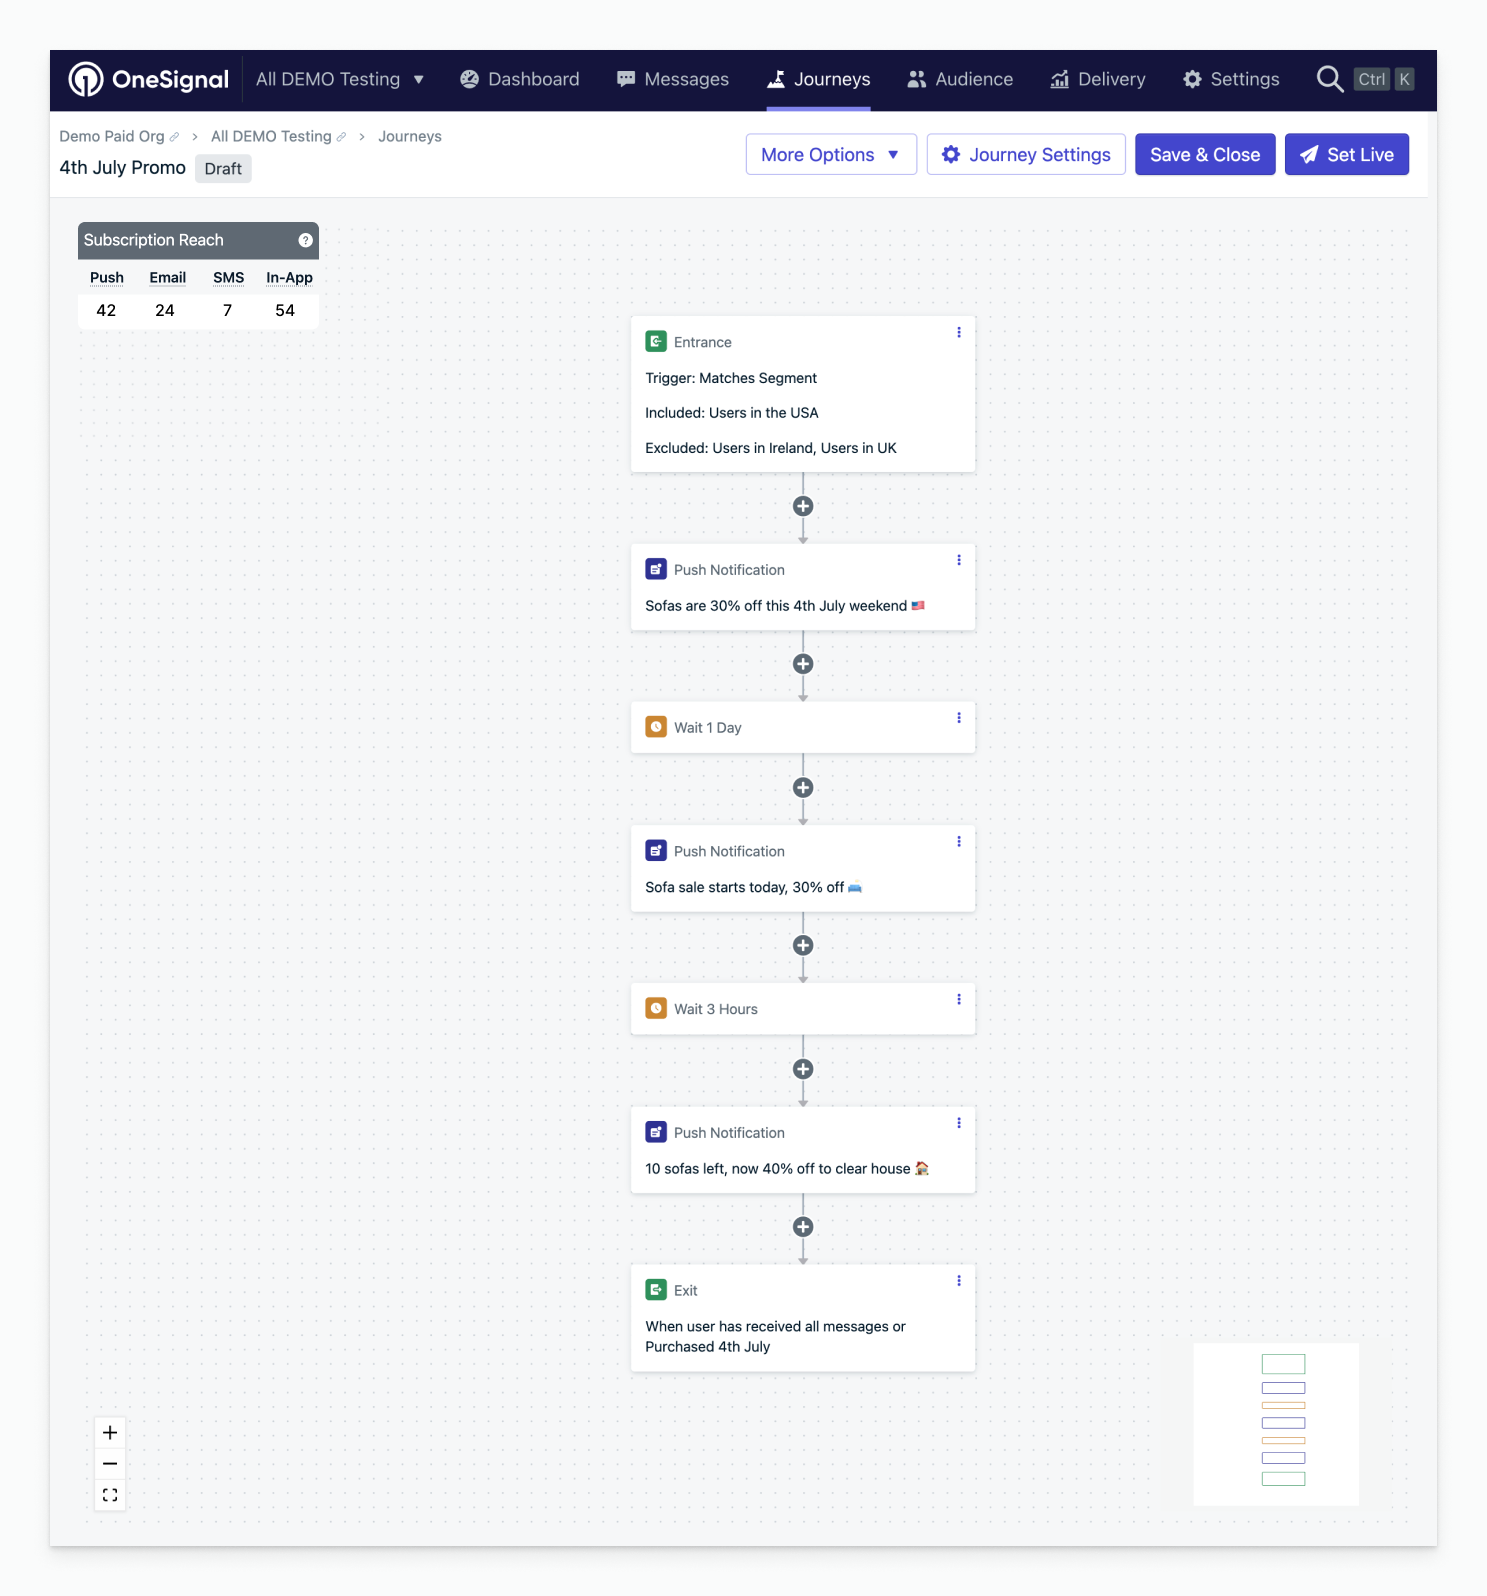
## Promotional campaign
Use this pattern for time-limited promotions, sales events, or product launches. The journey builds anticipation, reminds users during the event, and creates urgency as it ends.
| Journey setting | Description |
| - | - |
| **Entry rules** | **User matches the segment criteria.** Subscribed users, or a segment relevant to the promotion. |
| **Exit rules** | **They moved through the entire journey or meet certain conditions.** Select a segment that defines the goal (for example, users who purchased). |
| **Re-entry rules** | **No** — for one-off campaigns, send once. |
| **Content** | Prepare them for the event, remind them when it starts, and offer a discount or reward as it gets close to ending. |
**Journey steps**
Send an email or push announcing the upcoming promotion. Include the date, what to expect, and a reason to pay attention.
Add a wait step timed to the start of your promotion.
Send a push notification or email with the promotion details, discount code, or call to action.
Give users time to act on the initial message.
Send a final push or email with urgency — "Sale ends tomorrow" or "Last chance for 20% off." Users who already converted will have exited via the exit rule.
***
## Send a message after a user leaves without completing an action
**Initial setup**
1. Use [Tags](./add-user-data-tags) to mark that the action needs to be performed by the user. Remove the tag when the action is completed.
2. Set up the [segment](./segmentation) for this tag.
| Journey setting | Option | Description |
| - | - | - |
| **Entry rules** | The user's last session is greater than the amount of time. | The threshold for how long the user has been inactive in your app or website. |
| **Audience** | Include the segment you want to target with the tag. | These are the users eligible to receive the message. |
| **Exit rules** | Exit when the user no longer matches the audience conditions. | When the user leaves the segment, they are no longer eligible for the journey message. |
| **Re-entry rules** | Yes, after a certain amount of time. | The amount of time you want to wait for the user to be eligible to get the message again. |
**Journey steps**
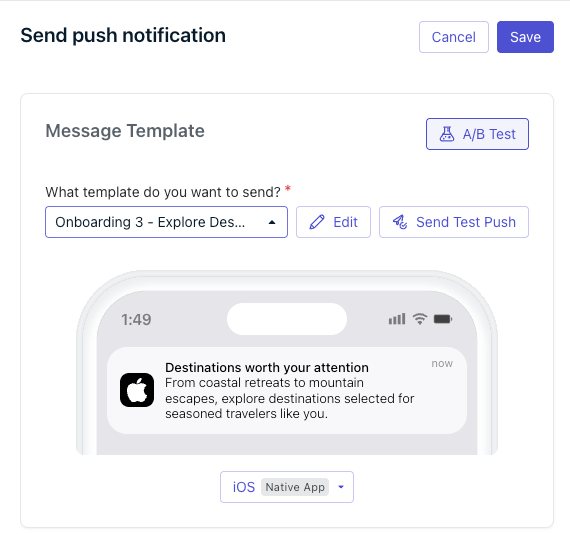
Choose a template for the message step. You can use push, email, SMS, or in-app depending on the action you want the user to take.
This can be a short or long interval depending on whether the message should repeat as a reminder. In this example, the wait is set to 104 weeks (2 years) so the message effectively sends only once — the long wait prevents the user from looping back through the journey while re-entry rules handle the next trigger.
***
## A/B test within a Journey
To test push, email, or SMS message content on a single step, use [Journey message A/B testing](./journeys-ab-testing) directly on the message step instead. It handles traffic splitting, reporting, and winner selection for you. The split branch method below is still the way to test things A/B testing doesn't cover, like wait durations, message counts, or other structural differences between paths.
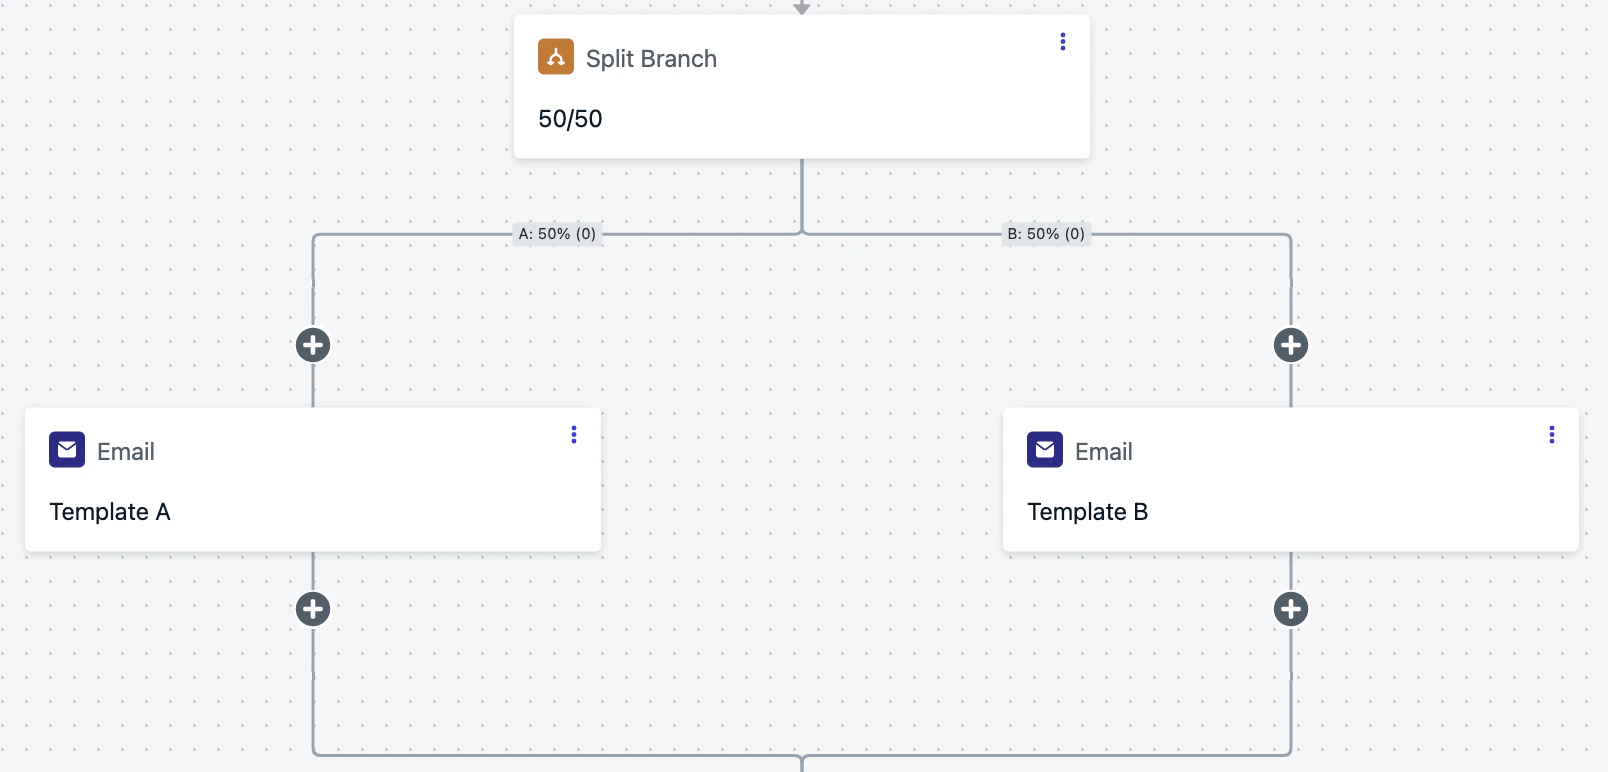
Using a **split branch** node, you can set a 50/50 split within your journey. Since [Journey message A/B testing](./journeys-ab-testing) already covers simple template-to-template comparisons, use the split branch for bigger, structural differences instead, for example, two message templates down one branch versus a single template down the other, or a different wait duration per branch.
Export the message data from each branch to compare [analytics](./analytics-overview) between variants.
To keep variants mutually exclusive across separate Journeys, or to send a percentage of this Journey's users into another one, see [Control Journey membership with tags](./journeys-membership-tags).
***
## Display in-app messages in order and once per day
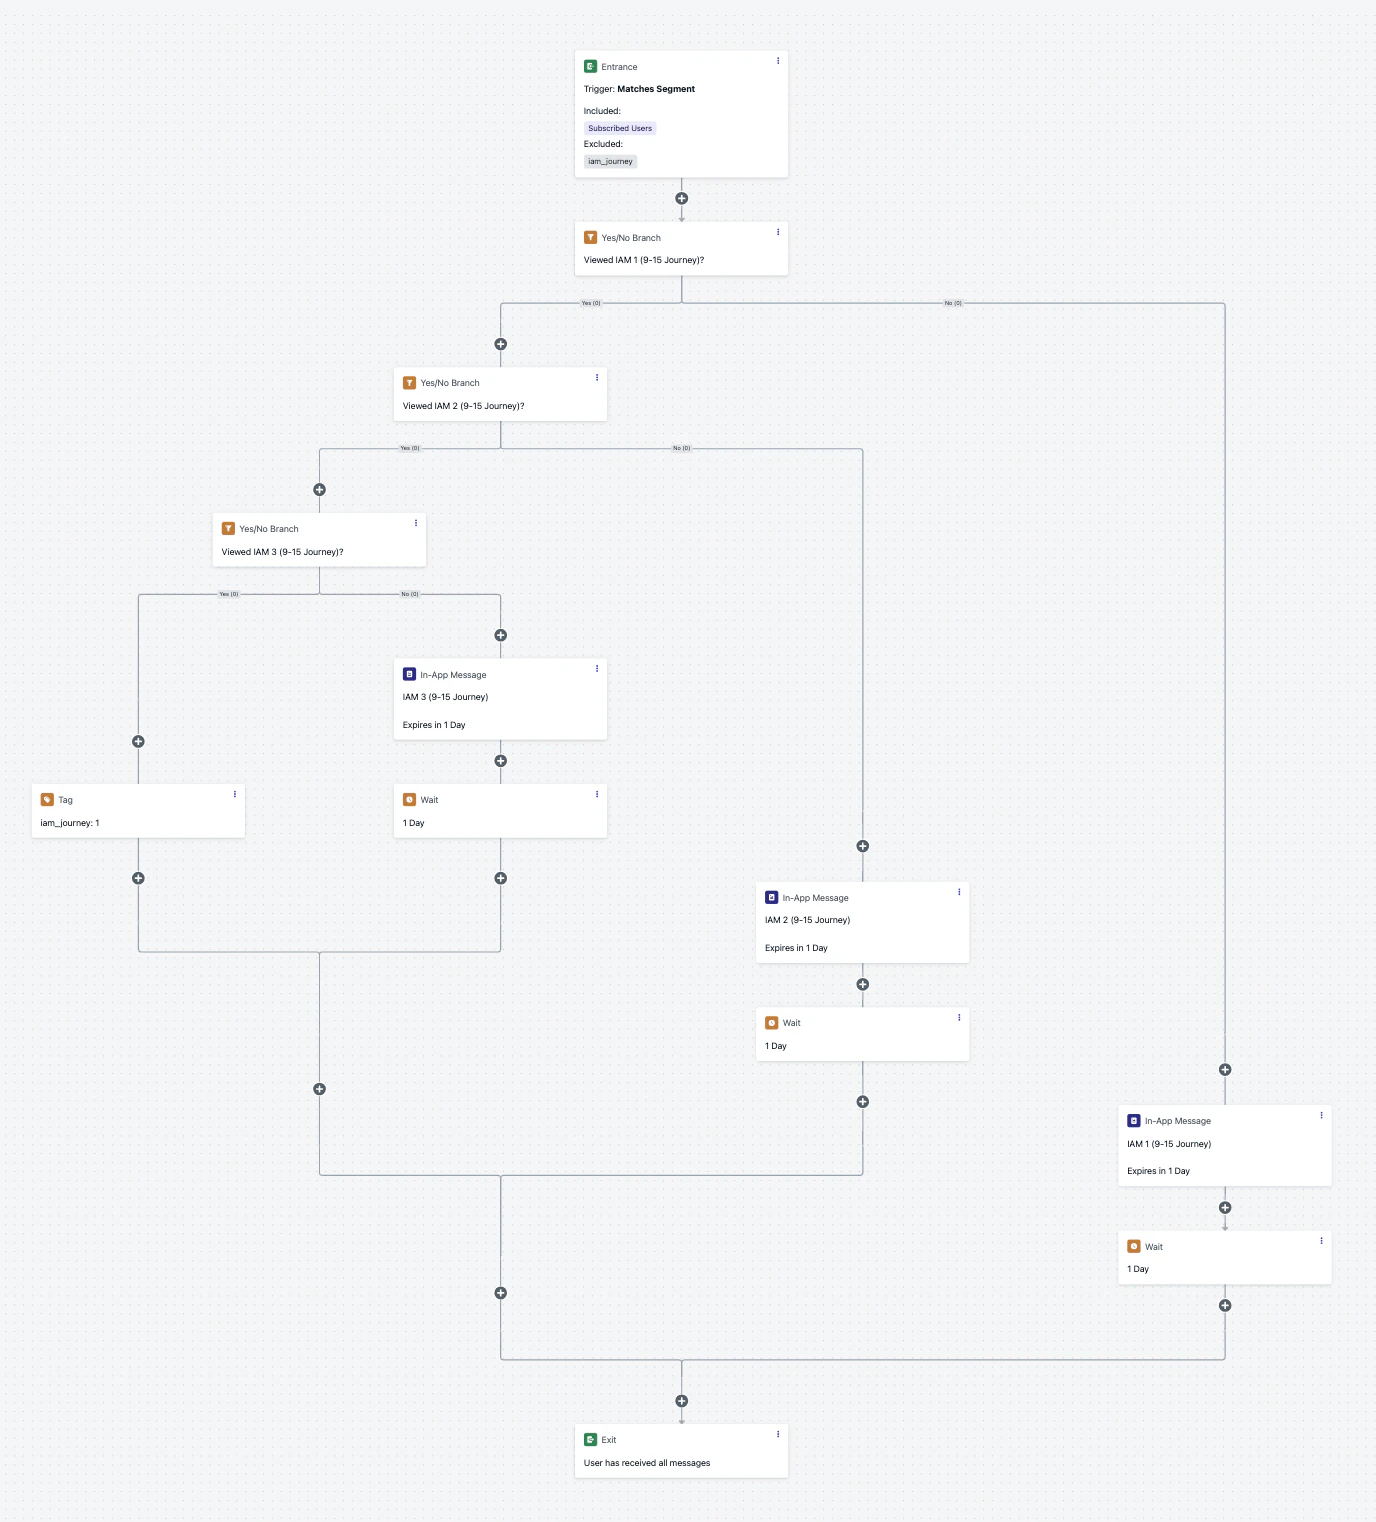
This example displays 3 or more in-app messages in sequence, showing one per day. If a user does not open the app, the next message appears the next time they open it.
**Initial setup**
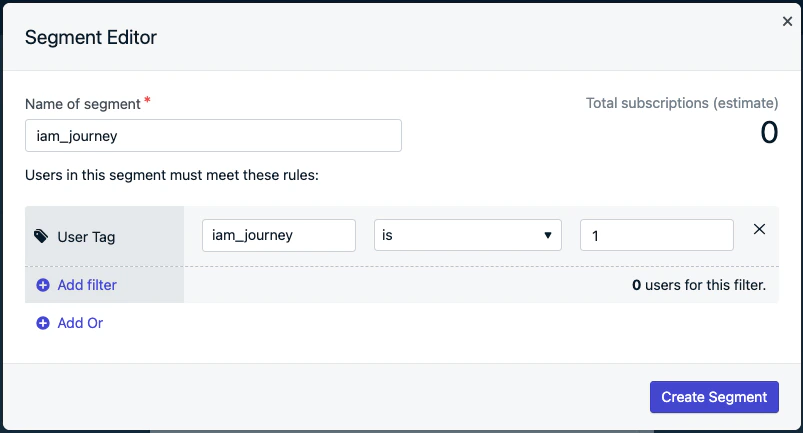
Create a segment called `iam_journey` with filter: User Tag `iam_journey` is `1`
1. You can change `iam_journey` to whatever name you choose.
2. This tag will be set on each user that finishes the journey and gets all messages.
See [design in-app messages with drag and drop](./design-your-in-app-message) for more.
| Journey setting | Option | Description |
| - | - | - |
| **Entry rules** | User matches the segment criteria | These are the users eligible to receive the message. |
| **Audience** | Include segment & exclude segment | Include the "Subscribed Users" segment. Exclude the "`iam_journey`" segment from step 1. |
| **Exit rules** | They moved through the entire journey | No additional conditions necessary. |
| **Re-entry rules** | Yes, after a certain amount of time | 2 minutes |
**Journey steps**
Repeat this order for the number of messages you want to display. This example uses 3 in-app messages (IAM 1, IAM 2, IAM 3).
1. **Add an in-app message step.**
1. Name the message, for example: `IAM 1`.
2. At the bottom of the message, set **delivery schedule** to **1 day**.
2. **Add a yes/no branch action before the in-app message step.**
1. Set your branching condition: previous message behavior: "`IAM 1` viewed".
2. **Follow the No branch**
1. Drag the `IAM 1` to the No branch.
2. Add a wait step for 1 day.
3. **Follow the Yes branch**
1. Within the Yes branch, repeat steps 1 and 2 for all messages, replacing `IAM 1` with the next in-app message (`IAM 2`, `IAM 3`).
2. At the final Yes branch, add **tag user** action.
1. Tag the same key used in Initial setup → Step 1 segment.
1. Example `iam_journey : 1`.
***
## Limited entry journey
Ensure users can only enter a journey a limited number of times while controlling the experience at each stage.
| Journey setting | Description |
| - | - |
| **Entry rules** | User matches the segment criteria (for example, subscribed users or any relevant target segment). |
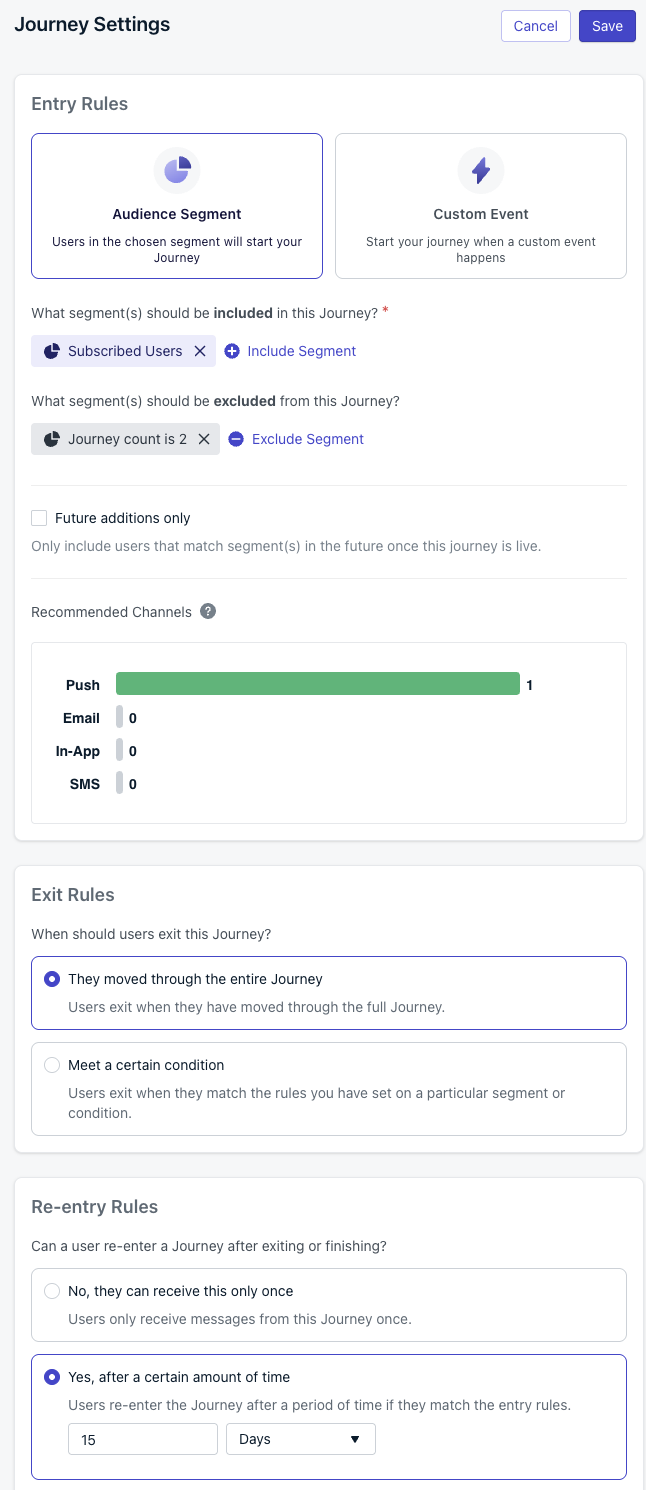
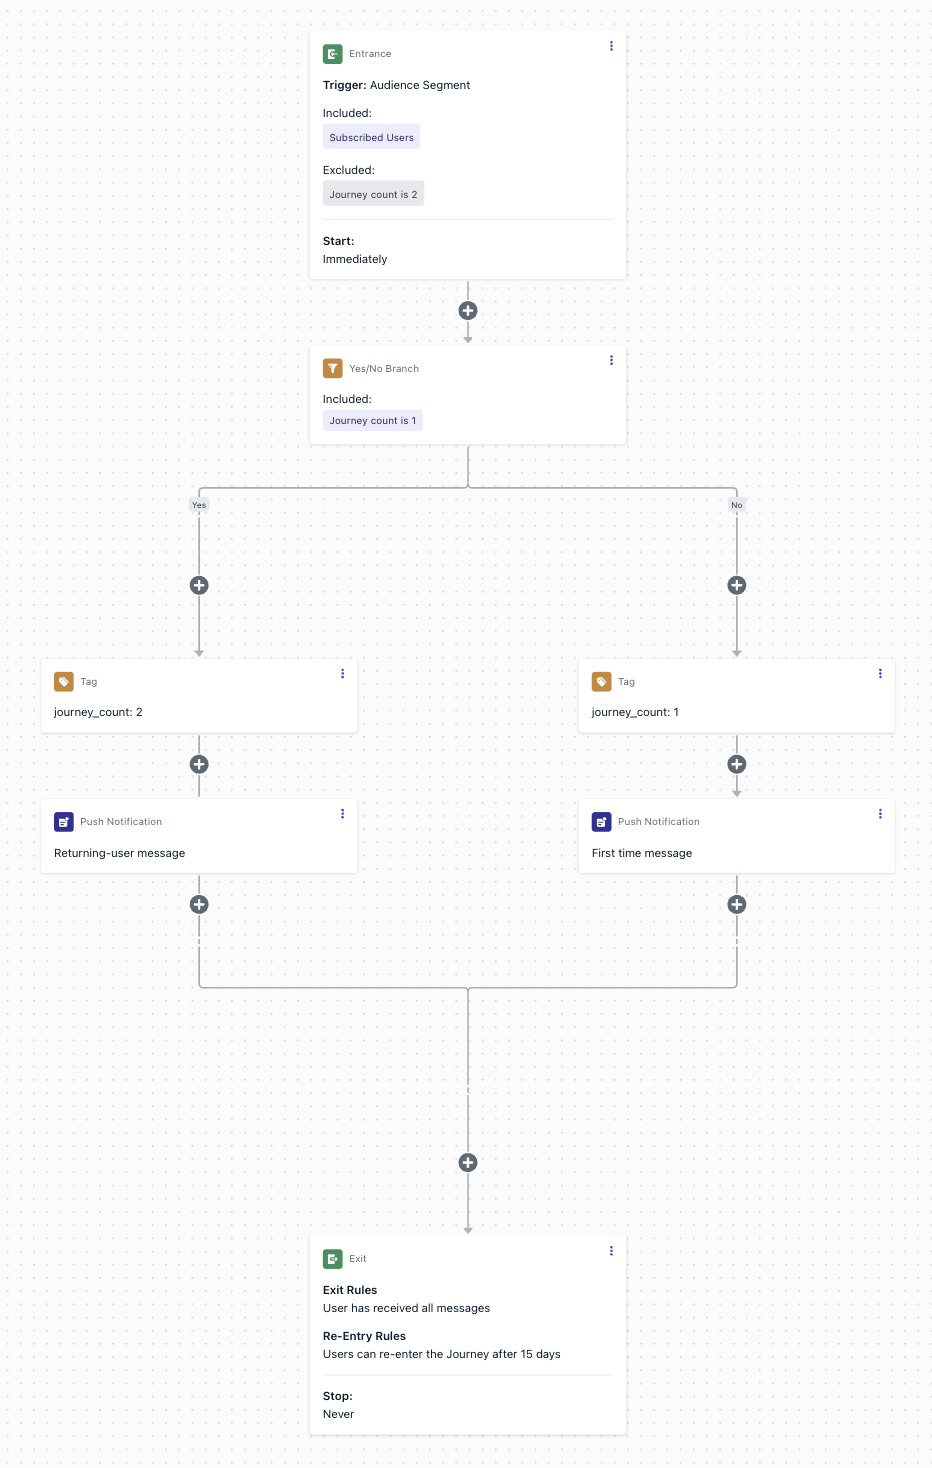
| **Audience** | Include your target segment. Exclude users with the tag `journey_count = 2` to cap entries at two times. |
| **Exit rules** | They moved through the entire journey. |
| **Re-entry rules** | Yes, after a certain amount of time: 15 days. |
| **Content** | Provide a first-time experience on initial entry, and a tailored second-time experience on re-entry. Prevent any further entries beyond the second. |
**Initial setup**
Use a user tag named `journey_count` to track entries. Tags are created automatically when you set them in the Journey. See [tag action](./journeys-actions#tag-user) for details.
In journey audience:
* Include your target segment (for example, “Subscribed Users”).
* Exclude users where user tag `journey_count` is `2`.
Set re-entry rules to “Yes, after a certain amount of time: 15 days.”\
This allows exactly one re-entry between the first and second runs.
**Journey steps**
Condition: user tag `journey_count` equals `1`.
* **Yes branch** = returning users (second entry).
* **No branch** = first-time users (no tag present yet).
* Add tag user action: set `journey_count` to `1`.
* Send your first-time messages and actions.
* Continue to end or additional logic as needed.
* Add tag user action: set `journey_count` to `2`.
* Send your returning-user messages and actions.
* Continue to end or additional logic as needed.
Because the audience excludes users with `journey_count = 2`, any attempted third entry is blocked automatically.
***
## Recurring journeys for specific days
Send recurring messages that align with a specific day of the week, like weekly promotions or event reminders.
| Journey setting | Description |
| - | - |
| **Entry rules** | User matches the segment criteria (for example, subscribed users). |
| **Audience** | Include your target segment. |
| **Exit rules** | They moved through the entire journey. |
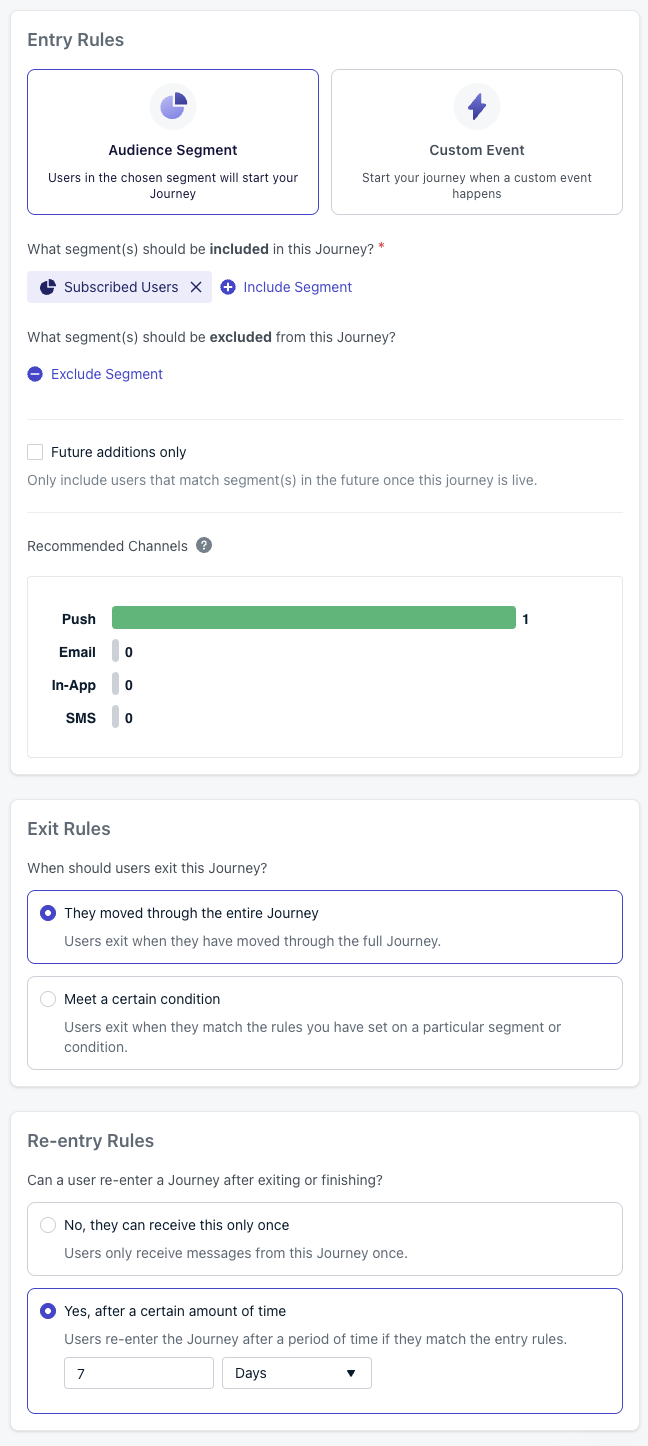
| **Re-entry rules** | Yes, after a certain amount of time: 7 days. |
| **Content** | A weekly message sent on a specific day (for example, every Friday). |
**Initial setup**
Include your target segment so eligible users can enter the journey at any time during the week.
Set re-entry rules to “Yes, after a certain amount of time: 7 days” to enable weekly recurrence.
* The re-entry timer starts when the user **exits** the Journey, not when they entered.
* A 7-day re-entry ensures users re-enter in time for the next week’s time window.
* The re-entry duration must be **longer than the time window duration** to avoid double-sends.
See [Using time windows for recurring sends](./journeys-actions#using-time-windows-for-recurring-sends) for details.
**Journey steps**
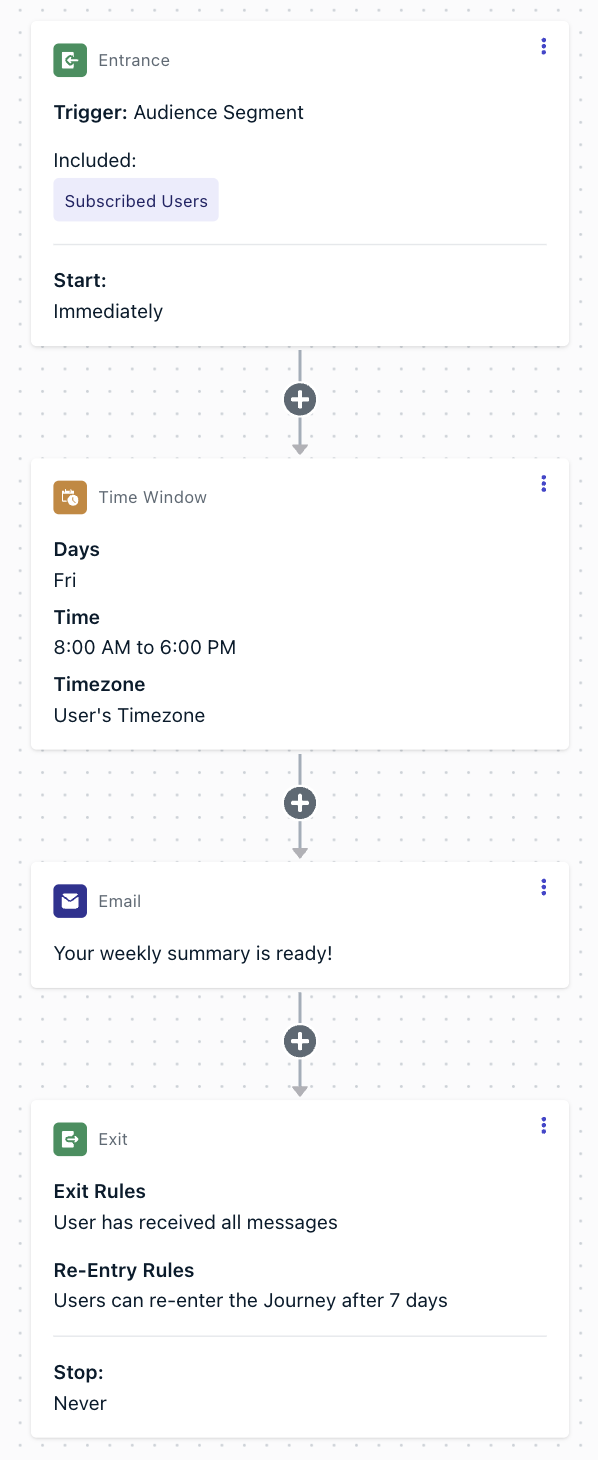
Configure the time window to filter for your target day of week (for example, Friday).\
Users entering the journey will wait until the next matching day.
Place the message node immediately after the time window so it sends when the day is reached.
Let users exit after the message sends. With re-entry at 7 days, they will rejoin and repeat weekly.
Update the message content regularly to avoid sending the same copy each week.
***
## Progressive journeys (event-driven)
Escalate engagement based on user progression using [custom events](./custom-events) and [wait-until](./journeys-actions#wait-until) conditions.
| Journey setting | Description |
| - | - |
| **Entry rules** | **Custom Event** = `Progression_Level`, with filter `progression_level = 0`. |
| **Audience** | Optional segment filter. You can run this for all users or restrict to a subset; no tags required. |
| **Exit rules** | - They moved through the entire journey. - Or when maximum progression level is reached (`progression_level = 3`). - Optionally: exit when a **Wait Until** node expires. - Optionally: branch from a **Wait Until** node to tag users who do not complete the event, leading them into a re-engagement journey. |
| **Re-entry rules** | No |
| **Content** | Stage-based messages that escalate as users complete milestones (emails in this example). |
**Journey steps**
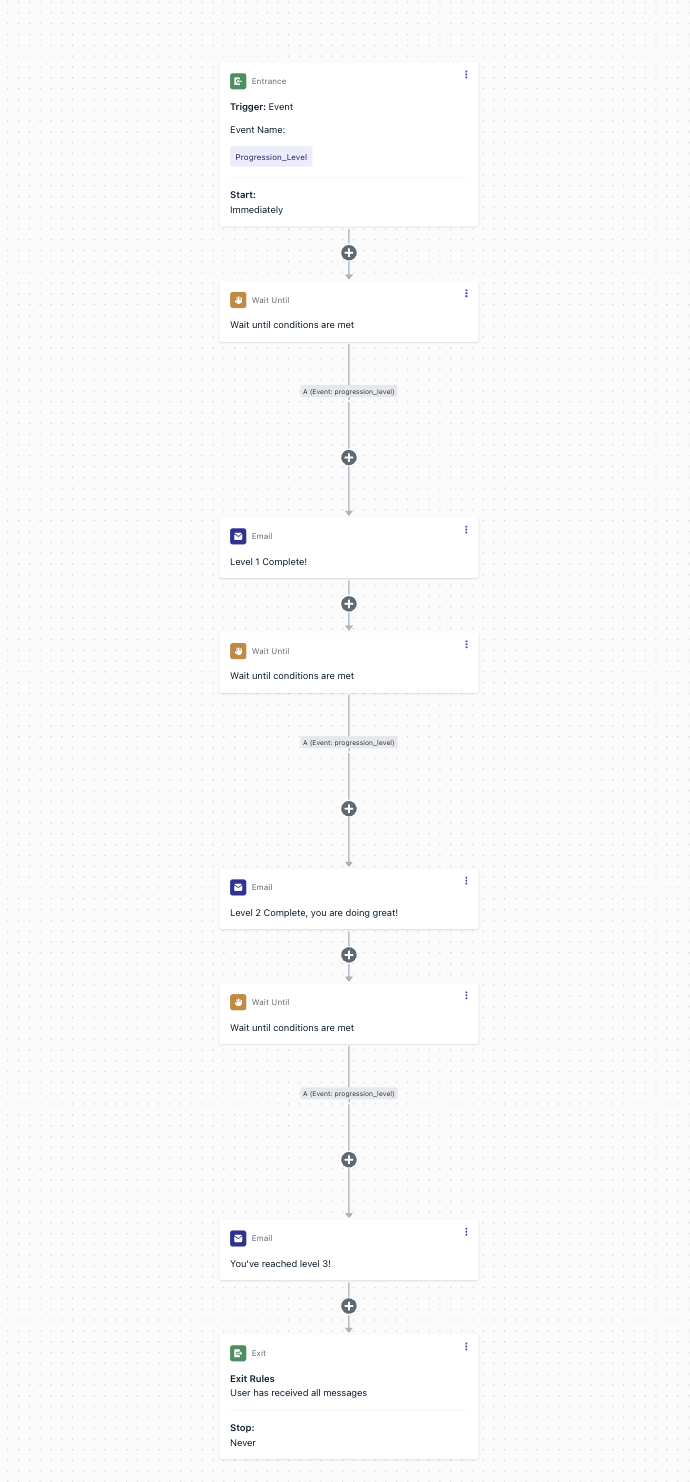
All eligible users enter based on entry rules.\
Trigger: **Custom Event** `Progression_Level` with `progression_level = 0`.\
Start: **Immediately**.
* Wait until custom event `Progression_Level` occurs with `progression_level = 1`.
* Send: **Level 1 Complete!** message.
* (Optional) Apply expiration on the wait node → exit user if milestone not reached.
* (Optional) Branch: if expiration hits, tag the user and send them into a re-engagement journey.
* Wait until custom event `Progression_Level` occurs with `progression_level = 2`.
* Send: **Level 2 Complete, you are doing great!** message.
* (Optional) Apply expiration or branch/tag to re-engagement.
* Wait until custom event `Progression_Level` occurs with `progression_level = 3`.
* Send: **You’ve reached level 3!** message.
* (Optional) Apply expiration or branch/tag to re-engagement.
End the journey once users complete Level 3, or when a Wait Until node expires.\
Optionally, use branch/tag paths to route stalled users into a re-engagement track.\
Schedule: **Start immediately**, **Never stops**.
This method ensures progression happens only when real engagement signals occur. Adding expiration and branch/tag logic lets you handle stalled users gracefully — either exiting them or re-routing into a re-engagement Journey.
***
## Branch a Journey by action button clicked
Route users down different Journey paths based on which push notification action button they tapped. This pattern uses [action buttons](./action-buttons), a [custom event](./custom-events), and a [Wait Until](./journeys-actions#wait-until) step to branch users by their specific button click — not just whether they clicked or not.
This example requires website or app code to capture the button click and send a custom event. It cannot be done entirely through the OneSignal dashboard.
| Journey setting | Description |
| - | - |
| **Entry rules** | User matches the segment criteria (for example, subscribed users or a campaign-specific segment). |
| **Exit rules** | They moved through the entire journey. |
| **Re-entry rules** | No |
| **Content** | Send a push with multiple action buttons, then branch follow-up messages based on which button the user tapped. |
The built-in [Yes/No branch](./journeys-actions#yesno-branch) message behavior conditions detect whether a user **clicked** or **was delivered** a message — but not *which* button they clicked. To branch by specific button, you capture the Action ID from the click event and send it as a Custom Event property that the Journey can branch on.
When creating the push message in the Journey (or in a [template](./templates)), open **Advanced Options > Action Buttons** and assign a unique **Action ID** to each button.
**Example**: A promotional push with two CTAs:
* Button 1: "Shop Now" → Action ID: `shop_now`
* Button 2: "Learn More" → Action ID: `learn_more`
See [Action buttons](./action-buttons) for full setup details.
On your website or in your app, listen for the notification click event and send a Custom Event that includes the Action ID as a property.
The Web SDK example requires version `160500` or later. Users should be [logged in](./web-sdk-reference#login) for custom events to be tracked.
```javascript Web SDK theme={null}
OneSignalDeferred.push(function(OneSignal) {
OneSignal.Notifications.addEventListener("click", function(event) {
var actionId = event.result.actionId;
if (actionId) {
OneSignal.User.trackEvent("cta_clicked", { button: actionId });
}
});
});
```
```kotlin Android SDK theme={null}
OneSignal.Notifications.addClickListener { event ->
val actionId = event.result.actionId
if (actionId != null) {
OneSignal.User.trackEvent("cta_clicked", mapOf("button" to actionId))
}
}
```
```swift iOS SDK theme={null}
let listener = { (event: OSNotificationClickEvent) in
if let actionId = event.result.actionId {
OneSignal.User.trackEvent("cta_clicked", properties: ["button": actionId])
}
}
OneSignal.Notifications.addClickListener(listener)
```
See [Custom events](./custom-events) for event requirements and limits.
After the push message step in your Journey:
1. Add a **Wait Until** step.
2. Add a condition for each button: Custom Event `cta_clicked` where property `button` equals the Action ID (for example, `shop_now`).
3. Add additional conditions for each Action ID you want to branch on (for example, `learn_more`).
4. Set an **expiration** (for example, 3 days) so users who don't click any button continue down a fallback path.
Users follow the branch for the **first condition they meet**. If no condition is met before the expiration, they follow the expiration branch.
On each branch after the Wait Until step, add the appropriate follow-up message or action:
* **"Shop Now" branch**: Send a product recommendation or discount code.
* **"Learn More" branch**: Send educational content or a feature overview.
* **Expiration branch**: Send a re-engagement message or exit the Journey.
You can chain multiple Wait Until steps to branch on subsequent interactions too — there is no limit on the number of Wait Until steps in a Journey.
***
## FAQ
### Can I schedule a message to send every day?
Yes. Add a [time window](./journeys-actions#time-window) node as the first step and configure it for every day of the week with the hours you want the message to send (for example, 10 AM to 6 PM in the user's time zone). Then set **re-entry rules** to re-enter after a time shorter than one day but **longer than the time window duration** — for example, 12 hours for an 8-hour window. This ensures users re-enter early enough to catch the next day's time window without risking a double-send within the same window.
### Can I A/B test different messages in a Journey?
Yes. Add a [split branch](./journeys-actions#random-split) node to divide users evenly (for example, 50/50). Place a different message template on each branch, then compare analytics between the two templates after the Journey runs.
### How do I limit how many times a user can enter a Journey?
Use a tag (for example, `journey_count`) to track entries. Increment the tag each time the user enters, and add an audience exclusion rule that blocks users once the tag reaches your desired limit. See the [Limited entry journey](#limited-entry-journey) example above.
### Why did my recurring Journey send on the wrong day?
The [time window](./journeys-actions#time-window) node filters by the user's local time zone if time zone data is available. If a user does not have time zone data, the message sends based on your app's default time zone. Verify that your time window settings and user time zone data are correct.
### How do I stop a running Journey?
Set the Journey status to **Paused** or **Stopped** in the Journey settings. Paused Journeys retain users at their current step; stopped Journeys exit all users immediately. See [Journey settings](./journeys-settings) for details.
***
## Related pages
Introduction to Journeys and how they work.
Add wait steps, branching logic, time windows, and split paths.
Configure entry rules, exit rules, re-entry, and scheduling.
Configure push, email, SMS, and in-app message steps in a Journey.
Full walkthrough for building an abandoned cart Journey.
Trigger Journeys and pass event properties for personalization.
Track Journey performance with delivery metrics, user activity, and conversion insights.
* [Maximizing User Engagement: The Synergy of Push Notifications and Email](https://onesignal.com/blog/use-push-notifications-and-email-together/)
* [Consistently Drive Value with Journeys](https://onesignal.com/blog/consistently-drive-value-with-journeys/)
* [Increase Engagement with Email for Cross-Channel Journeys](https://onesignal.com/blog/increase-engagement-with-email-for-cross-channel-journeys/)
* [Improve Retention with In-App and SMS for Journeys](https://onesignal.com/blog/improve-retention-with-in-app-and-sms-for-journeys/)
This documentation is built and hosted on [Mintlify](https://mintlify.com), a developer documentation platform.
 ***
## Re-engagement campaign
Use this pattern to win back users who haven't opened your app or visited your site recently. The journey sends a series of increasingly compelling messages and exits the user as soon as they return.
| Journey setting | Description |
| - | - |
| **Entry rules** | **User's last session is greater than 7 days;** subscribed users. Consider excluding segments like paid customers if the goal is to re-engage free users. |
| **Exit rules** | **They moved through the entire journey or meet certain conditions** — exit when the user becomes active in your app or website. |
| **Re-entry rules** | **Yes, after a certain amount of time: 7 days.** Users re-enter whenever they go inactive again. |
| **Content** | Remind users to come back to your app when they haven't opened it in a while, and entice them with rewards or discounts. |
**Journey steps**
***
## Re-engagement campaign
Use this pattern to win back users who haven't opened your app or visited your site recently. The journey sends a series of increasingly compelling messages and exits the user as soon as they return.
| Journey setting | Description |
| - | - |
| **Entry rules** | **User's last session is greater than 7 days;** subscribed users. Consider excluding segments like paid customers if the goal is to re-engage free users. |
| **Exit rules** | **They moved through the entire journey or meet certain conditions** — exit when the user becomes active in your app or website. |
| **Re-entry rules** | **Yes, after a certain amount of time: 7 days.** Users re-enter whenever they go inactive again. |
| **Content** | Remind users to come back to your app when they haven't opened it in a while, and entice them with rewards or discounts. |
**Journey steps**
 ***
## Abandoned cart
***
## Abandoned cart
 ***
## Send a message after a user leaves without completing an action
**Initial setup**
1. Use [Tags](./add-user-data-tags) to mark that the action needs to be performed by the user. Remove the tag when the action is completed.
2. Set up the [segment](./segmentation) for this tag.
| Journey setting | Option | Description |
| - | - | - |
| **Entry rules** | The user's last session is greater than the amount of time. | The threshold for how long the user has been inactive in your app or website. |
| **Audience** | Include the segment you want to target with the tag. | These are the users eligible to receive the message. |
| **Exit rules** | Exit when the user no longer matches the audience conditions. | When the user leaves the segment, they are no longer eligible for the journey message. |
| **Re-entry rules** | Yes, after a certain amount of time. | The amount of time you want to wait for the user to be eligible to get the message again. |
**Journey steps**
***
## Send a message after a user leaves without completing an action
**Initial setup**
1. Use [Tags](./add-user-data-tags) to mark that the action needs to be performed by the user. Remove the tag when the action is completed.
2. Set up the [segment](./segmentation) for this tag.
| Journey setting | Option | Description |
| - | - | - |
| **Entry rules** | The user's last session is greater than the amount of time. | The threshold for how long the user has been inactive in your app or website. |
| **Audience** | Include the segment you want to target with the tag. | These are the users eligible to receive the message. |
| **Exit rules** | Exit when the user no longer matches the audience conditions. | When the user leaves the segment, they are no longer eligible for the journey message. |
| **Re-entry rules** | Yes, after a certain amount of time. | The amount of time you want to wait for the user to be eligible to get the message again. |
**Journey steps**
 Using a **split branch** node, you can set a 50/50 split within your journey. Since [Journey message A/B testing](./journeys-ab-testing) already covers simple template-to-template comparisons, use the split branch for bigger, structural differences instead, for example, two message templates down one branch versus a single template down the other, or a different wait duration per branch.
Export the message data from each branch to compare [analytics](./analytics-overview) between variants.
To keep variants mutually exclusive across separate Journeys, or to send a percentage of this Journey's users into another one, see [Control Journey membership with tags](./journeys-membership-tags).
Using a **split branch** node, you can set a 50/50 split within your journey. Since [Journey message A/B testing](./journeys-ab-testing) already covers simple template-to-template comparisons, use the split branch for bigger, structural differences instead, for example, two message templates down one branch versus a single template down the other, or a different wait duration per branch.
Export the message data from each branch to compare [analytics](./analytics-overview) between variants.
To keep variants mutually exclusive across separate Journeys, or to send a percentage of this Journey's users into another one, see [Control Journey membership with tags](./journeys-membership-tags).
 ***
## Display in-app messages in order and once per day
This example displays 3 or more in-app messages in sequence, showing one per day. If a user does not open the app, the next message appears the next time they open it.
**Initial setup**
***
## Display in-app messages in order and once per day
This example displays 3 or more in-app messages in sequence, showing one per day. If a user does not open the app, the next message appears the next time they open it.
**Initial setup**
 **Initial setup**
 **Initial setup**
 **Journey steps**